The lamp lighting problem in Blender
Why a basic emissive bulb with a glass shader produces some of the worst noise you can hit in Cycles ArcViz, and a preview of the node-based fix that this post walks through.
Why this fix matters for archviz lamps
If you do archviz in Blender and you drop a bulb with a lamp into a scene, you are going to have problems unless you build it carefully. The absolute worst-case version is probably what almost everyone has shipped at least once before realising something needed to change: a render that takes hours to finish and is still unusable when it lands.
There is a very simple fix that solves most of the noise, but it leaves a specific residual problem behind. It is the kind of thing you keep noticing once you know to look for it. This post walks through a fix that took a long time to land on. Threads on Blender Artists offered plenty of suggestions, and several of them work, but the node setup shown here is the one that fits an archviz workflow best.
Even if you tweak it for your own scenes, the underlying logic is worth understanding. The pay-off is clean lamp renders at low sample counts without flattening the bulb or leaning on the compositor.
The starting scene: bulb, filament and glass
The starting scene is deliberately basic, because it is the scene you have probably built at some point yourself. A glass bulb wraps an emissive filament, with the filament sitting inside as a separate piece of geometry that does the actual lighting work.

On the filament, an Emission node is set to a strength of 1000 and plugged straight into the material output. The bulb glass uses a plain Glass BSDF with transmission turned up to 1. Nothing fancy: just the default glass shader most people reach for first.
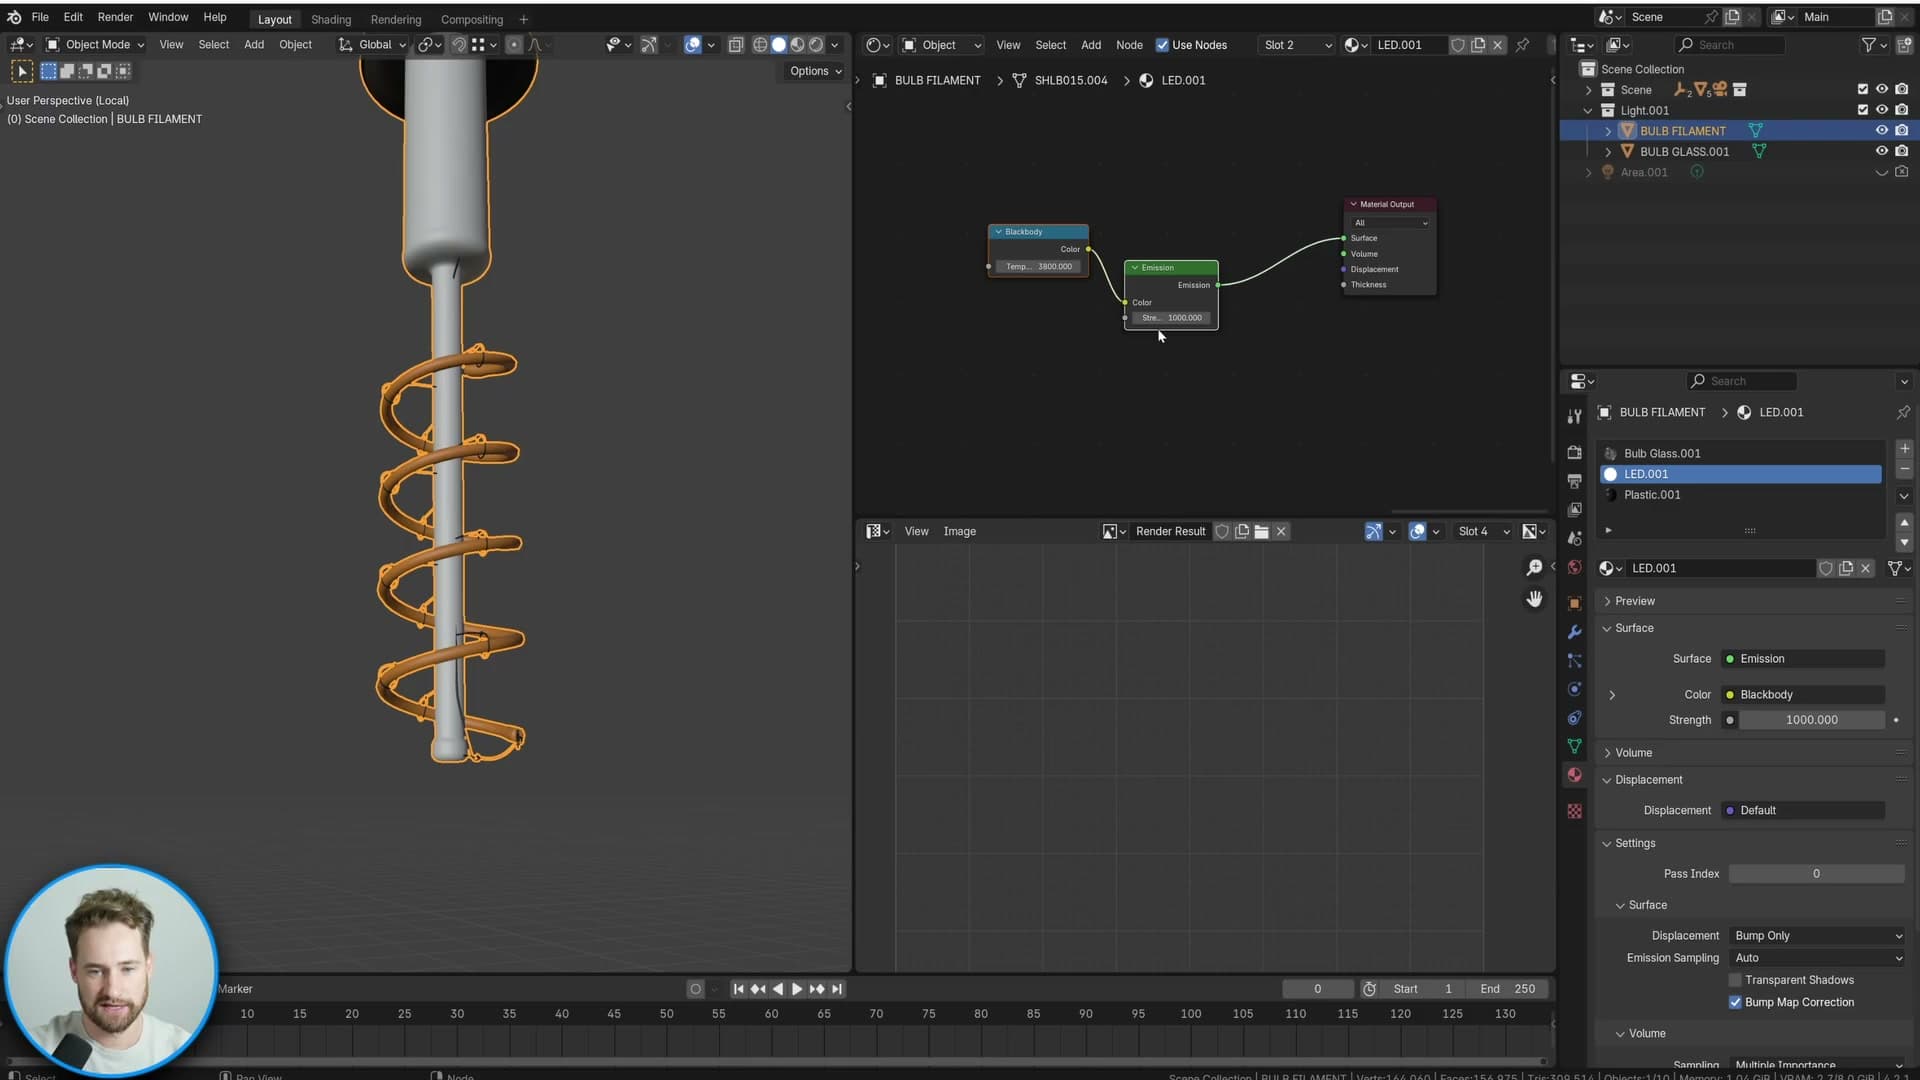
Hit render with that setup and you get the absolute worst-case result. It is the exact configuration almost every archviz artist has produced before realising the bulb needs a smarter shader, and it is the baseline the rest of this post measures every fix against.
Demonstrating the unusable default render
What happens when you naively combine a strength-1000 emission filament with a plain Glass BSDF and hit render: noise that won't clean up even at 40,000 samples.
The naive Glass BSDF + Emission setup
Before fixing anything, it helps to see exactly how bad the default approach looks. Drop a plain Glass BSDF onto the bulb's outer glass, set Transmission to 1, leave the emissive filament as it is, and hit render. No tricks, no tweaks. Almost everyone who has tried to light a lamp in archviz has stood at this exact starting point.
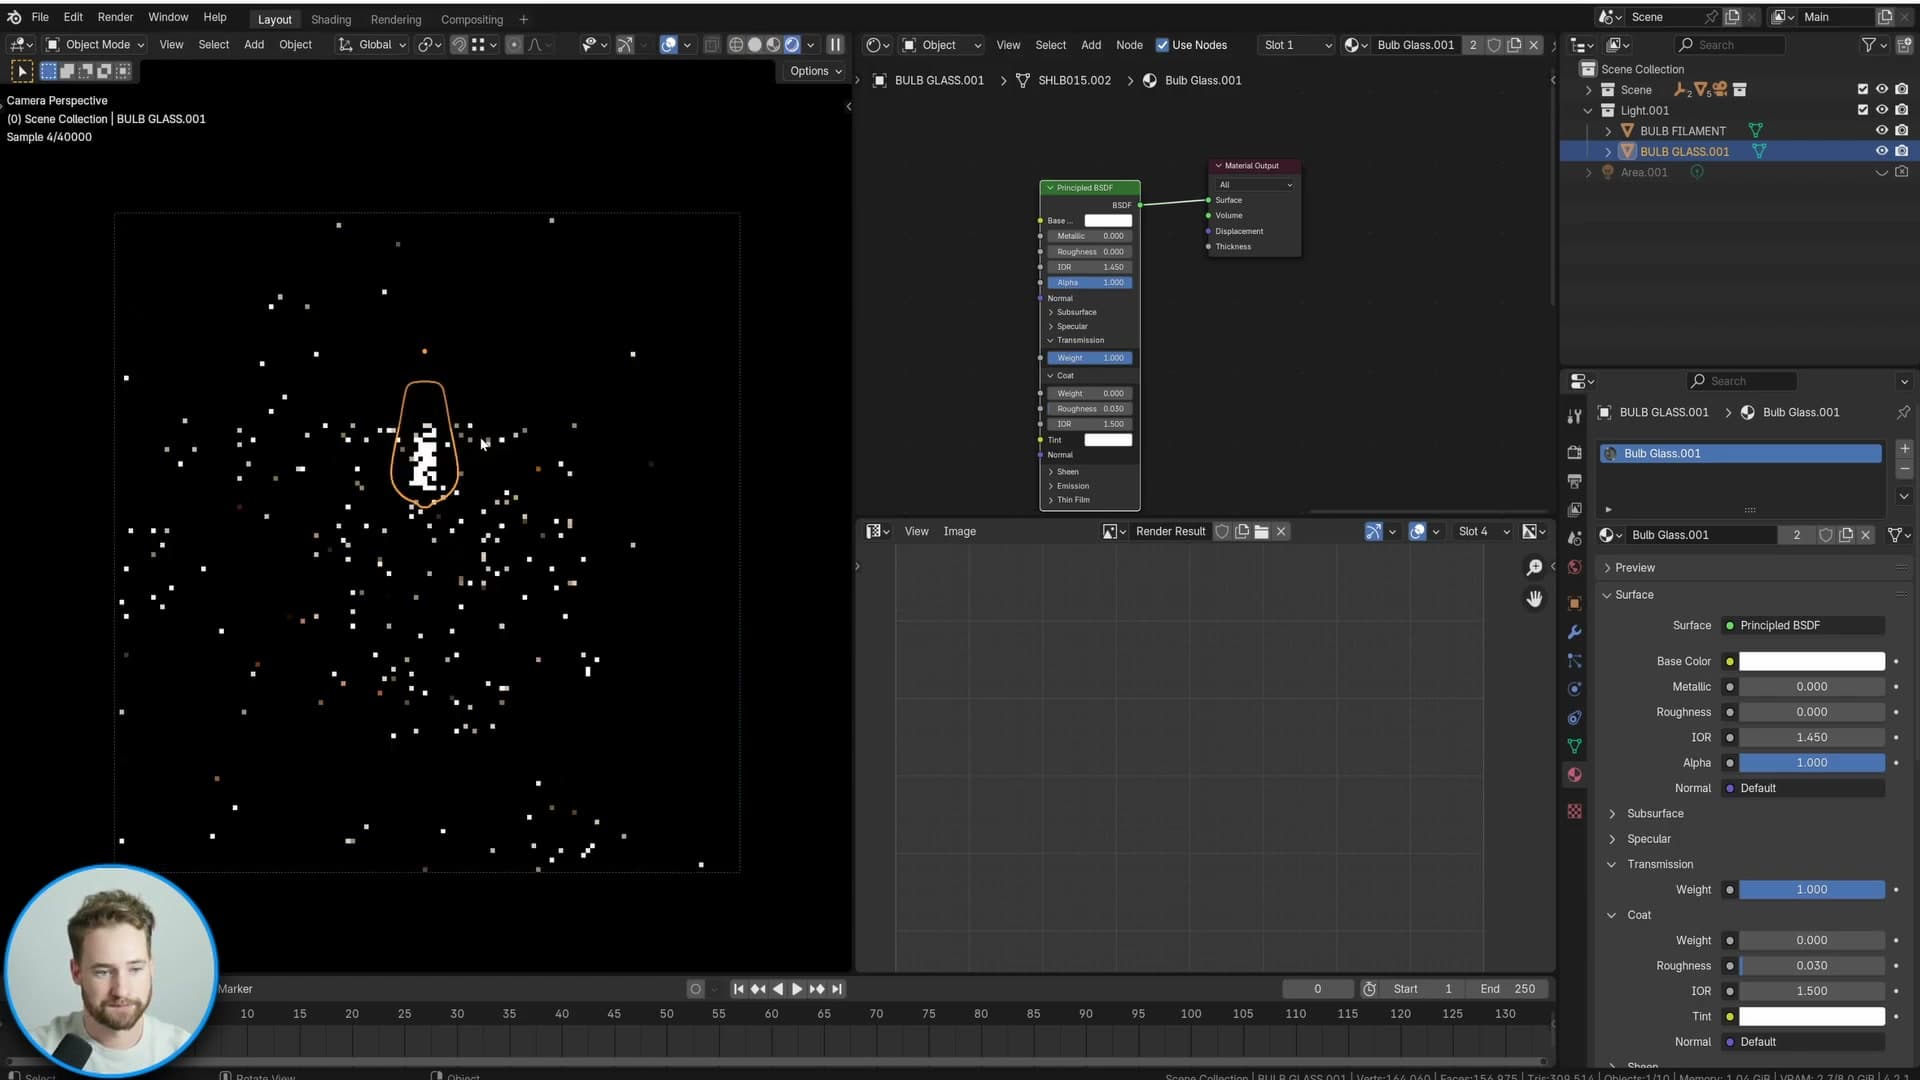
The result is the worst-case scenario for Cycles. The viewport fills with fireflies and chaotic noise the moment the render kicks off. To prove the point, the max sample count here is pushed all the way to 40,000, and even that is not guaranteed to clean the image up. It is genuinely unlikely to ever be usable at any reasonable sample budget.
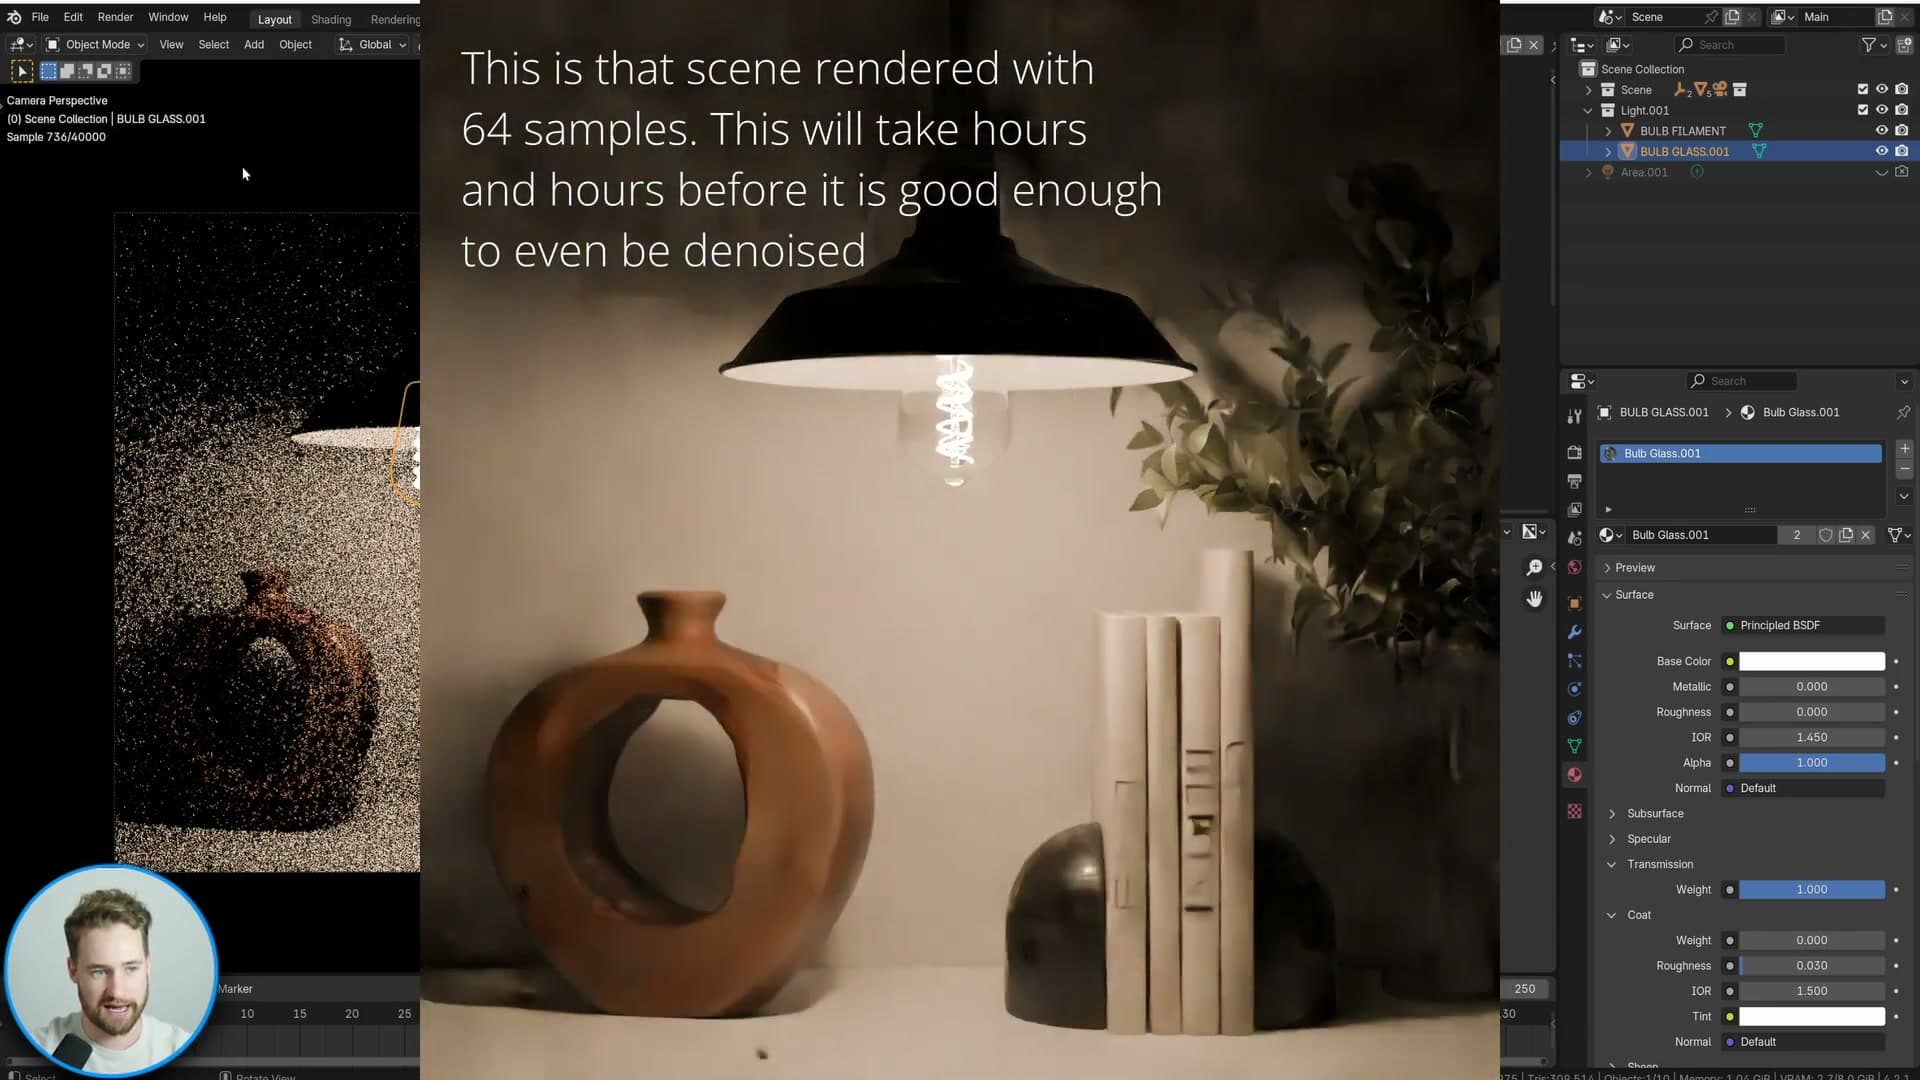
This is the baseline the rest of the post is fixing. When the headline talks about renders speeding up by a thousand times, this unusable noise-fest is what is being compared against. From here, every change is about getting clean output without throwing samples at the problem.
The first fix: a shadow-ray glass shader
Replace the Glass BSDF with a Mix Shader that switches to Transparent on shadow and reflection rays. The bulb glass still looks like glass to the camera but stops choking the renderer with indirect noise.
Building the Light Path + Mix Shader node group
The first fix is a small node group that lets the bulb glass behave one way for the camera and a completely different way for every other ray Cycles fires at it. Start by deleting whatever shader is currently driving the outer glass and rebuild it from scratch.
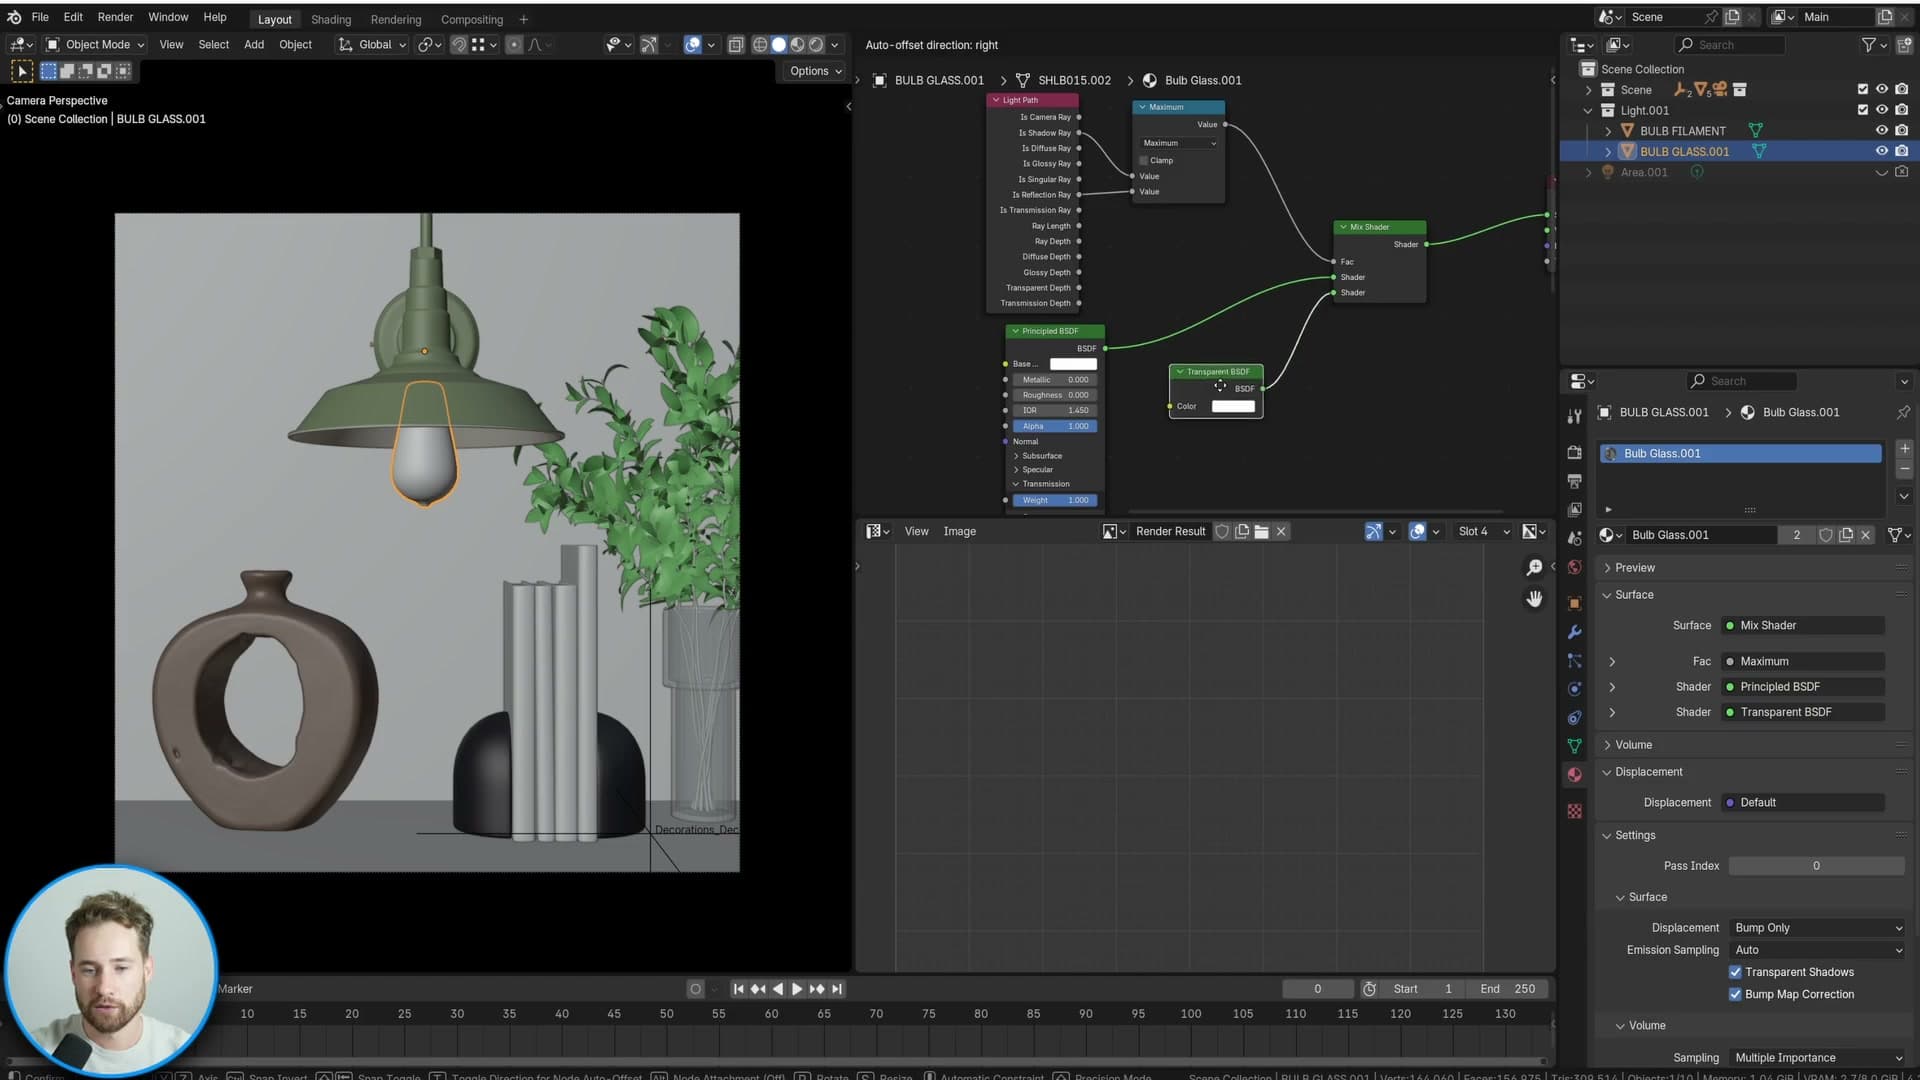
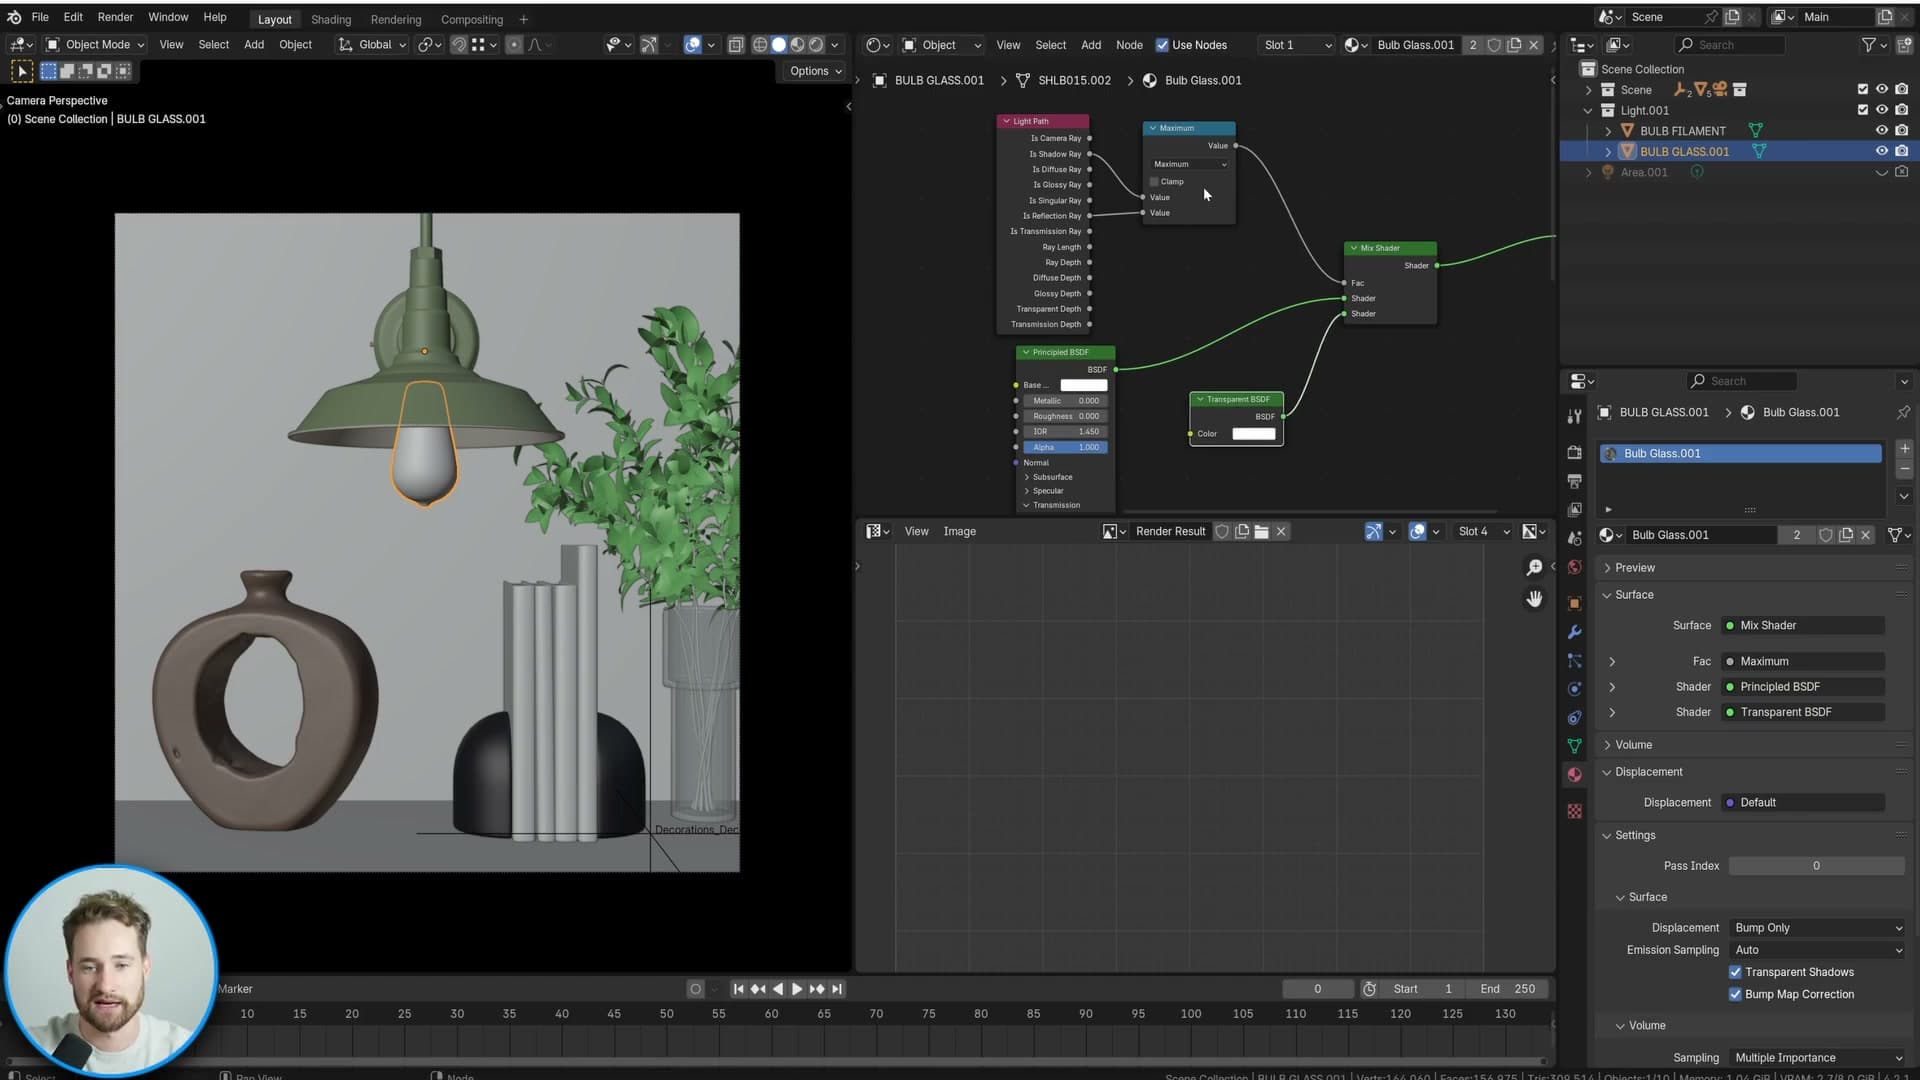
Add a Glass BSDF and feed it into the top slot of a Mix Shader. Add a Transparent BSDF and feed that into the bottom slot. The factor that decides between them comes from a Light Path node. Combine its Is Shadow Ray and Is Reflection Ray outputs and route the result into the Mix Shader's factor input. Plug the Mix Shader into the Material Output and you are done.
The logic is simple once you read it back. A camera ray sees the Glass BSDF and the bulb still looks like glass with all the refraction and reflections you would expect. A shadow ray or a reflection ray, on the other hand, sees the Transparent BSDF and passes straight through as if the material was not there. To the camera the bulb is glass; to the rest of the scene it is invisible.
Apply the exact same node setup to the small inner piece of glass that sits around the filament itself. Real-world bulbs frequently have this second layer of glass and the scene file mirrors that. Give both meshes the identical shader so neither one chokes the renderer with shadow-ray noise.
Cleaner result, but fireflies remain
Trigger a render preview and the improvement is immediate. By roughly 200 samples the image is dramatically cleaner than the naive glass shader produced. The indirect noise that was bouncing around inside the bulb is gone because shadow and reflection rays no longer interact with the glass at all.
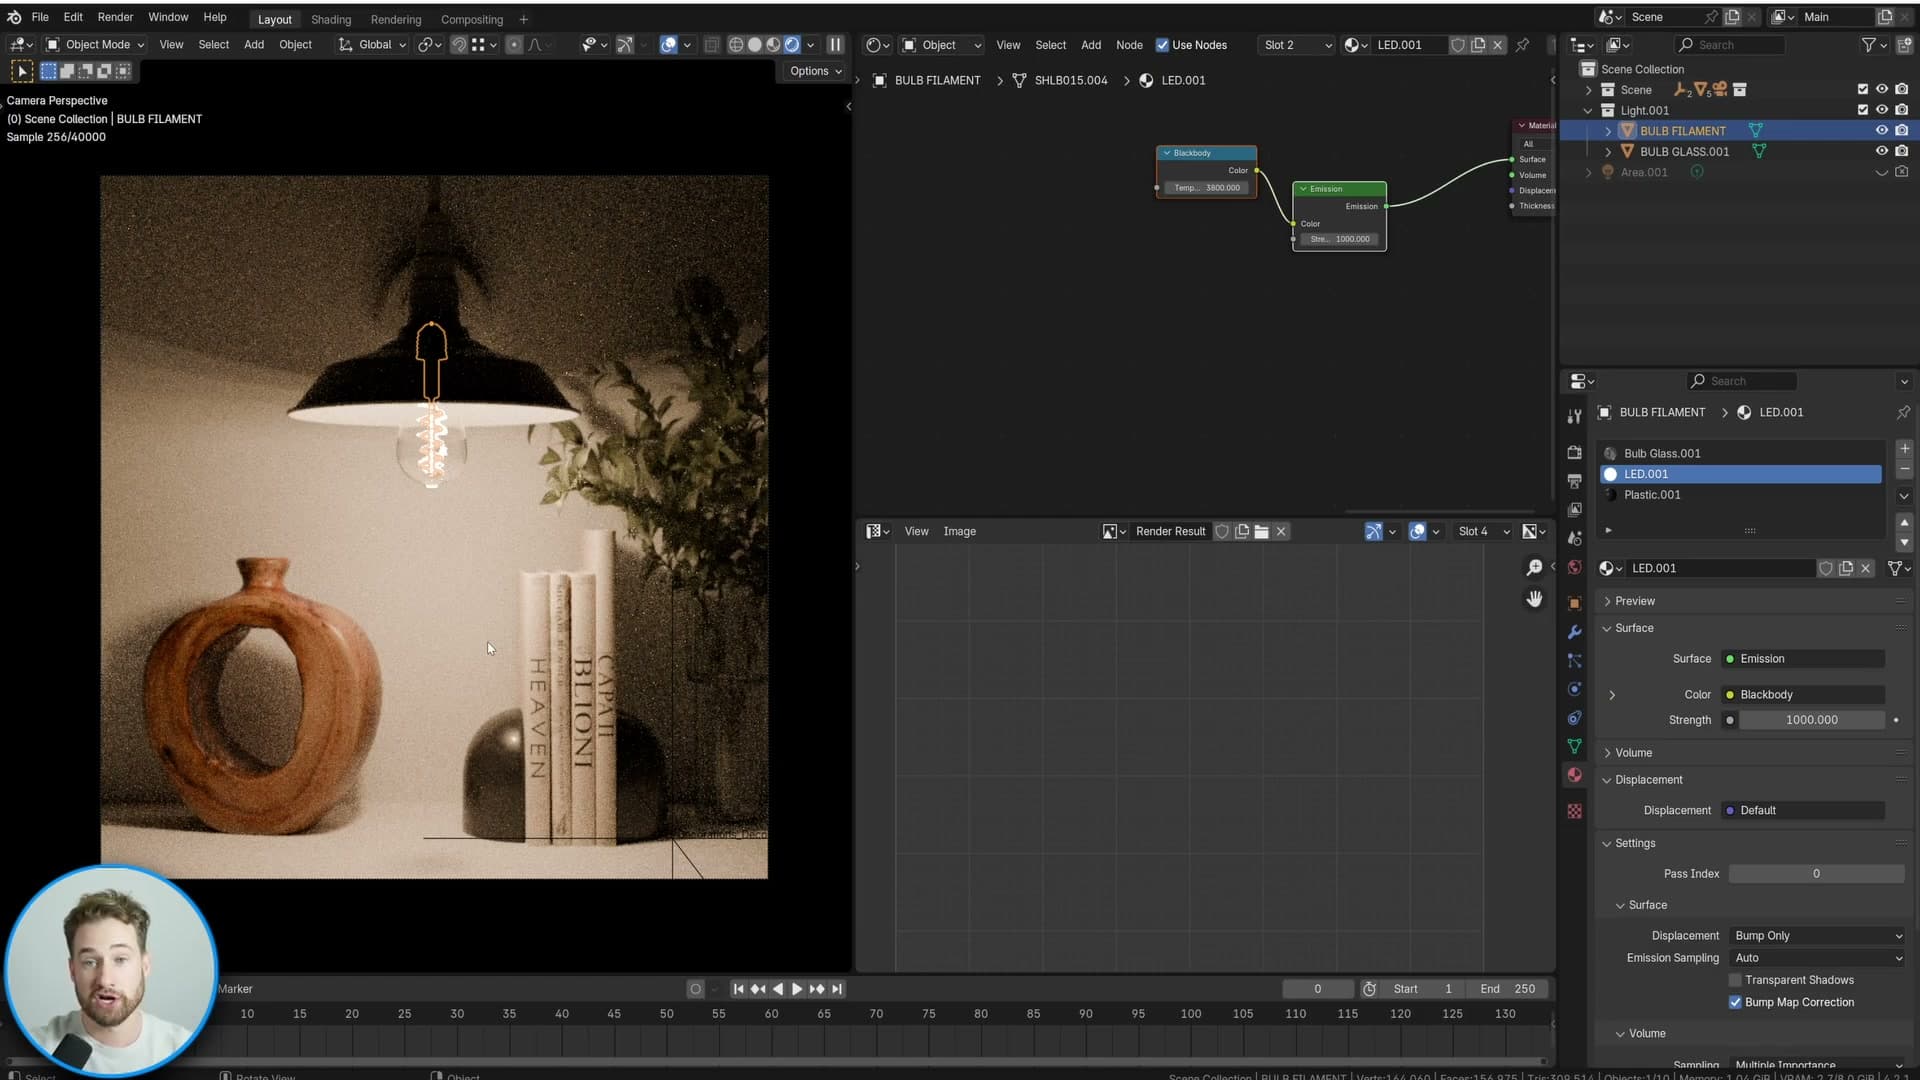
It is not perfect though. Look closely and you will still see fireflies: single pixels that are completely blown out, far brighter than anything around them. These come from the emissive filament itself, not the glass, and they are the next problem to solve.
For a still image the denoiser will mostly clean these up and you can probably ship the frame. For an animation that is not good enough. When each frame contains different fireflies in different places, the denoiser smears them inconsistently from frame to frame and you end up with flickering artefacts crawling across the sequence. The only reliable fix is to stop the fireflies appearing in the first place.
Why clamping isn't the answer
Setting Clamp Indirect to 10 nukes the fireflies but also strips the bulb of the blown-out, eye-searing quality that makes a light look real. For ArcViz, clamping should always be the last resort.
The clamping trade-off
The obvious objection at this point is: why not just clamp? Open Render Properties, push Clamp Indirect up to 10, and the fireflies do vanish. Problem solved, at least on paper.
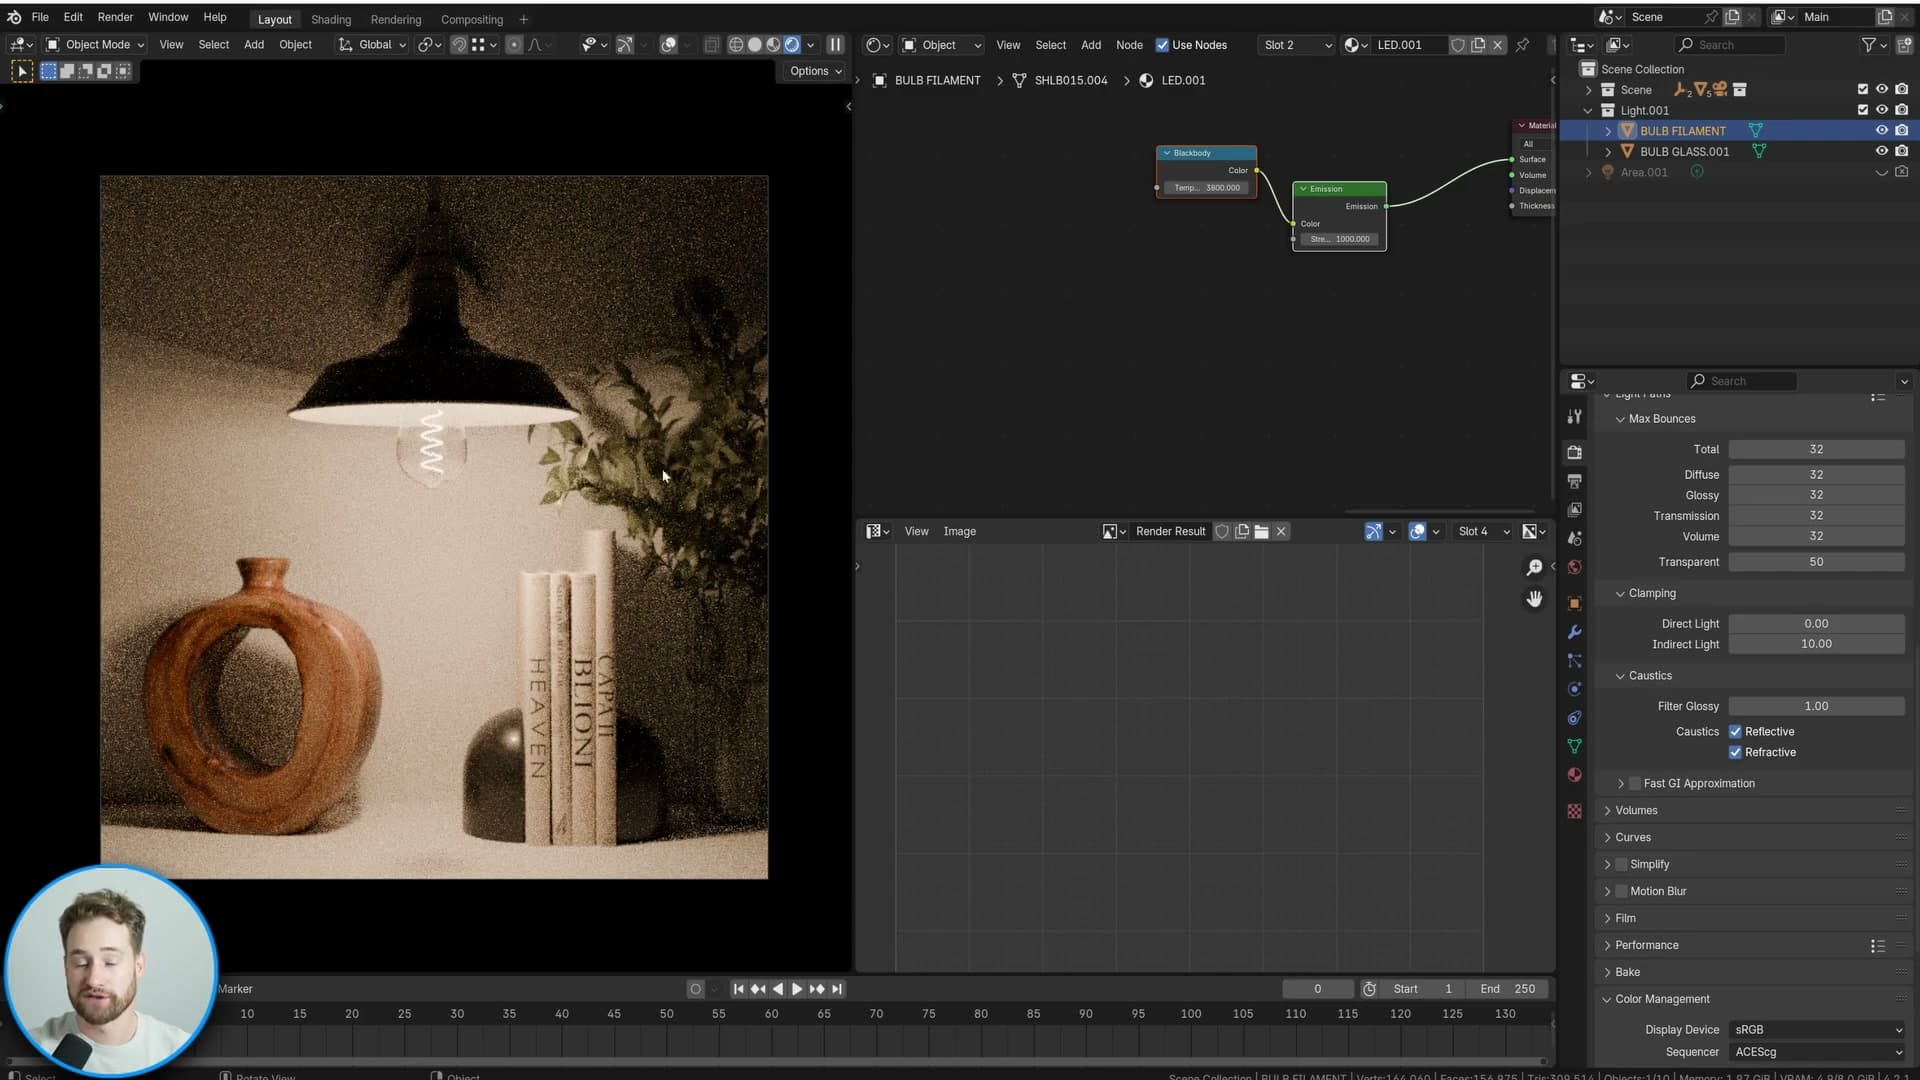
Look at the bulb after that change, though, and the trade-off is immediate. The filament reads as flat. There is no blown-out core, no eye-searing highlight, none of the quality that makes a real bulb something you instinctively glance away from. A real light is too bright to look at directly, and clamping strips exactly that property out of the render.
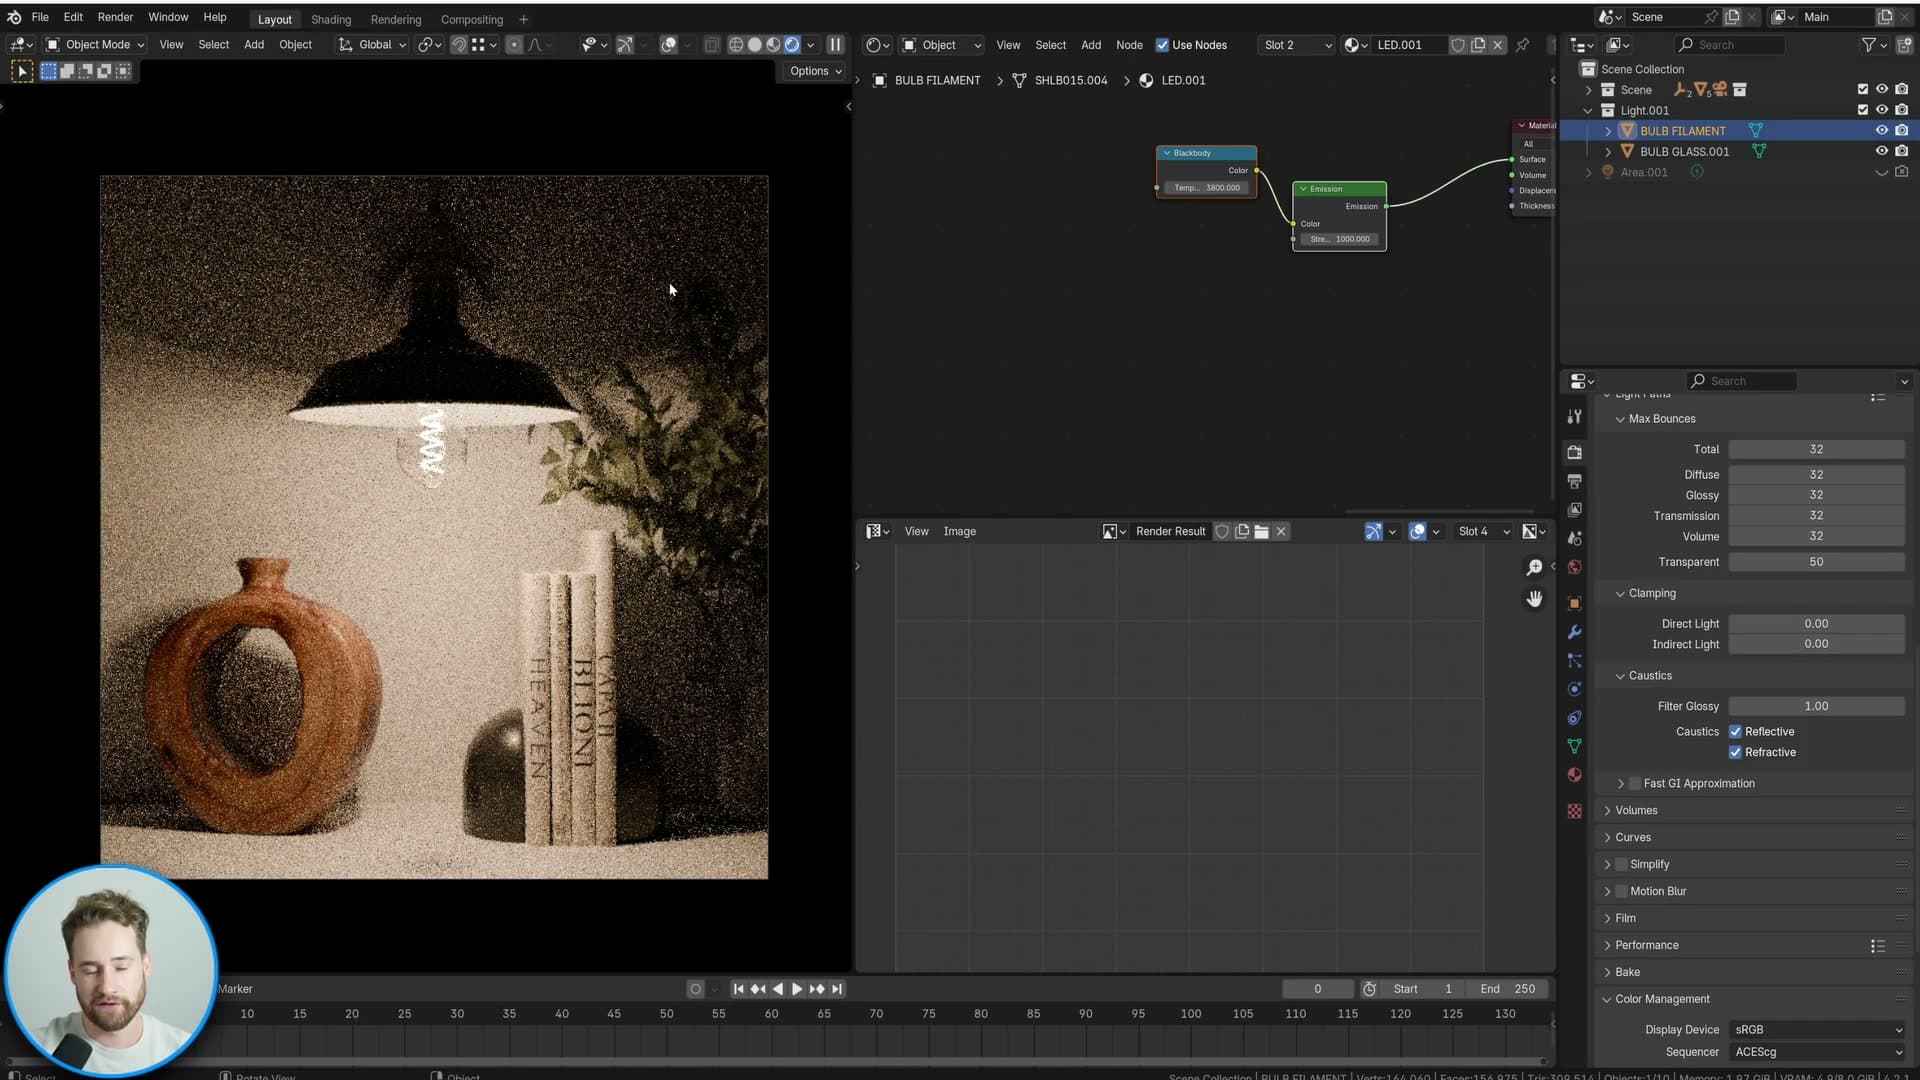
For archviz work, that is a bad trade. Clamping should be the last thing you reach for, not the first, because it tames noise by cutting energy out of the image that you actually want. Switch the clamp back off and the fireflies return at full strength. That confirms there is a real problem to solve, just not one you should solve this way.
Why point and area lights solve noise quickly
Cycles handles analytic lights (point, area) far more efficiently than tiny mesh emitters. The plan: keep the filament for the look, but offload actual scene illumination to a point light.
Analytic lights vs tiny mesh emitters
Inside Blender, the fastest and most accurate light types for Cycles are the analytic ones: point lights and area lights. They are the most efficient sources you can have in a scene. A tiny mesh emitter, on the other hand, forces Cycles to work much harder, because the renderer has to fire rays at a small geometric surface and reconcile the noise that comes back. That mismatch in efficiency is the whole reason the filament is so painful to render directly.
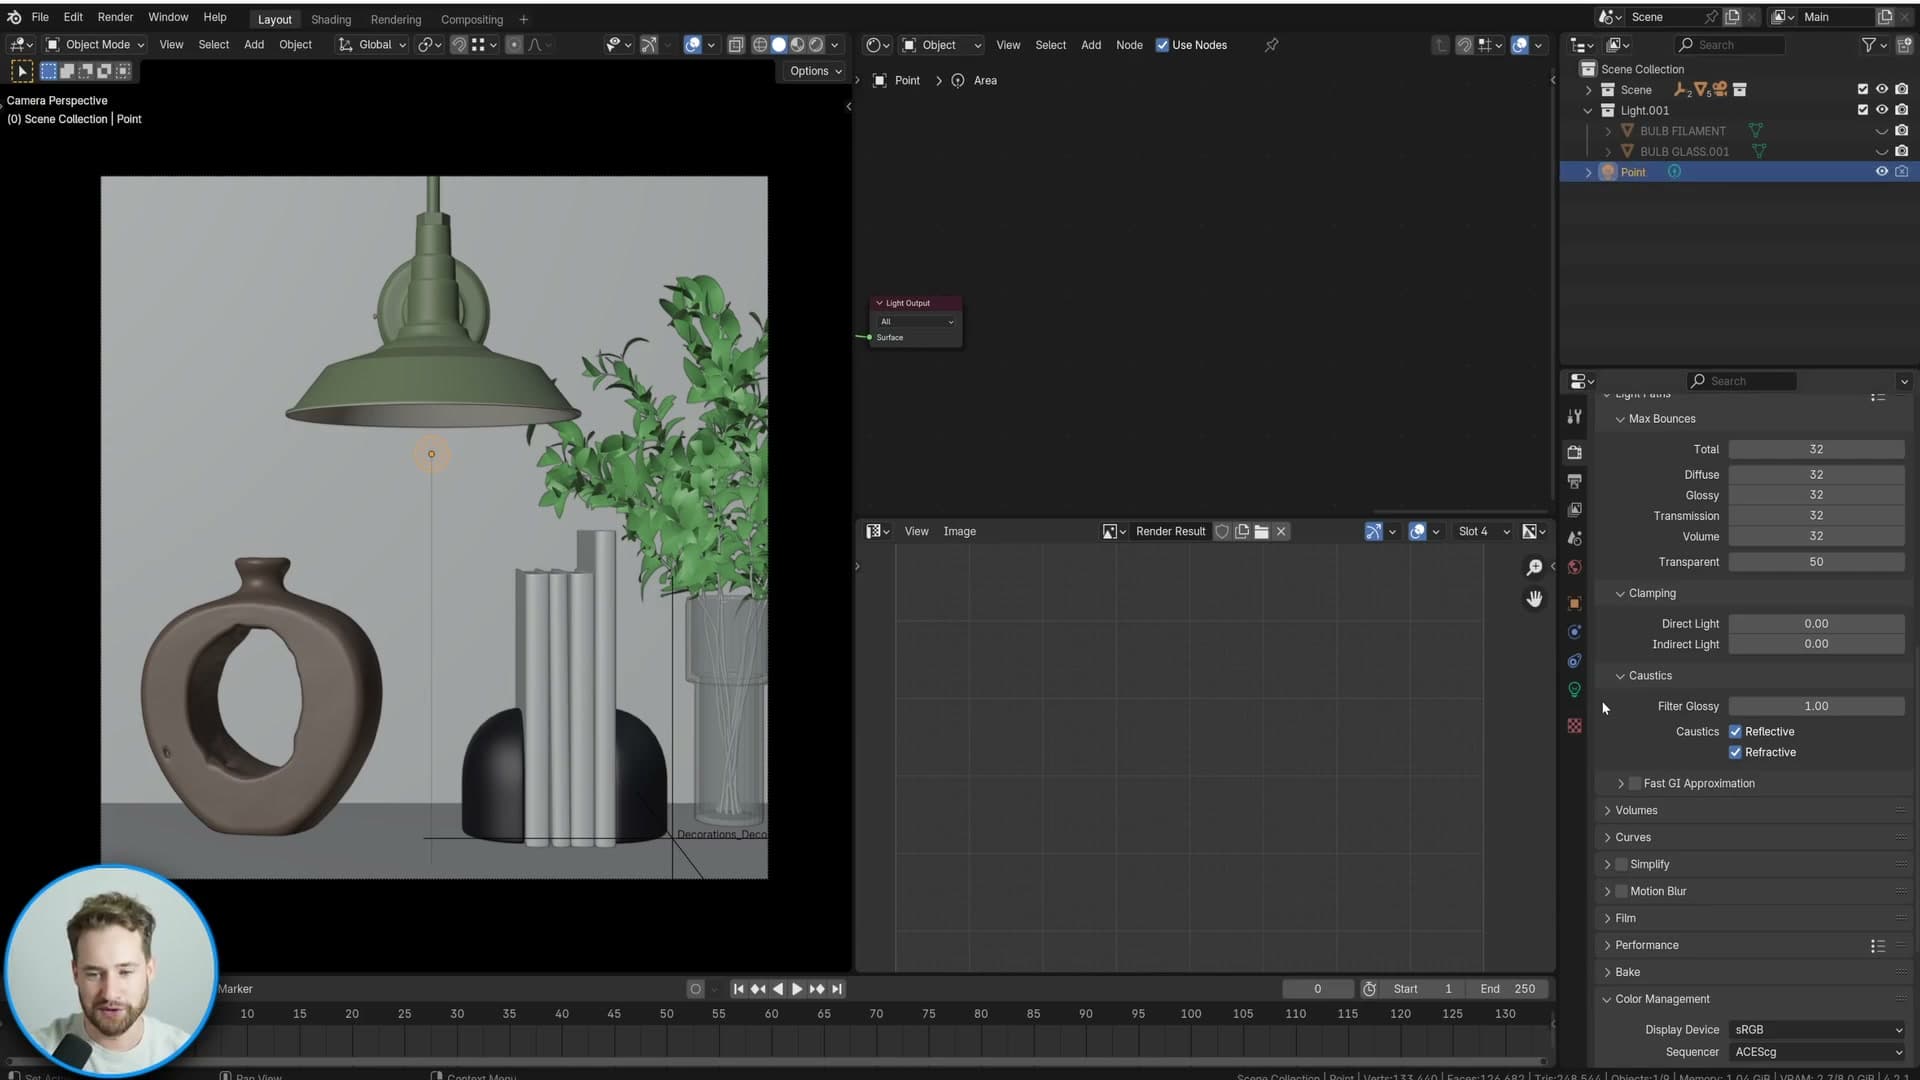
To prove the point, swap the bulb's emission out for a simple point light dropped into the same spot, then hit render. The image cleans up almost instantly. Mesh lights can never reach that pace.
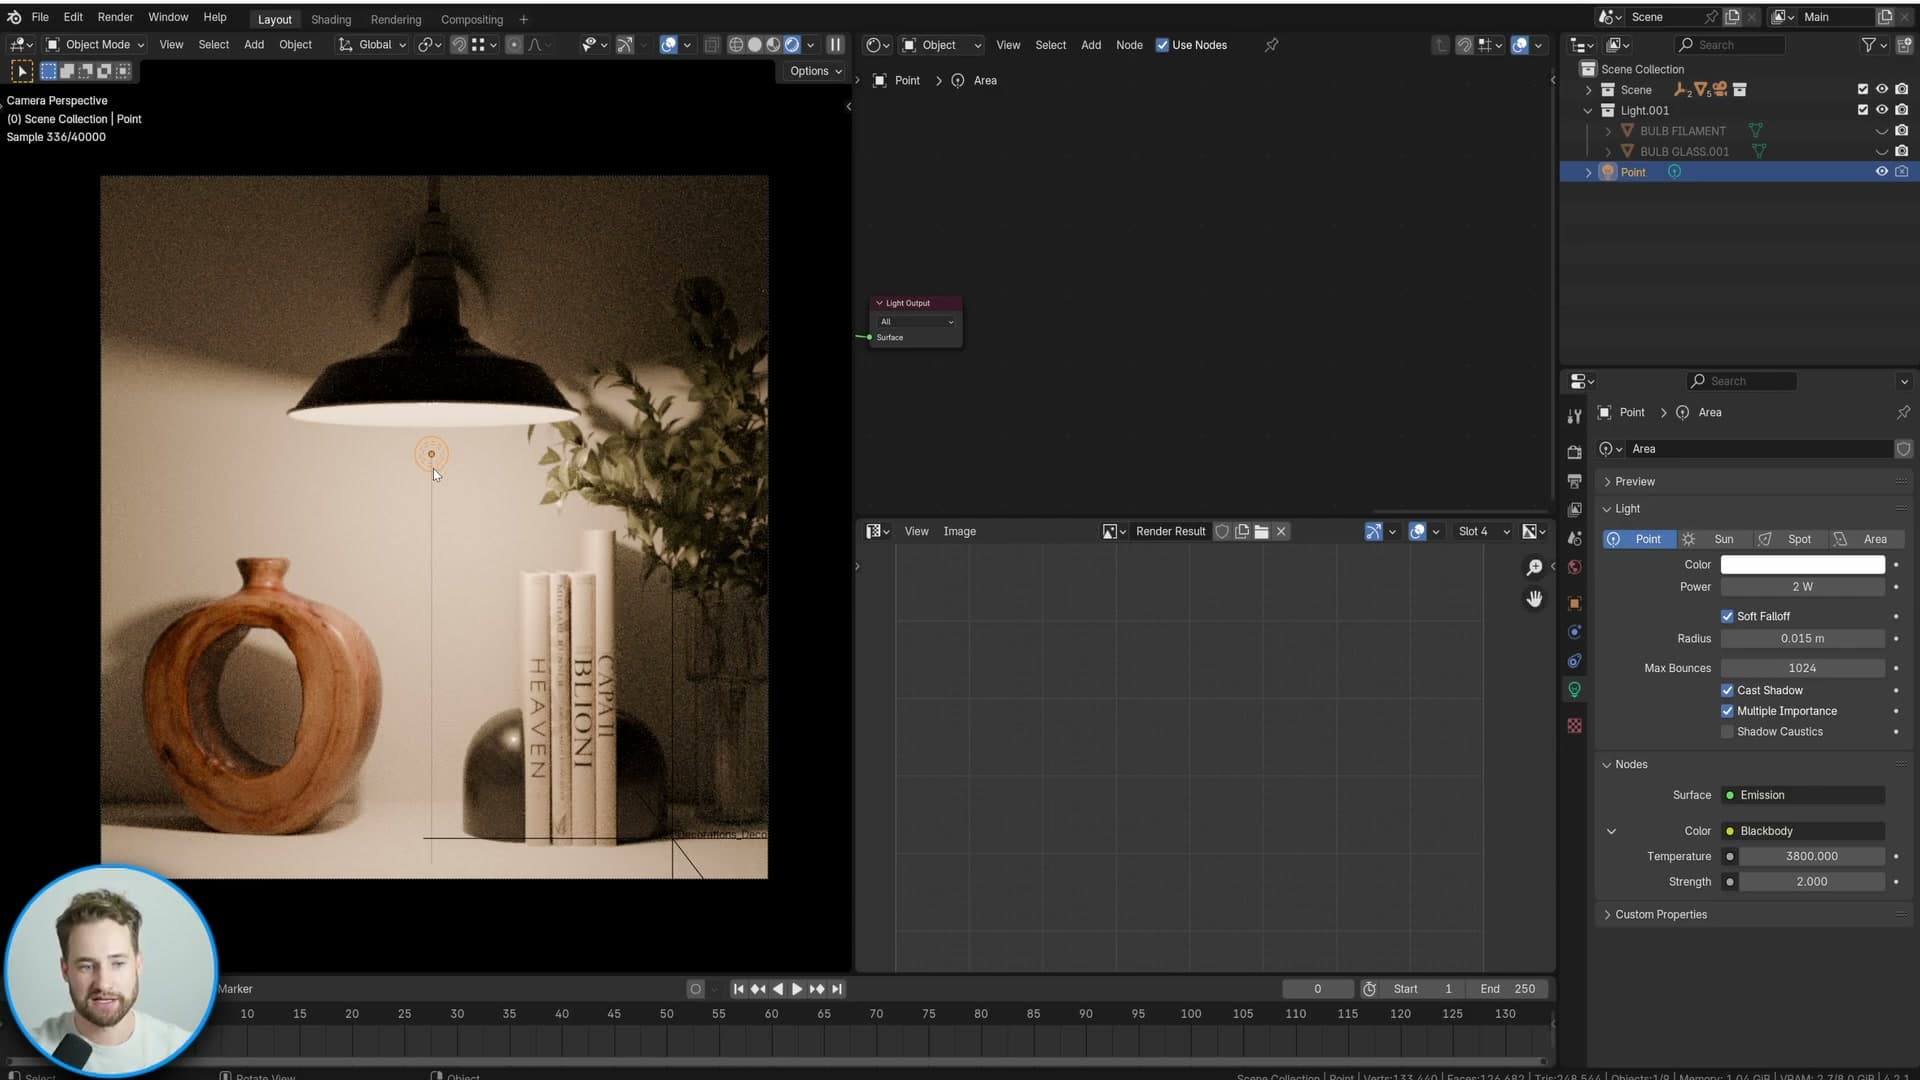
That gives you the plan for the rest of the technique. Use a point light to actually illuminate the scene, and keep the filament's emission shader purely for the look of a glowing bulb inside the glass. The two roles get split between the right tools for each.
Why the holdout/composite approach was rejected
Before settling on this approach, the question went out on Blender Artists. One suggestion that came back was to render the scene twice and composite the results. The first pass would have the glass and filament rendered properly with everything else flagged as a holdout, and the second pass would render the rest of the scene without the glass. The two would then be merged together in the compositor.
That works in principle, but it is the long way around. The goal here is a single render, not a multi-pass compositing dance. On top of that, even the holdout-and-merge approach still produced fireflies in testing, so it did not actually solve the underlying problem. It just hid it behind extra work.
There are other solutions floating around too, and if you have one of your own it is worth hearing about. The technique covered in the rest of this post is the route that landed cleanly as a single, self-contained shader trick.
Confining the filament with Ray Length and Ray Depth
The core trick: use Light Path → Ray Length to fade the filament past 13 cm, then multiply by Ray Depth < 2 to cap secondary bounces. The filament now only illuminates the lamp itself.
Limiting falloff distance with Ray Length
The goal of the next node group is to build a filament that only lights its immediate area. Start with a Light Path node and grab its Ray Length output. Ray Length is the distance the current ray has travelled, and you can use that distance to draw a hard sphere of influence around the filament.
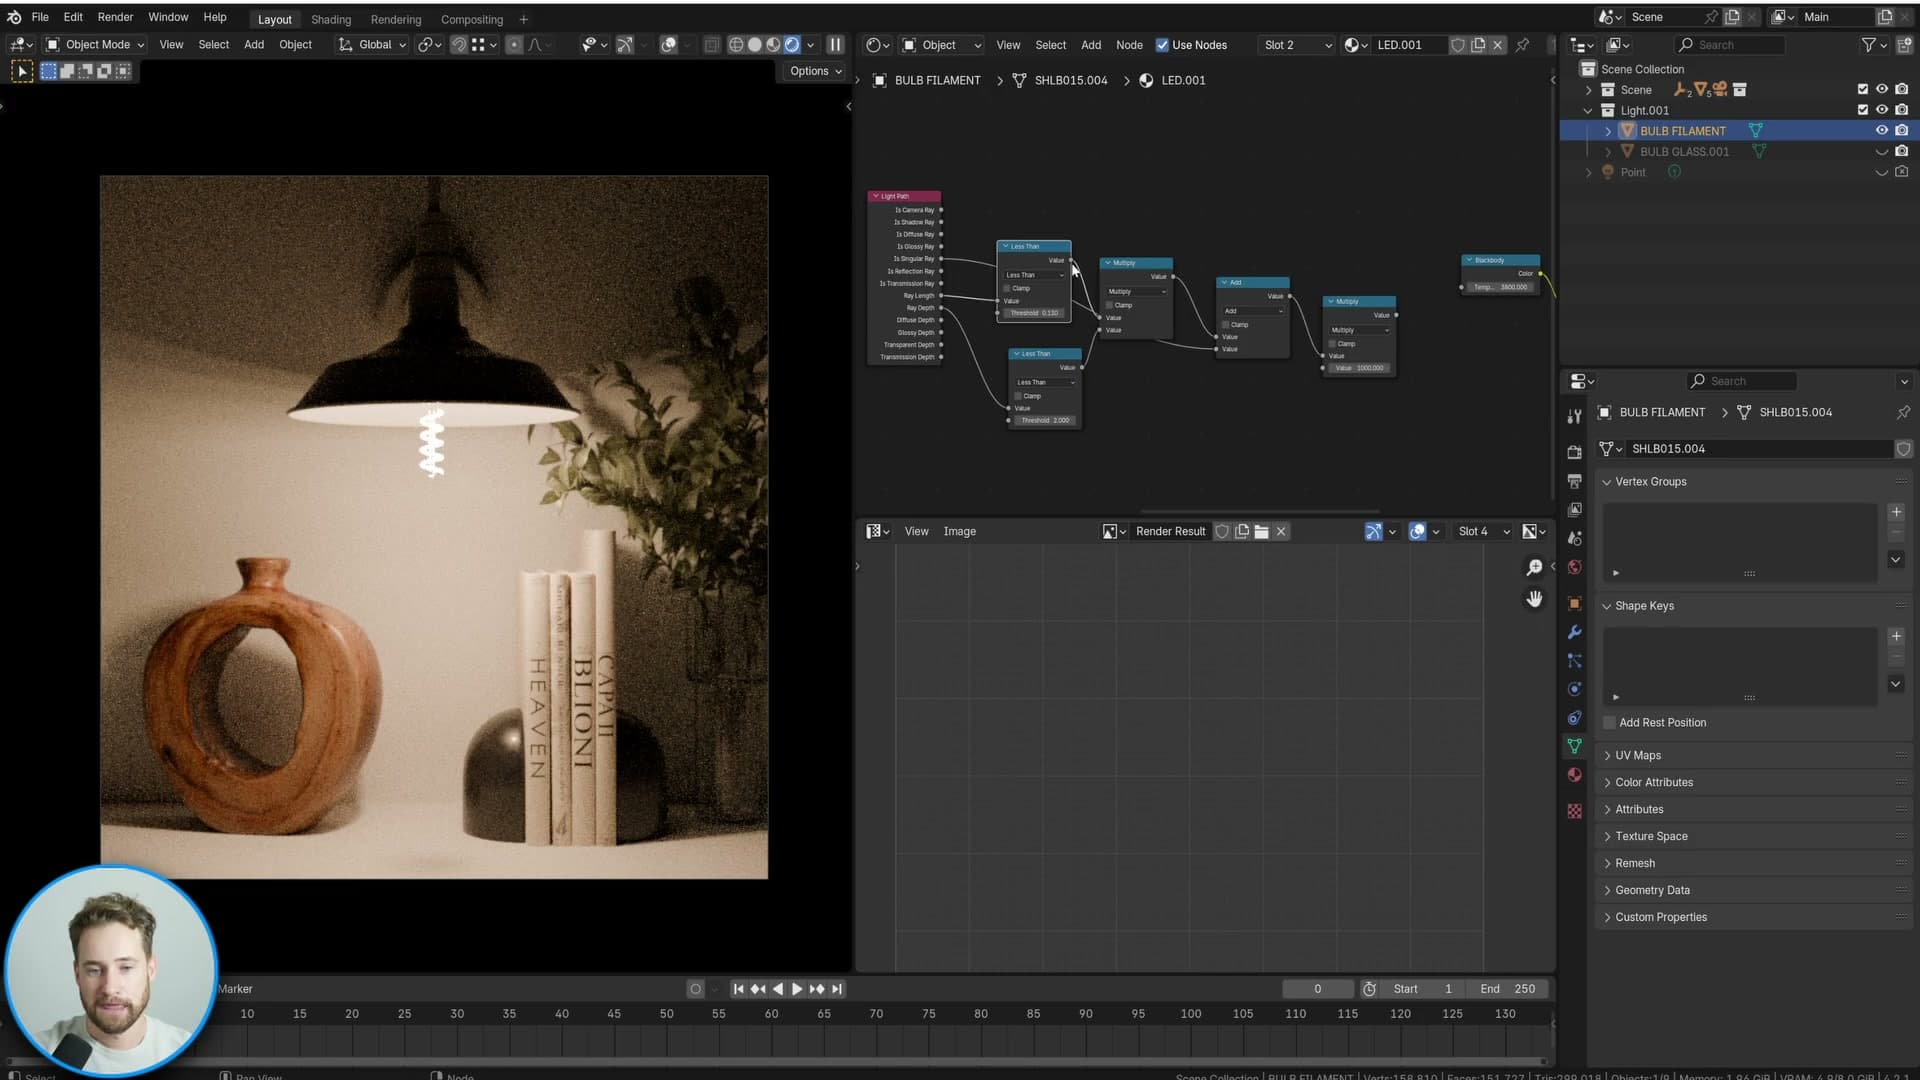
Compare the Ray Length value against 0.13, which is thirteen centimetres. Any ray that has travelled further than that threshold gets discarded, so the filament's energy can't reach across the room. Feed that result through a Multiply node set to 1000, which matches the emission strength you're already pushing through the shader, and plug the output into the Emission node.
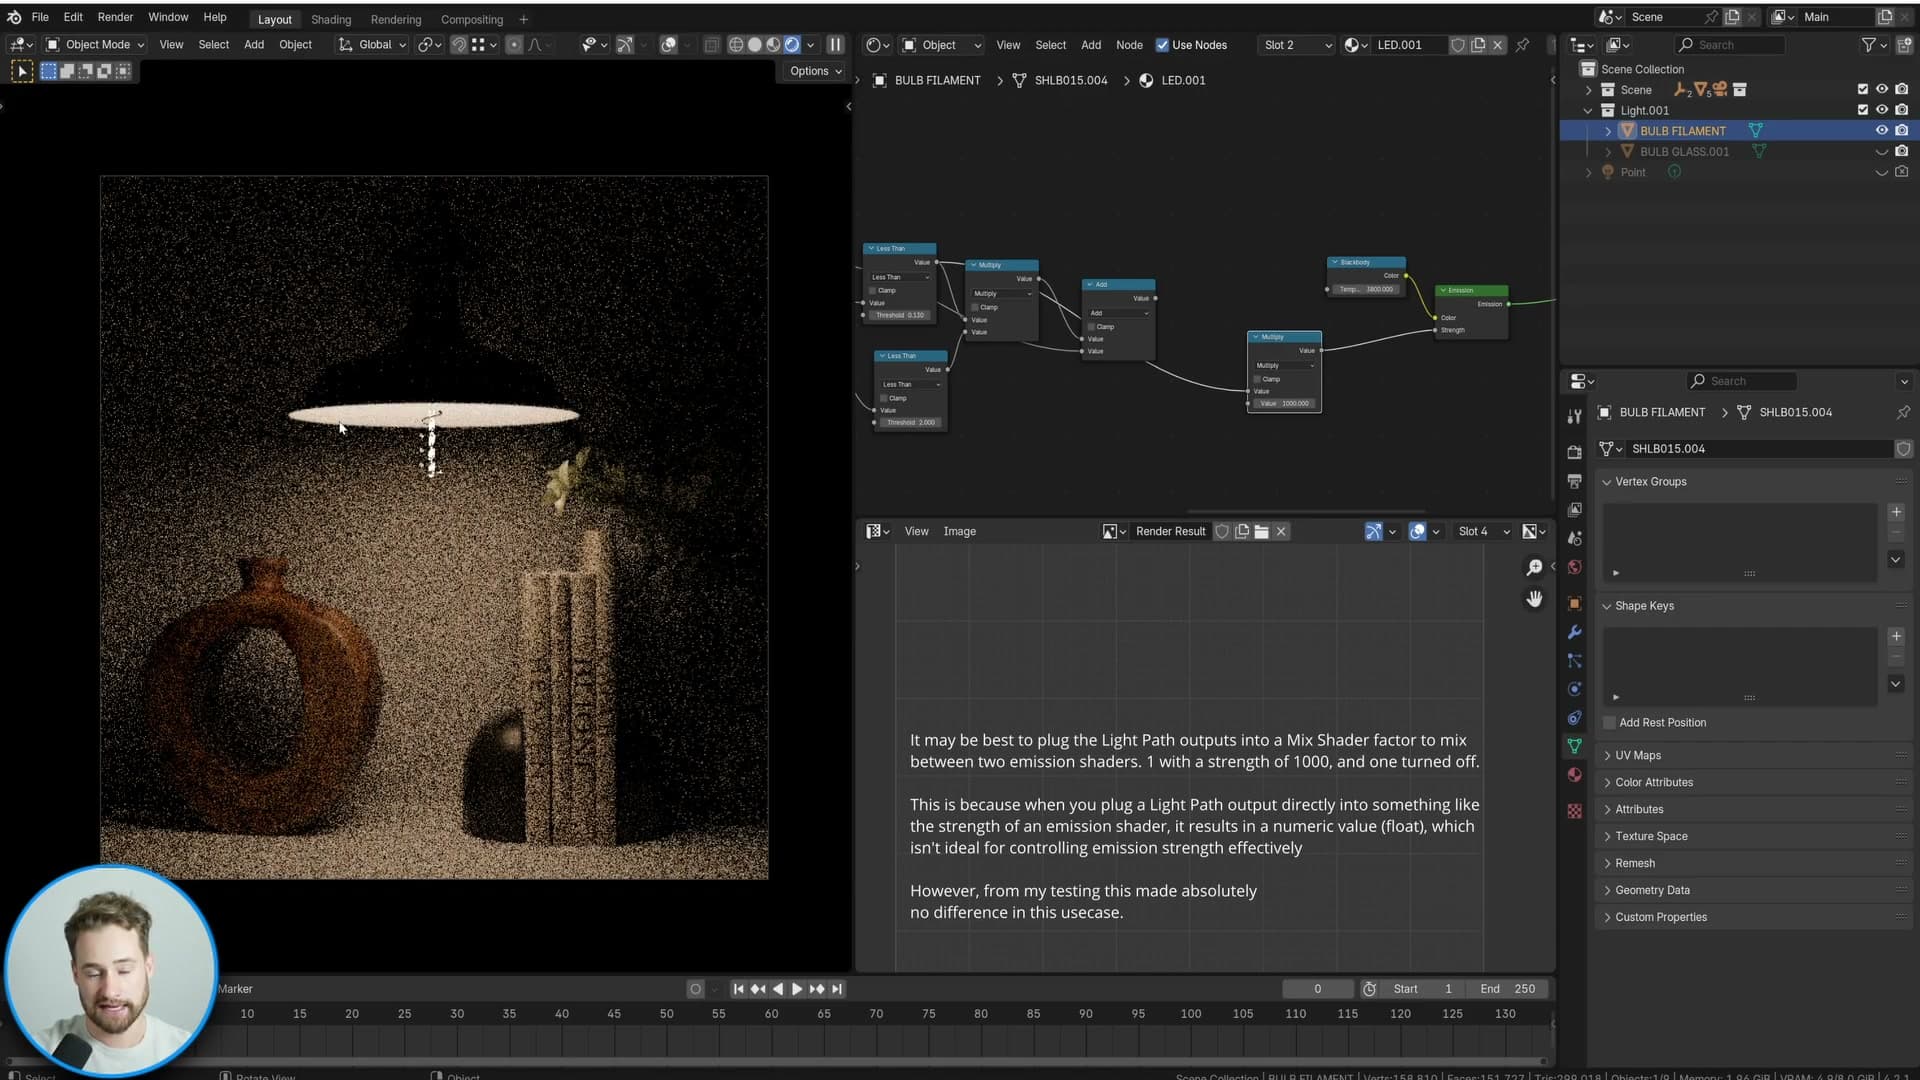
The lamp itself now lights correctly: the glass, the inner shade, the bulb cavity. Everything within 13 cm of the filament reads as illuminated. But the moment a ray bounces off one of those surfaces and heads out into the room, it carries the filament's brightness with it. Secondary bounces are still leaking fireflies into the scene, which is what the next node deals with.
Capping bounces with Ray Depth
The companion output to Ray Length is Ray Depth, which tells the shader how many bounces the current ray has already taken. Plug Ray Depth into a comparison and you can cap the filament's contribution to a specific number of bounces.
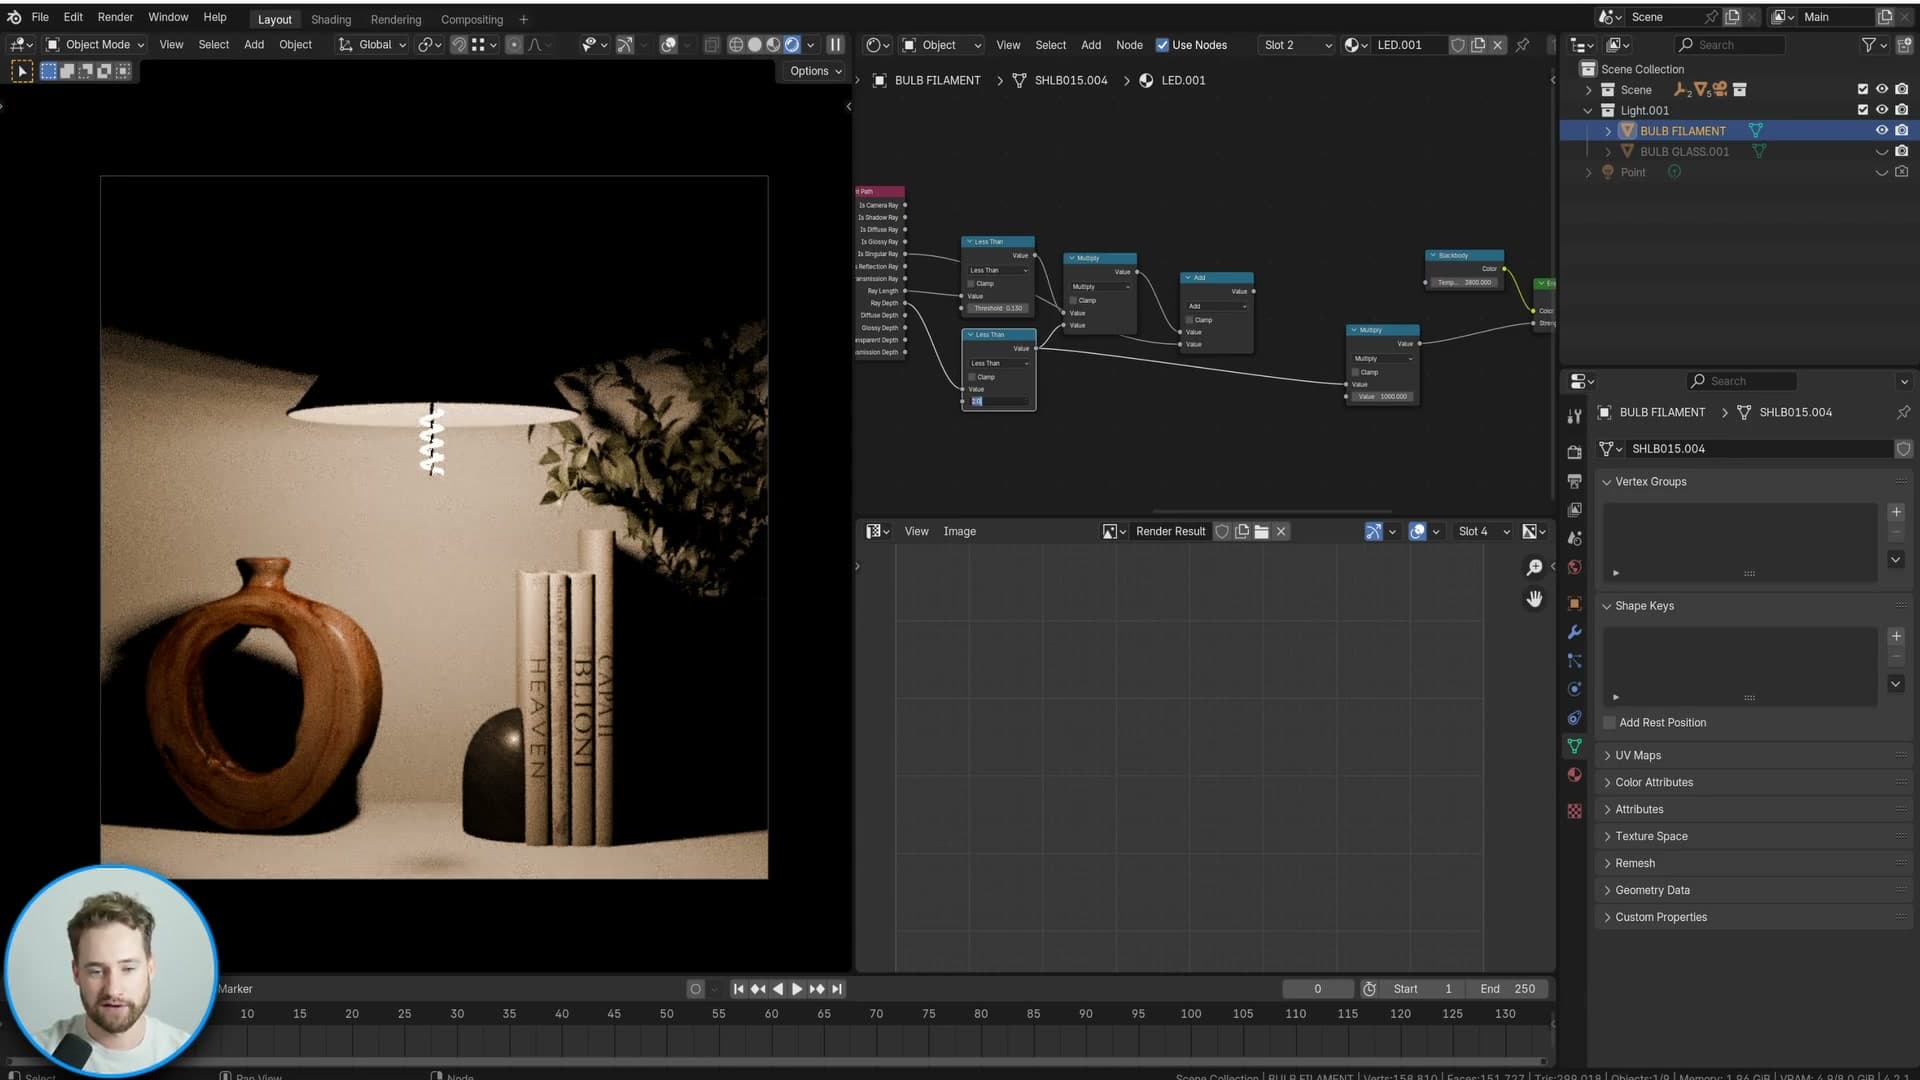
Walk the threshold up to see the effect. At less than 1, only rays going directly to the camera survive. Everything else is cut off. At less than 2, you also keep one bounce: light leaving the filament, hitting the lamp interior, and arriving at the camera. Push it to less than 3 and you start seeing the next bounce, light hitting a wall and then returning. By the time you reach 10 the result is closer to realistic light transport, but the fireflies come straight back with it.
The sweet spot is 2. That keeps the filament limited to direct visibility plus one bounce inside the lamp itself, which is enough to make the bulb read as lit without flooding the room with noisy indirect light.
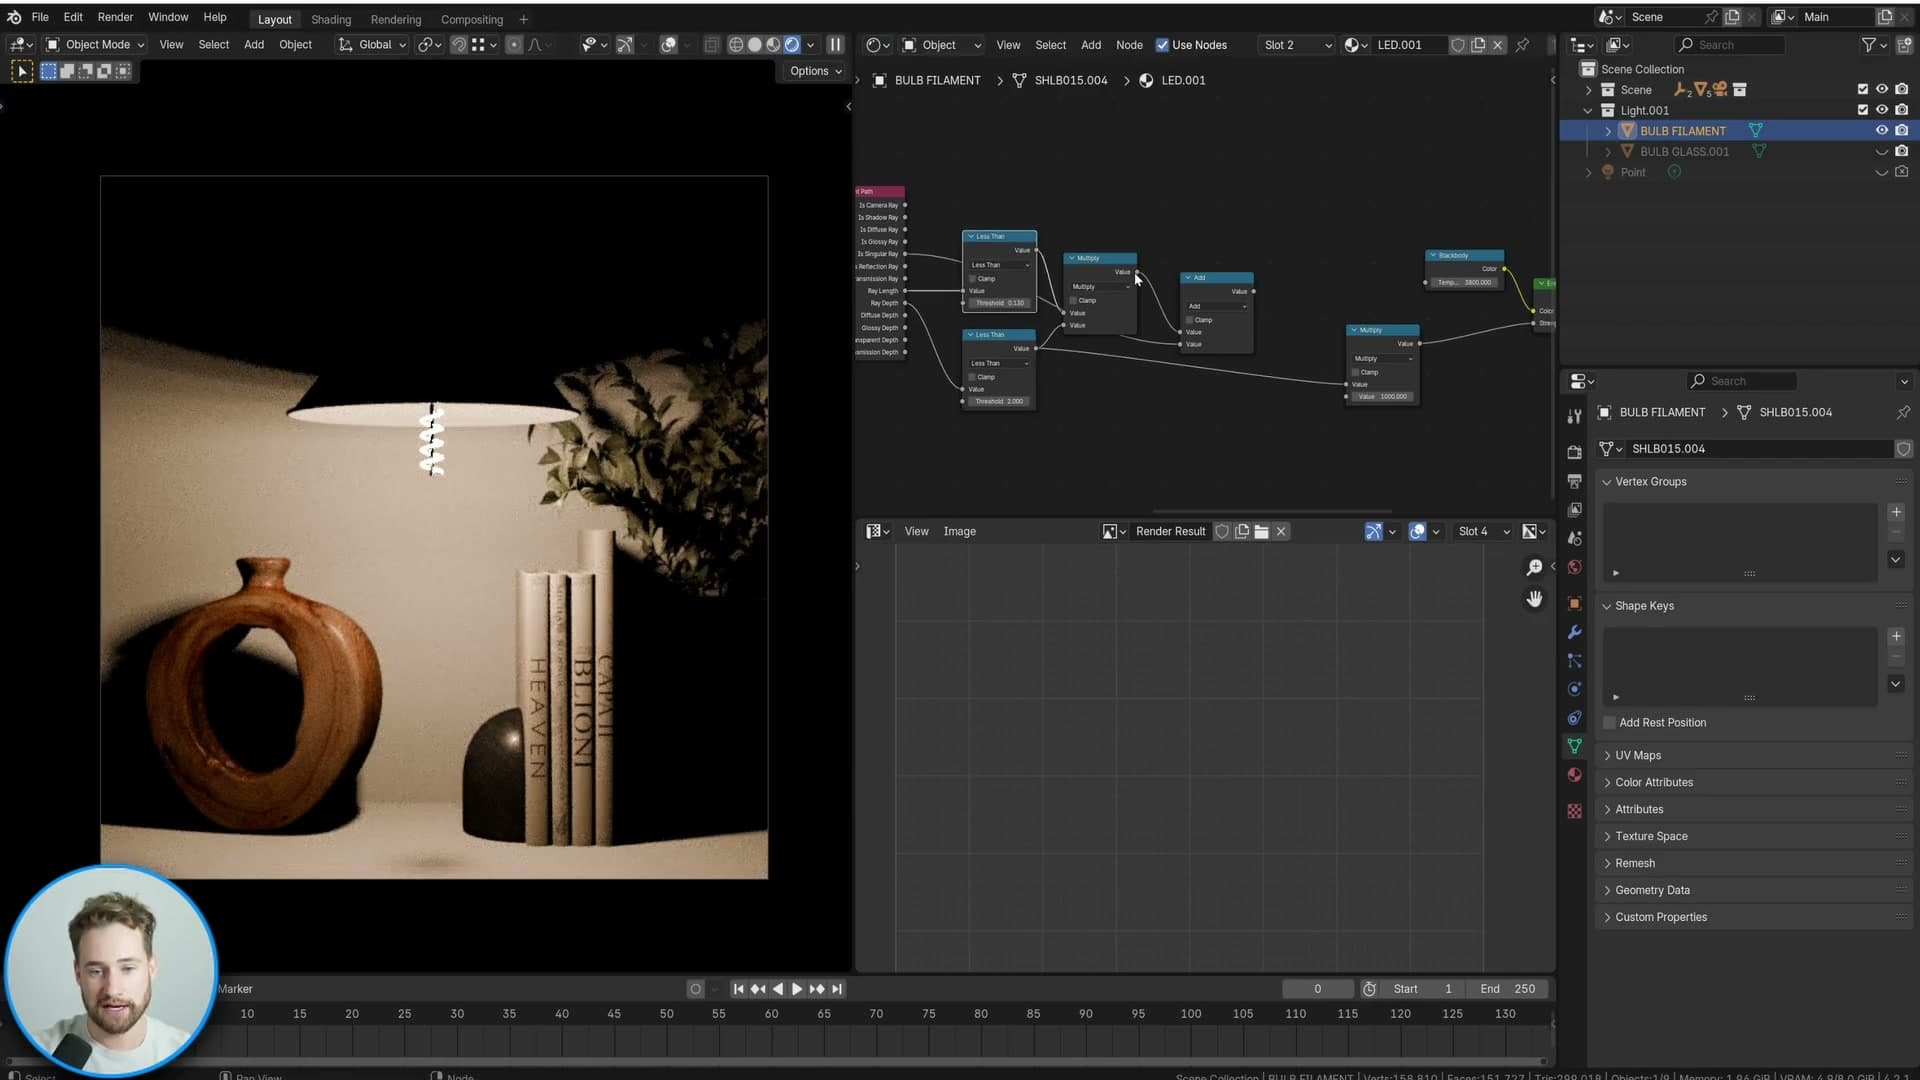
Multiply the Ray Length output and the Ray Depth output together, then run that combined value into the emission strength. The filament now obeys both rules at once: it can't reach beyond 13 cm, and it can't survive more than one bounce. The lamp glows; the room stays clean.
Keeping the filament visible through the glass
A side-effect of the Ray Depth cap is that the filament disappears in reflections. A Singular Ray check feeds the original emission back in for camera and reflection rays, restoring the look.
Routing camera rays back through the emission
The Ray Length and Ray Depth gating from the previous module does exactly what you want for the room. It keeps the filament from polluting the scene with indirect noise. But it has a cost: once you reattach the bulb glass, the filament vanishes from view. The camera ray hits the glass, refracts, and by the time it reaches the filament the gating logic has already zeroed the emission out. You need a way to make the filament visible to direct viewing and reflections without undoing the work that killed the fireflies.
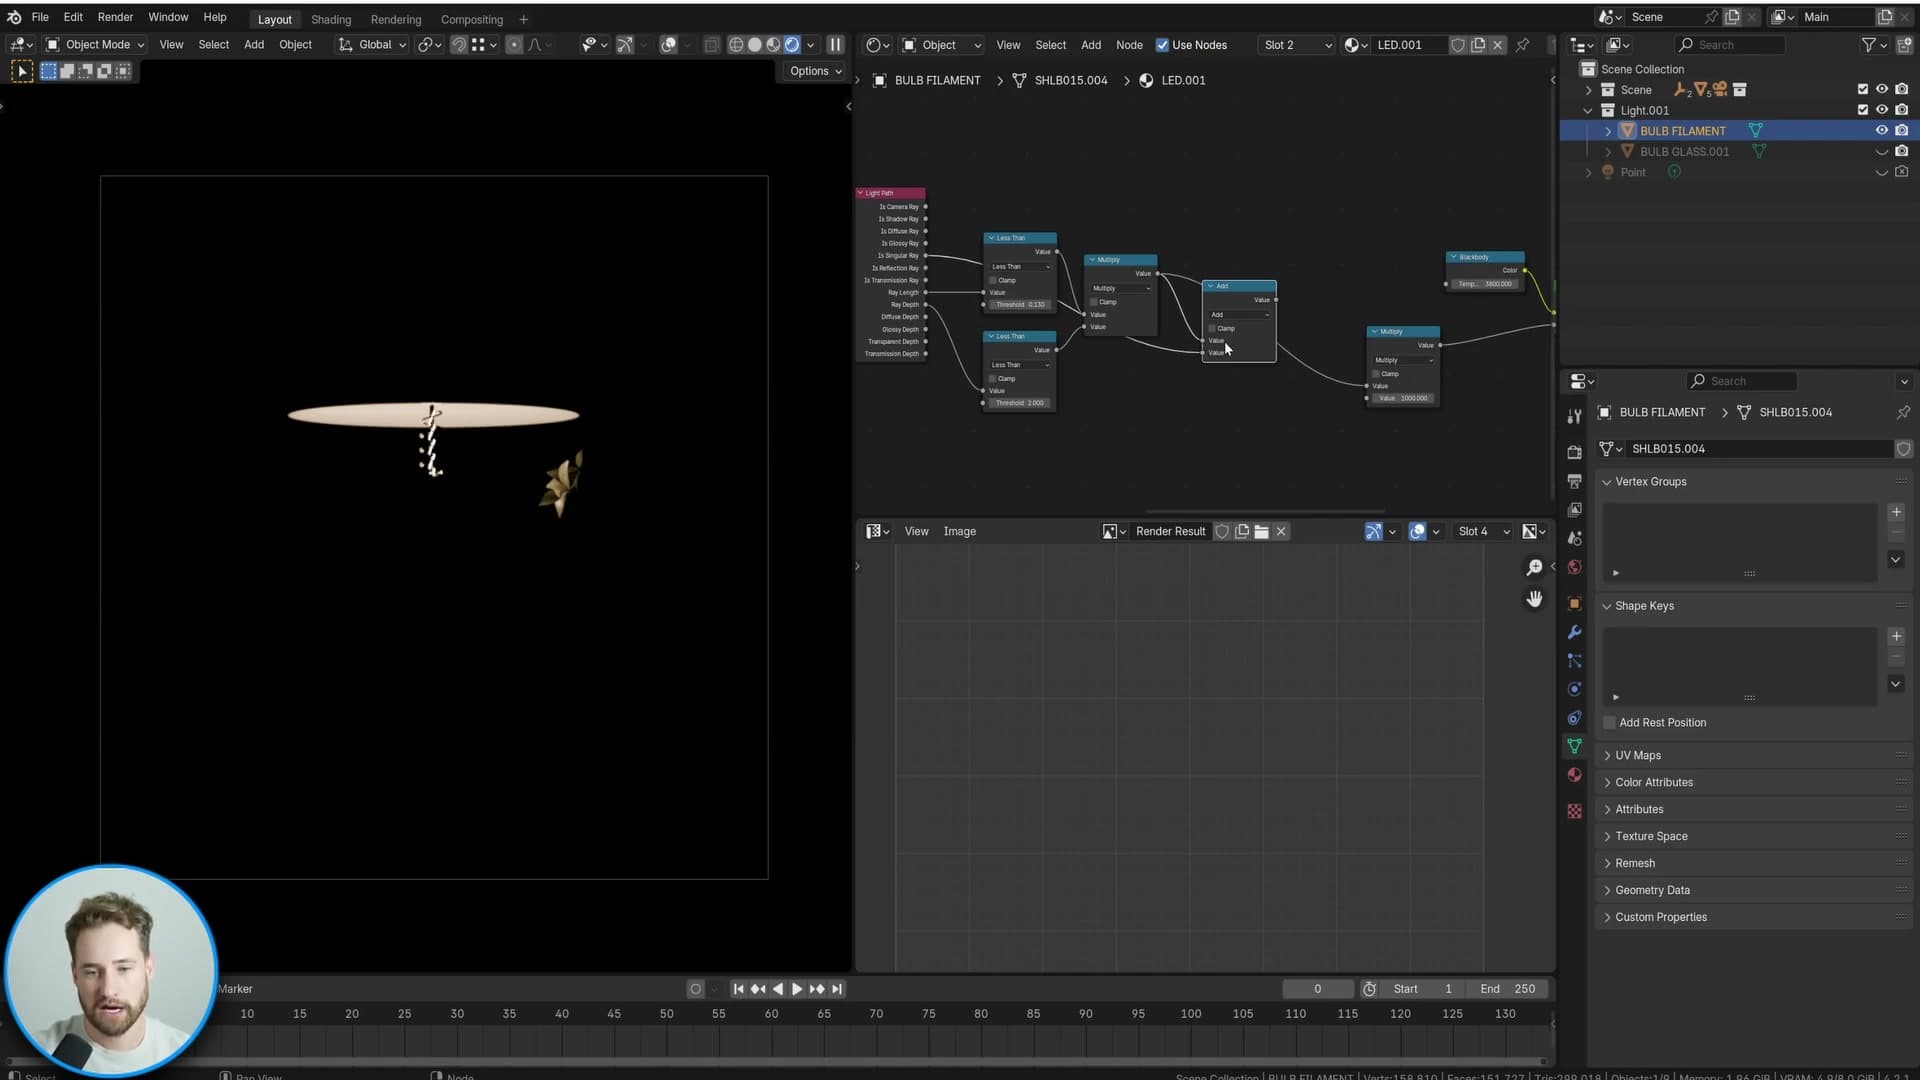
The fix is a Singular Ray check fed back into the multiplication chain. Pull the Is Singular Ray output from the Light Path node and add it into the same value that the Ray Length and Ray Depth checks are multiplying. Singular rays cover both direct camera rays and the sharp reflection/refraction rays that produce mirror-like bounces, so adding this output back in restores the filament wherever it should genuinely be seen: through the glass, in the glossy highlights on the bulb, and in any nearby reflective surfaces.
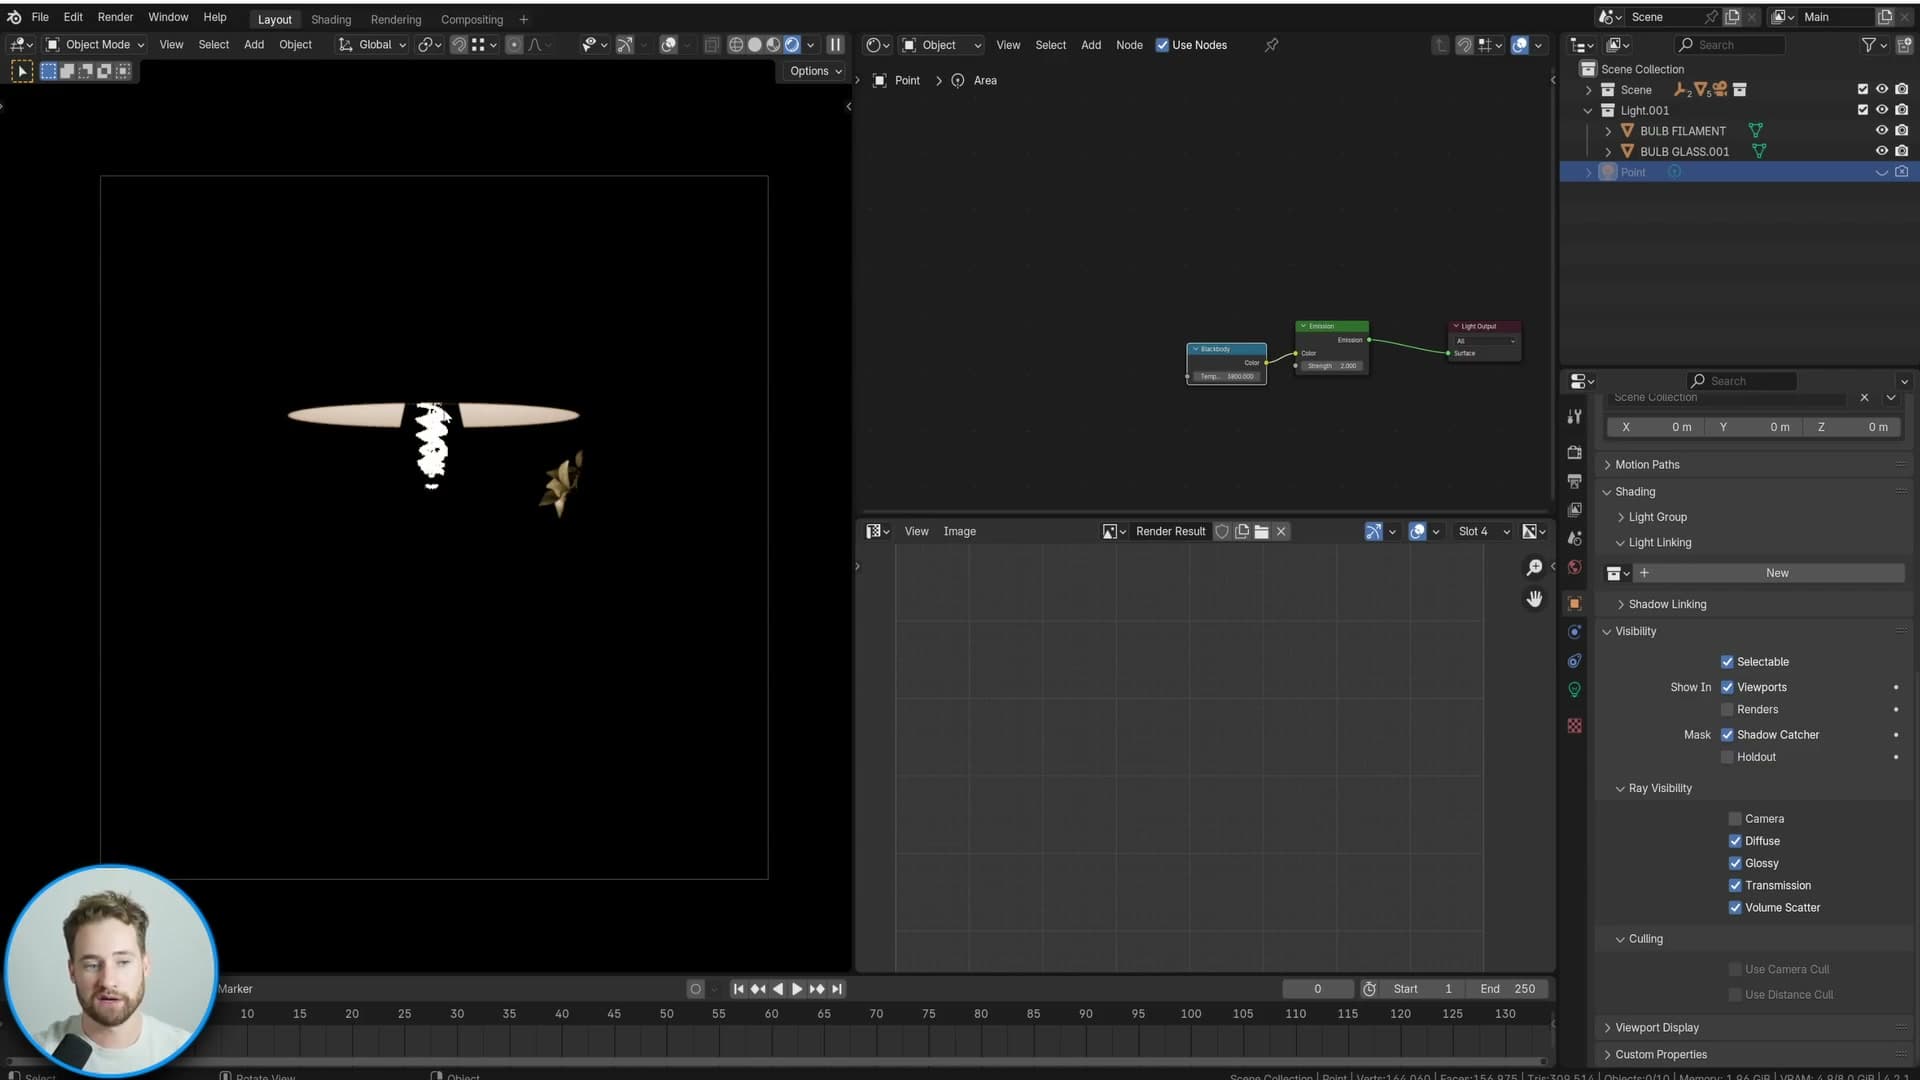
With the glass material reapplied to the bulb, the result is the look you were chasing. The filament reads correctly inside the glass with rich reflections, the immediate area around the bulb is illuminated as expected, and the rest of the scene stays completely free of fireflies. The lampshade picks up its glow from the filament directly, while everything beyond that short radius remains noise-free.
Lighting the scene with a linked point light
With the filament now decorative, a 1.5 cm, 2 W point light handles real illumination. Light Linking excludes the bulb mesh from the point light so reflections off the glass don't reintroduce noise.
Adding the analytic point light
With the filament's shader now locked down to a tiny radius around the coil, the bulb stops polluting the room with indirect noise. But it also stops doing the job of lighting the room. That illumination has to come from somewhere, so the next step is to add an analytic light source inside the bulb itself.
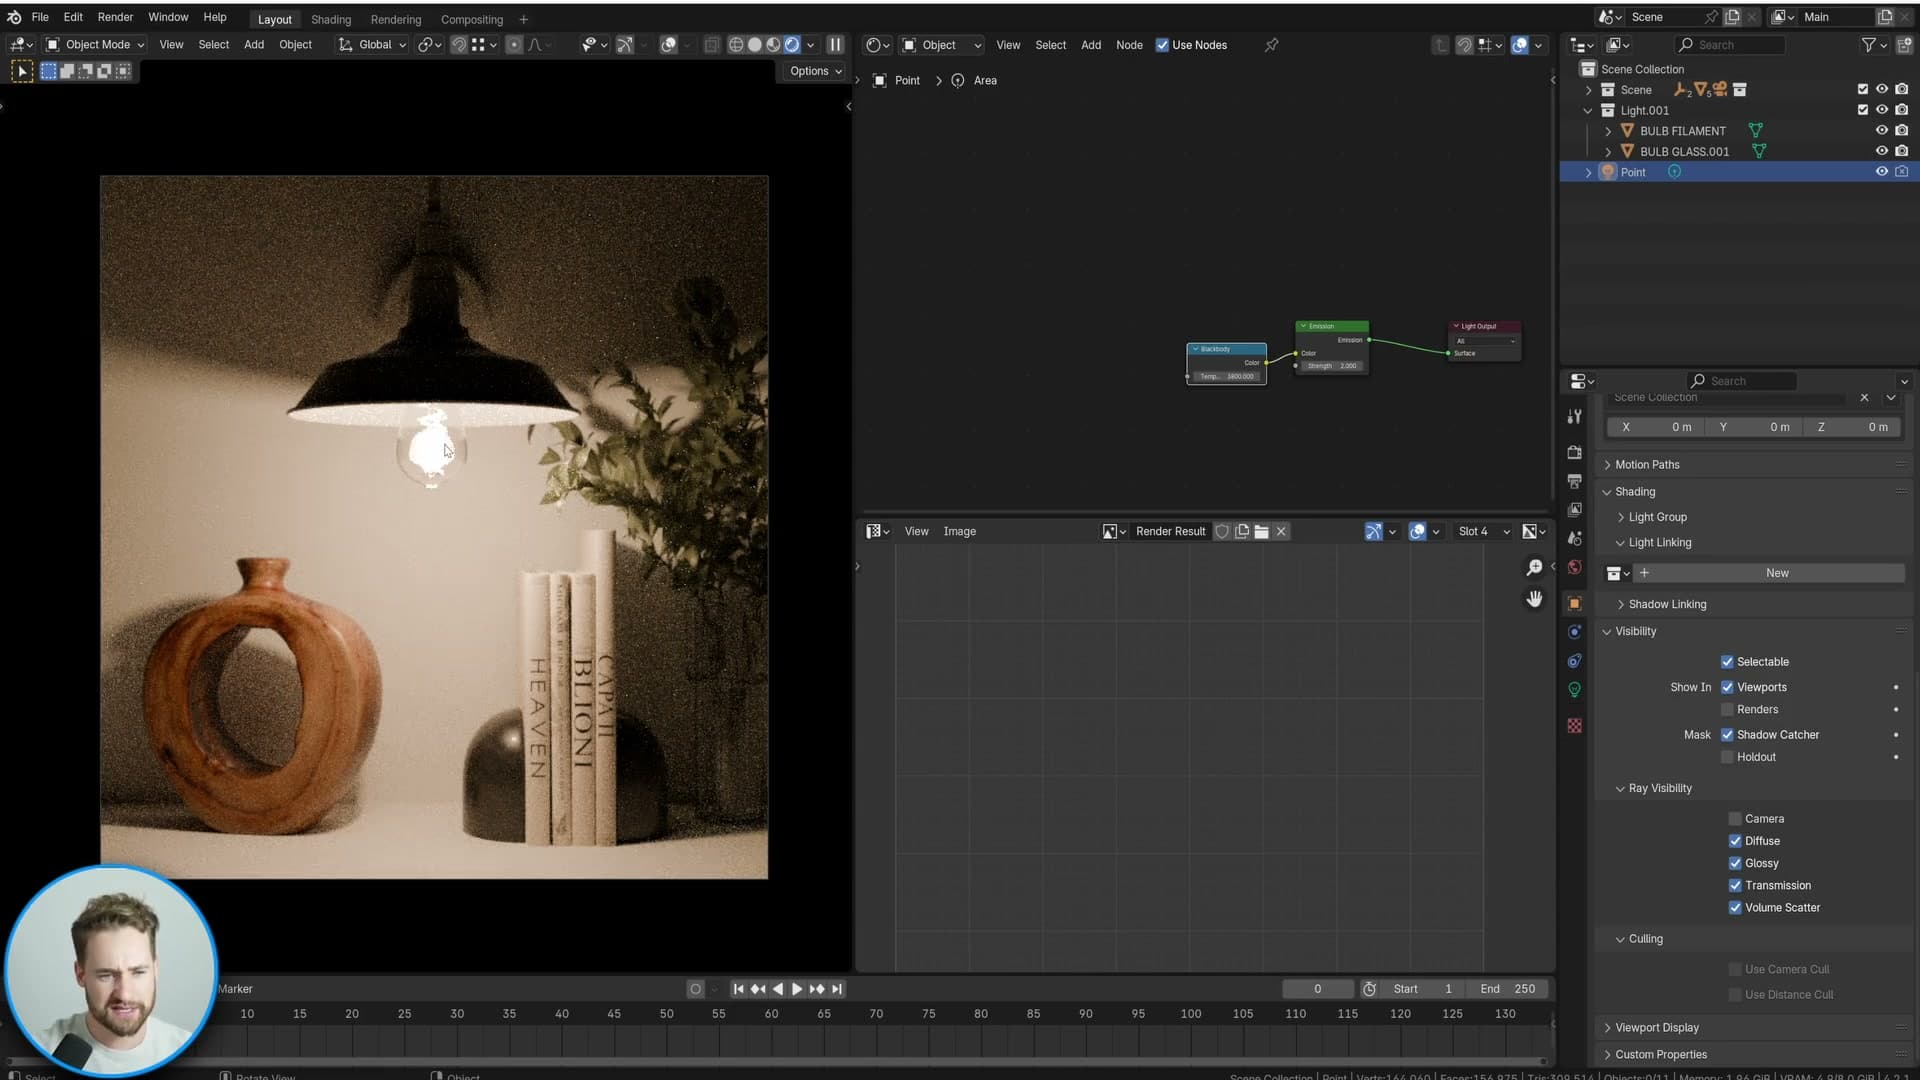
Drop a point light into the scene and position it inside the glass envelope, roughly where the filament sits. Turn it on and the room reads correctly again: the walls, the ceiling and the surfaces around the lamp are all properly lit, and you're getting that work done by a clean analytic source rather than a noisy mesh emitter.
There's still a problem, though. The point light's rays hit the bulb glass from the inside and reflect through it, which throws fresh noise back into the scene from the bulb itself. You've swapped one source of fireflies for another, just in a different shape.
Note: the new light is small, about 1.5 cm across, and weak at only around 2 W. The intent is to mimic the filament's location and rough output, not to overpower it.
Excluding the bulb mesh via Light Linking
The fix for the bulb-glass reflection noise is Light Linking. The idea is simple: tell this particular point light to ignore the bulb mesh entirely, so its rays never see the glass and never bounce off it.
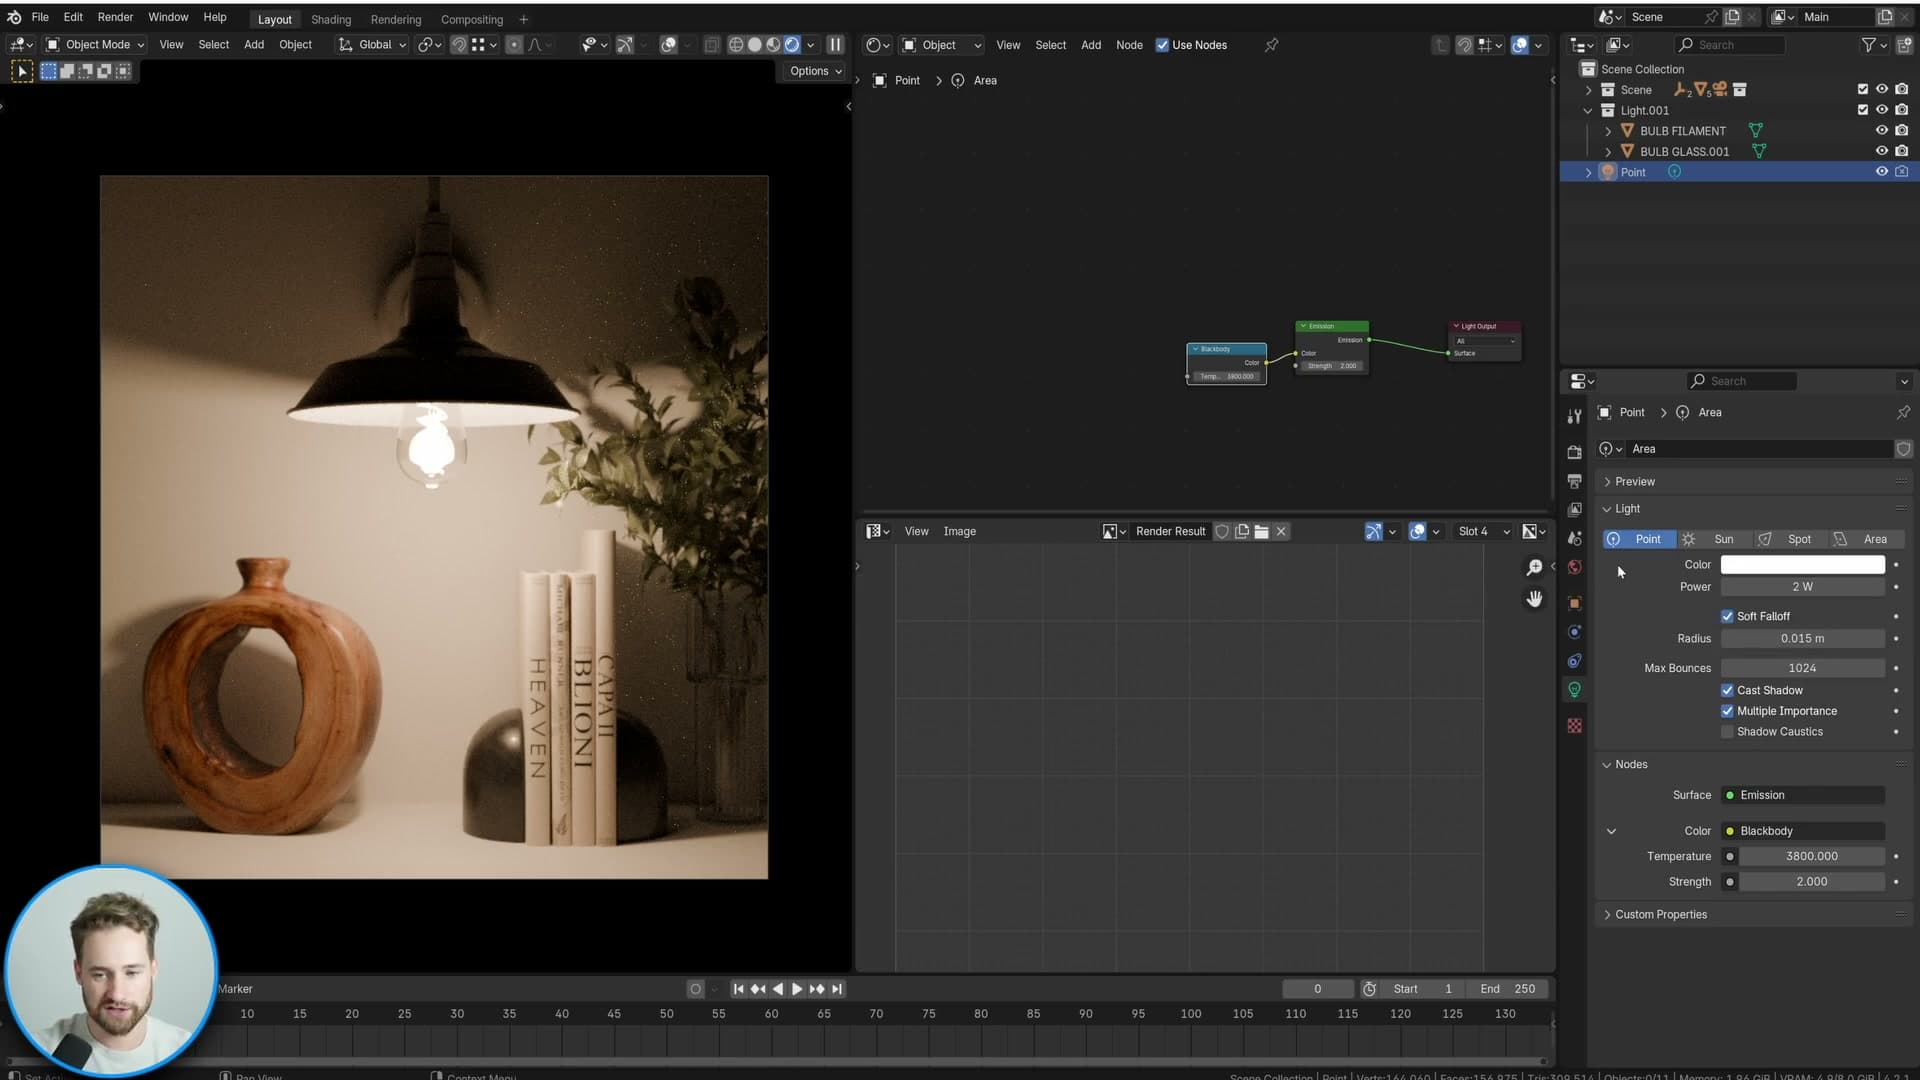
Group the objects you want the light to skip (the bulb glass, the inner glass and the filament) into a collection used for light linking.
Then, with the point light selected, open its Light Linking panel in the Object Properties, click New, and assign the collection containing the bulb parts. That tells Blender you don't want this point light affecting those objects in any way.
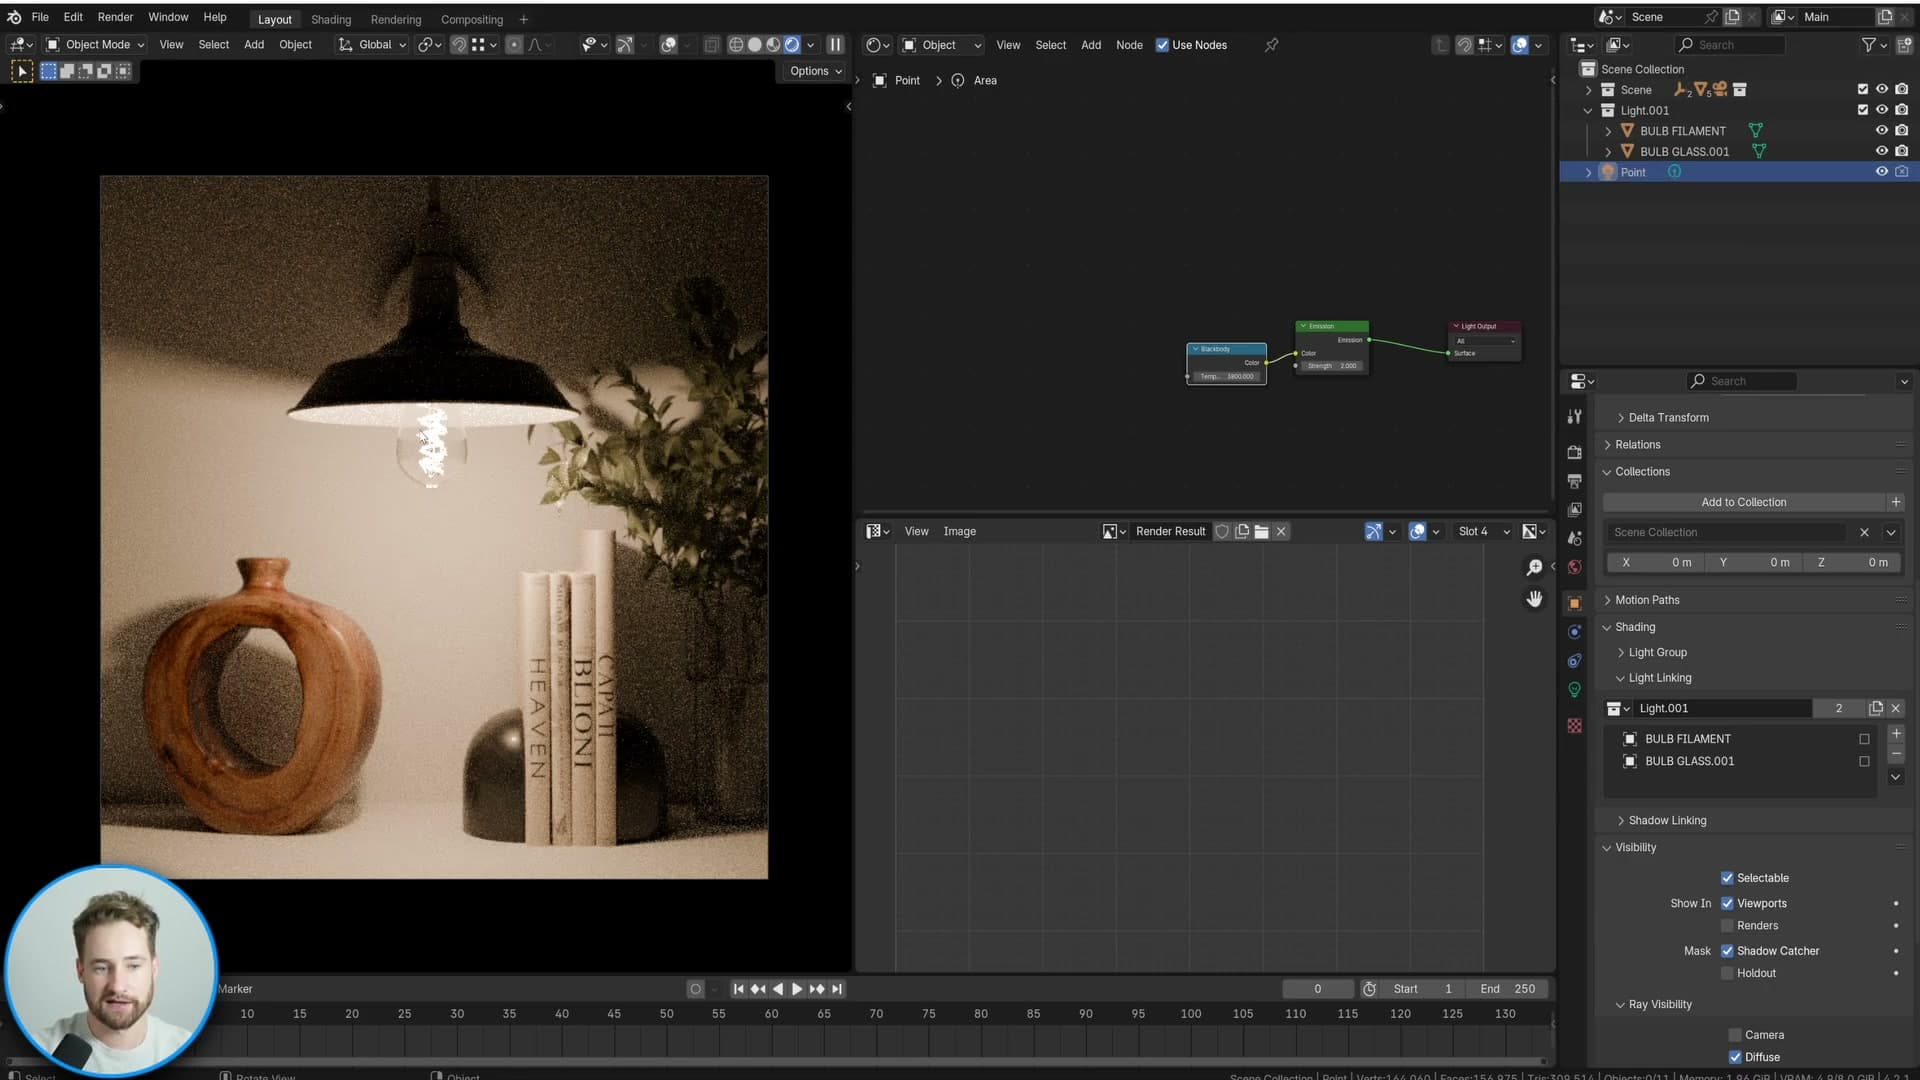
Render again and the result is clean. The room is lit by the analytic point light, the bulb still glows through the camera-ray-only emission trick from earlier, and because the point light no longer interacts with the bulb mesh, there's no reflection noise coming back off the glass. Completely noise-free, and reaching that result inside a few seconds of render time.
64 vs 256 sample comparison
Side-by-side at matched sample counts. The modified setup at 64 samples beats the naive emissive setup at 256, which still has fireflies that would wreck any animation.
Comparing noise levels at matched samples
To see what the node setup actually buys you, drop the maximum samples to 64 and render both versions of the lamp side by side. On the left is the bulb with the modified node setup, where the filament's range is confined and a linked point light is doing most of the room lighting. On the right is the naive build: no point light, just pure emission coming straight off the filament mesh.
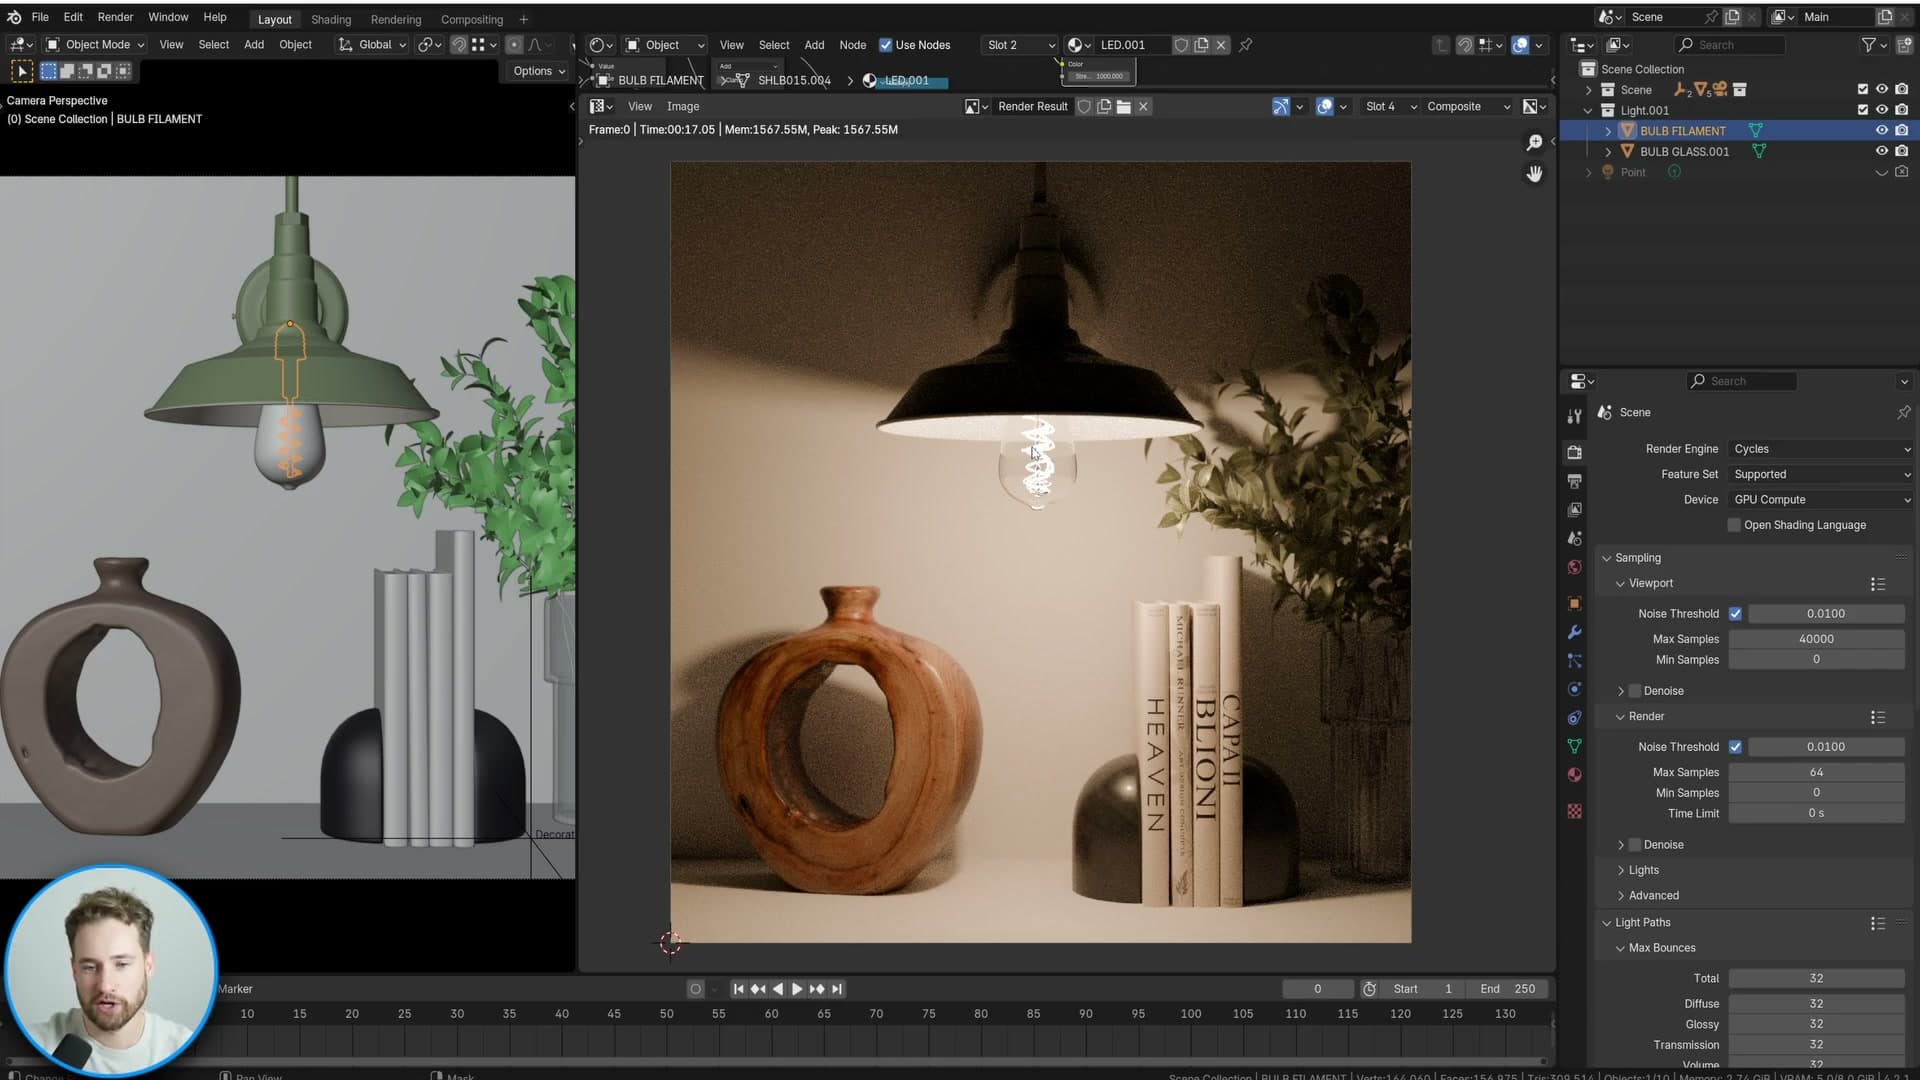
Look at the dark corners of the scene. At a matched 64 samples, the modified version is dramatically cleaner. The shadowed areas read as smooth gradients rather than the speckled mess the emissive-only bulb produces.
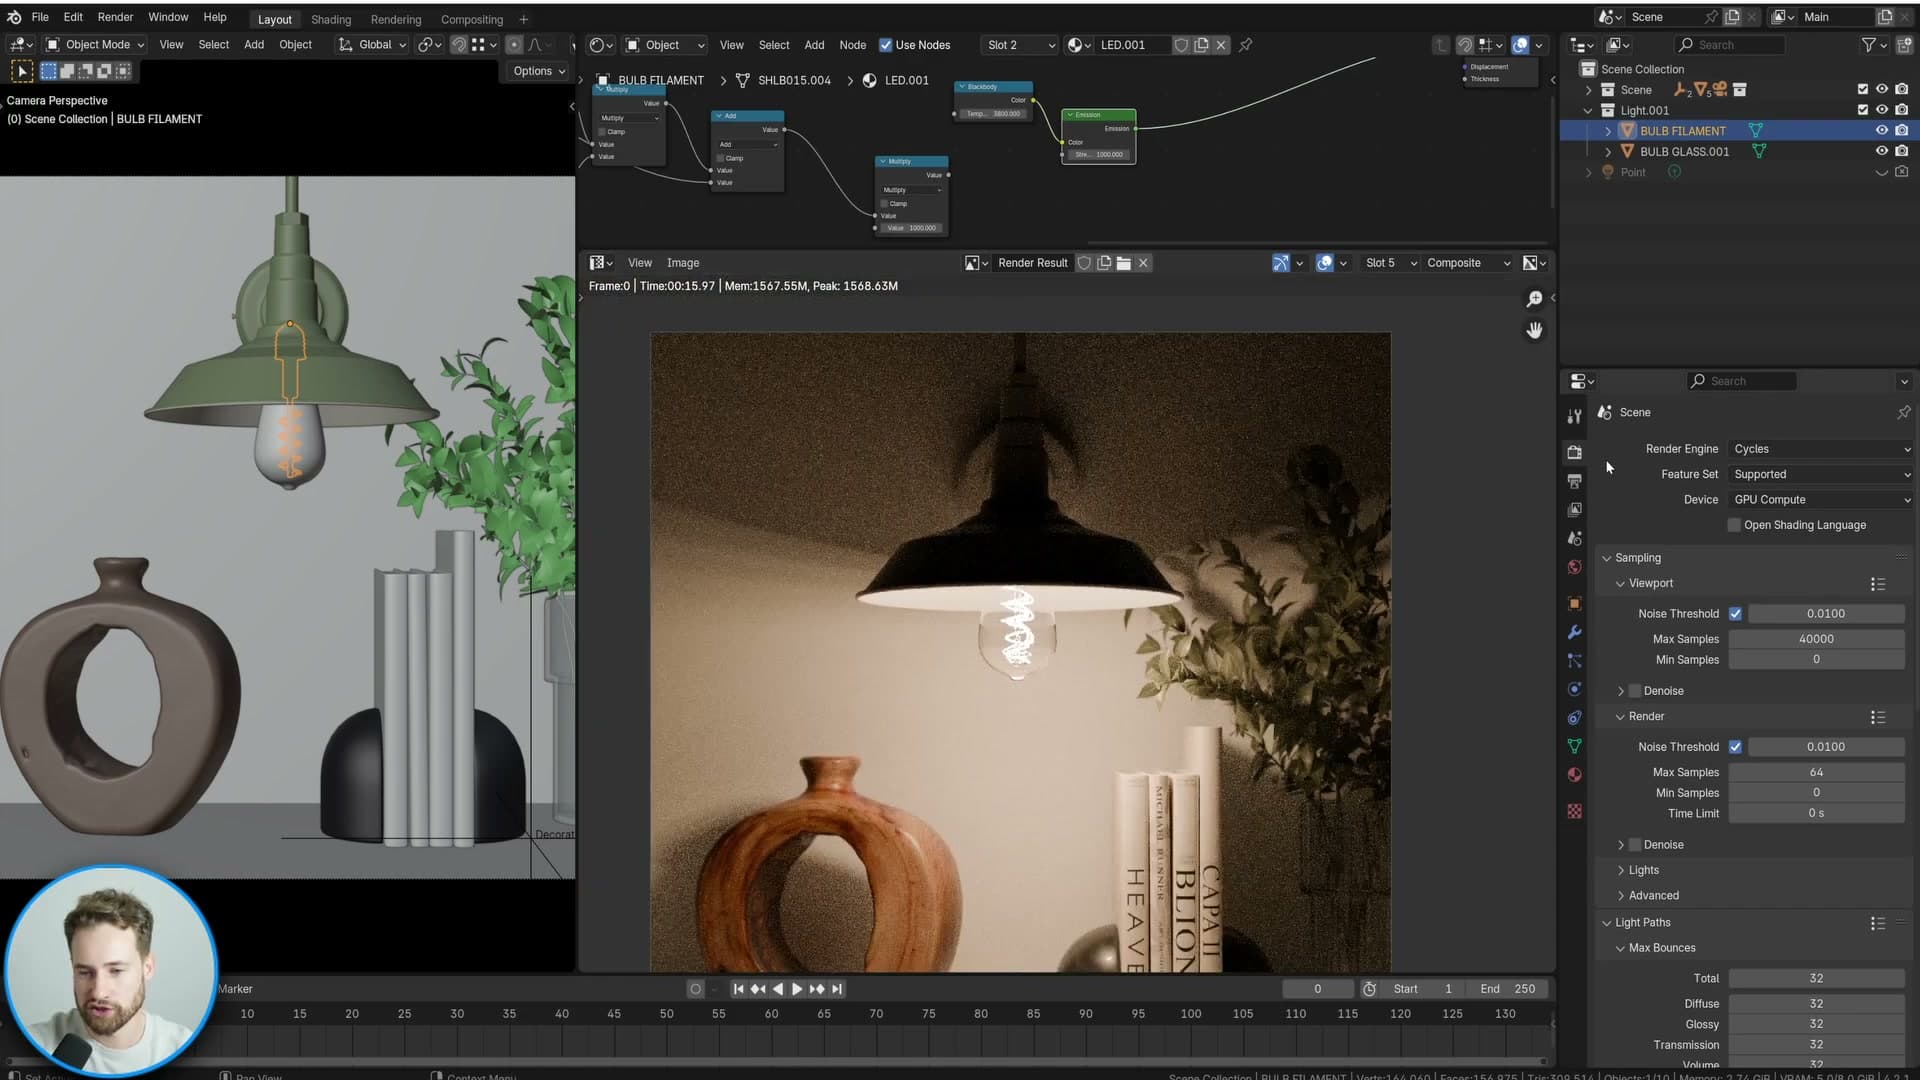
To make the comparison fairer on the naive setup, push its sample count up to 256. The overall noise level now roughly matches the modified version at 64. But the 256-sample render still has those persistent fireflies scattered across the image, and those alone would make it unusable for animation. Every frame would flicker with a different constellation of bright pixels.
Simulating filament glow with stacked point lights
To get the rich loop-shaped glow back without reintroducing noise, duplicate the point light along the filament with Alt+D Z, then dial each instance to strength 1 or so for a soft layered halo.
Duplicating point lights along the filament
The shadow-ray glass plus a single linked point light is clean and fast, but you have probably noticed that the rich loop-shaped glow that the original emissive filament produced is gone. With one analytic point light sitting where the filament used to be, the bulb reads as a simple bright dot rather than the layered tangle of incandescent wire you started with. That effect, fortunately, is straightforward to put back.
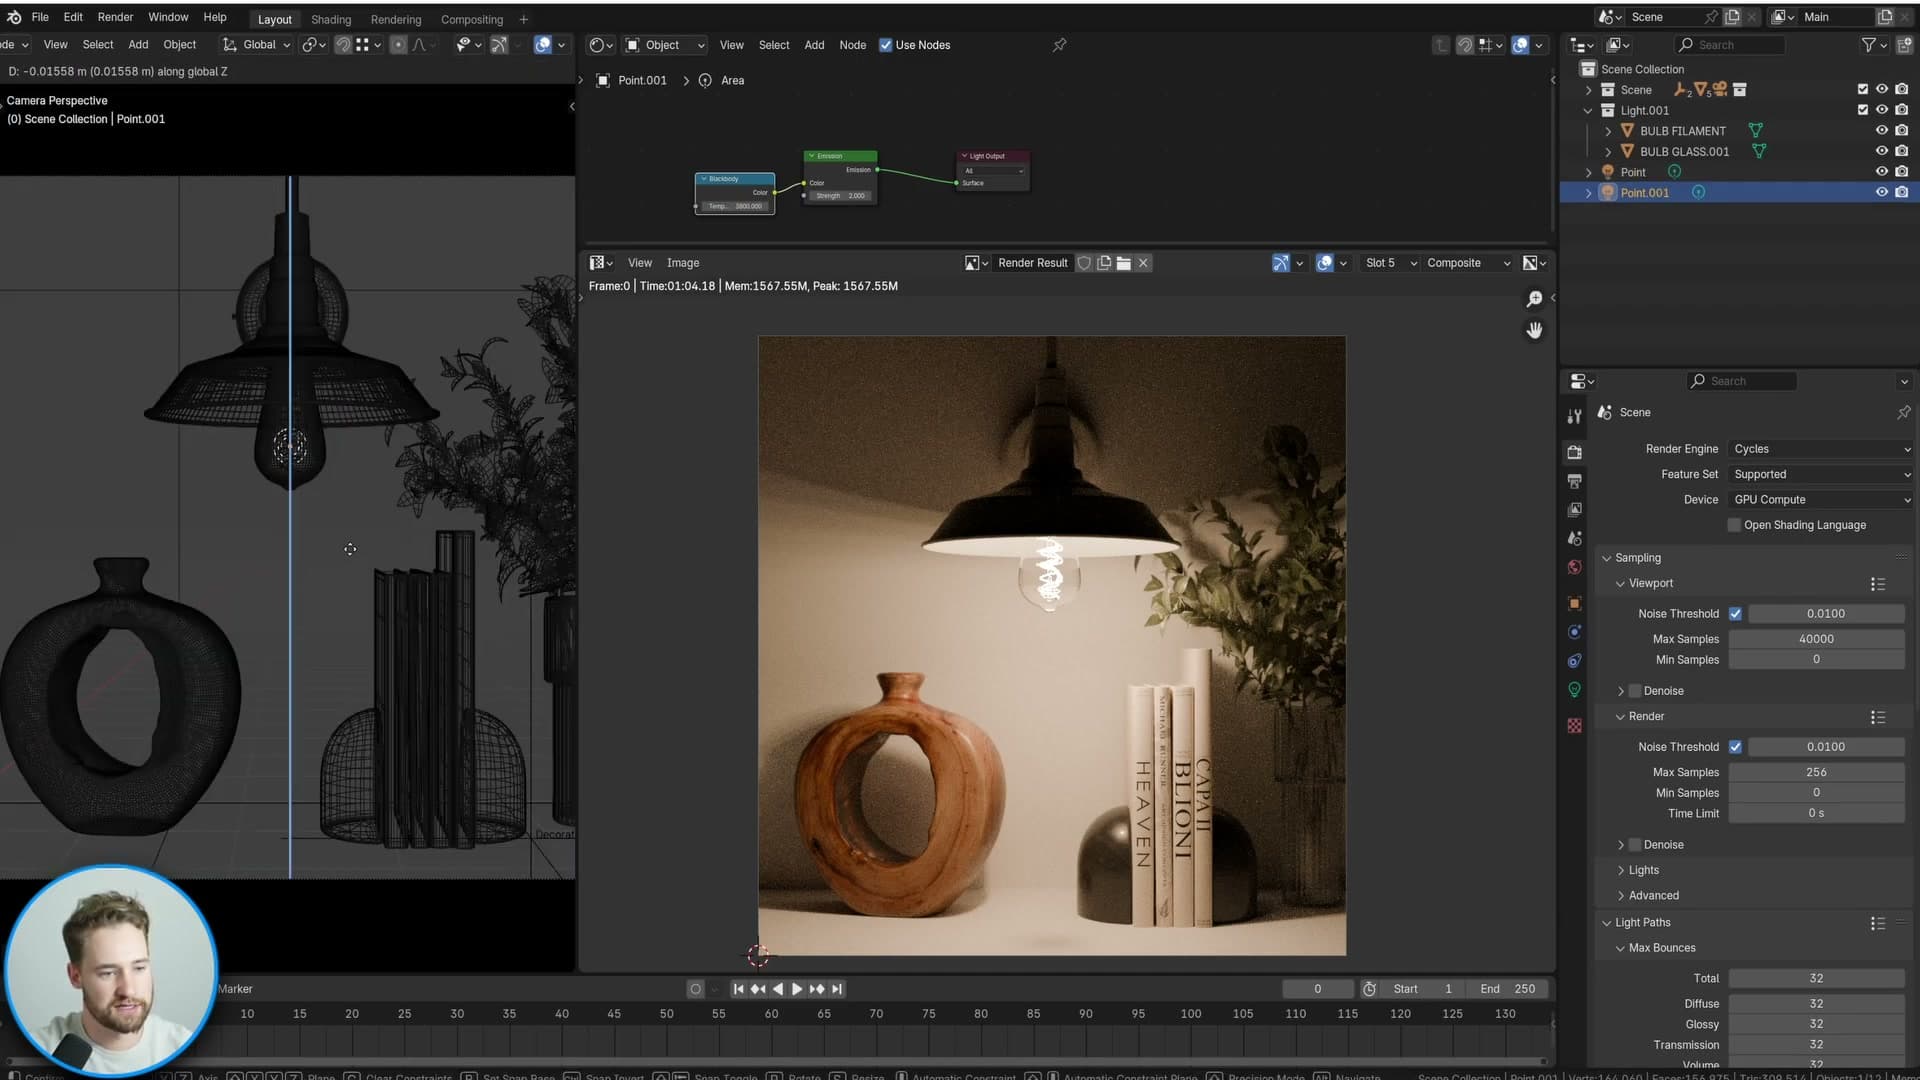
Go back to the modified version with the bulb turned on, and select the point light. The plan is to stack a few instances of the same light along the filament loops so the rendered halo reads as three overlapping sources rather than one. With the point light selected, press Alt+D then Z to make a linked duplicate constrained to the vertical axis, and drag it down to roughly where the next loop of filament sits. Repeat so you end up with three lights spread through the filament volume.
Because they are linked duplicates, any change you make to one instance propagates to the rest. Switch to render preview and reduce the size down to 0.005 so the lights are tiny enough to read as point-like glints inside the glass. You will start to see the loop-shaped highlights and soft halo coming back, very close to the look of the original emissive version. Three lights at full strength is a little hot, though, so drop the strength to a value of around 1 until the bulb stops blowing out.
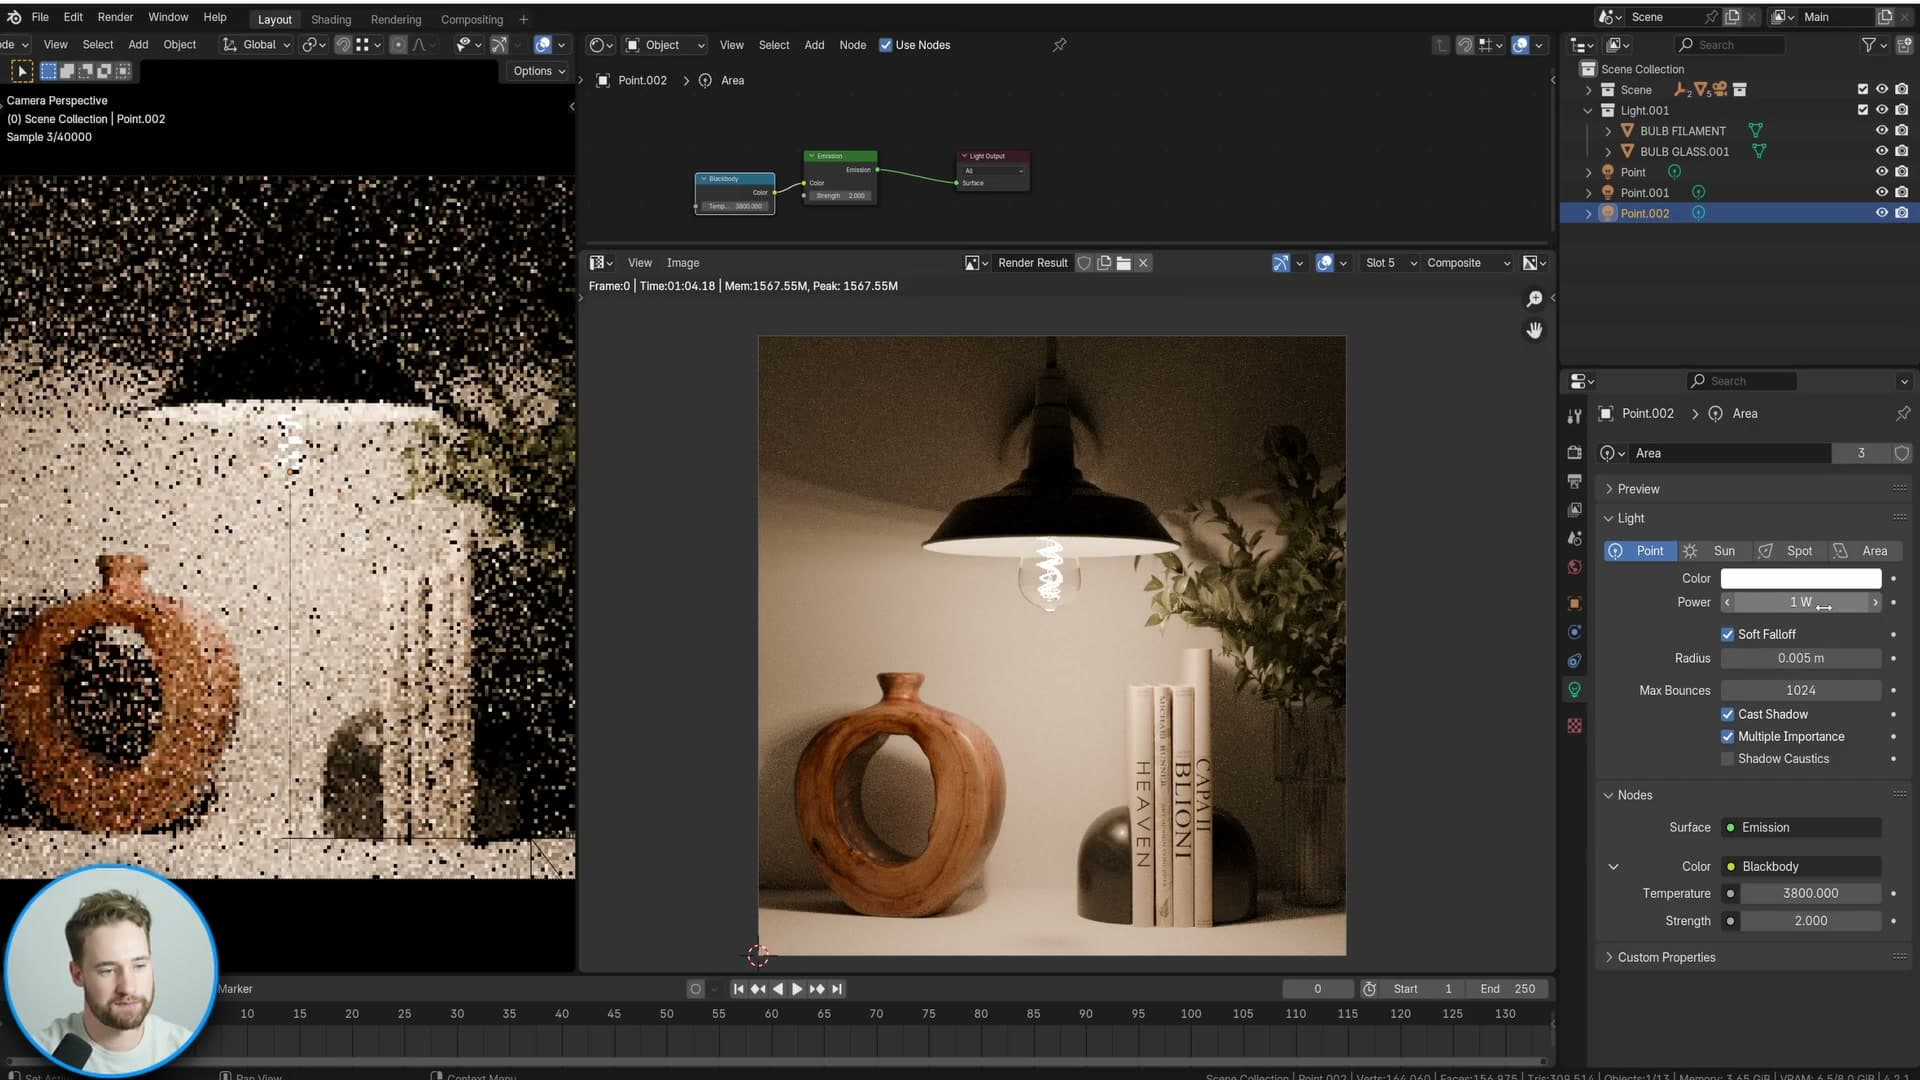
From there you can slide each instance up or down along Z to tune which parts of the filament feel brightest. The result is the convincing layered glow of the original mesh-light setup with none of the firefly cost. The analytic point lights do all the room illumination work, and the duplicates only have to sell the visible filament read through the glass.
Final comparison and the free node setup
Side-by-side of the unmodified vs modified bulb shows the same render budget producing dramatically different output. The example scene and node group are available as a free download from iMeshh.
Side-by-side: unmodified vs modified
With every node wired up, a final pass of fine-tuning brings the modified bulb visually very close to the original unmodified version. The finished render (accidentally pushed to 256 samples again) sits side by side with the simple emissive bulb, and the difference is dramatic. Same render budget, vastly cleaner output, and the bulb still reads as a real light source rather than a flattened blob.
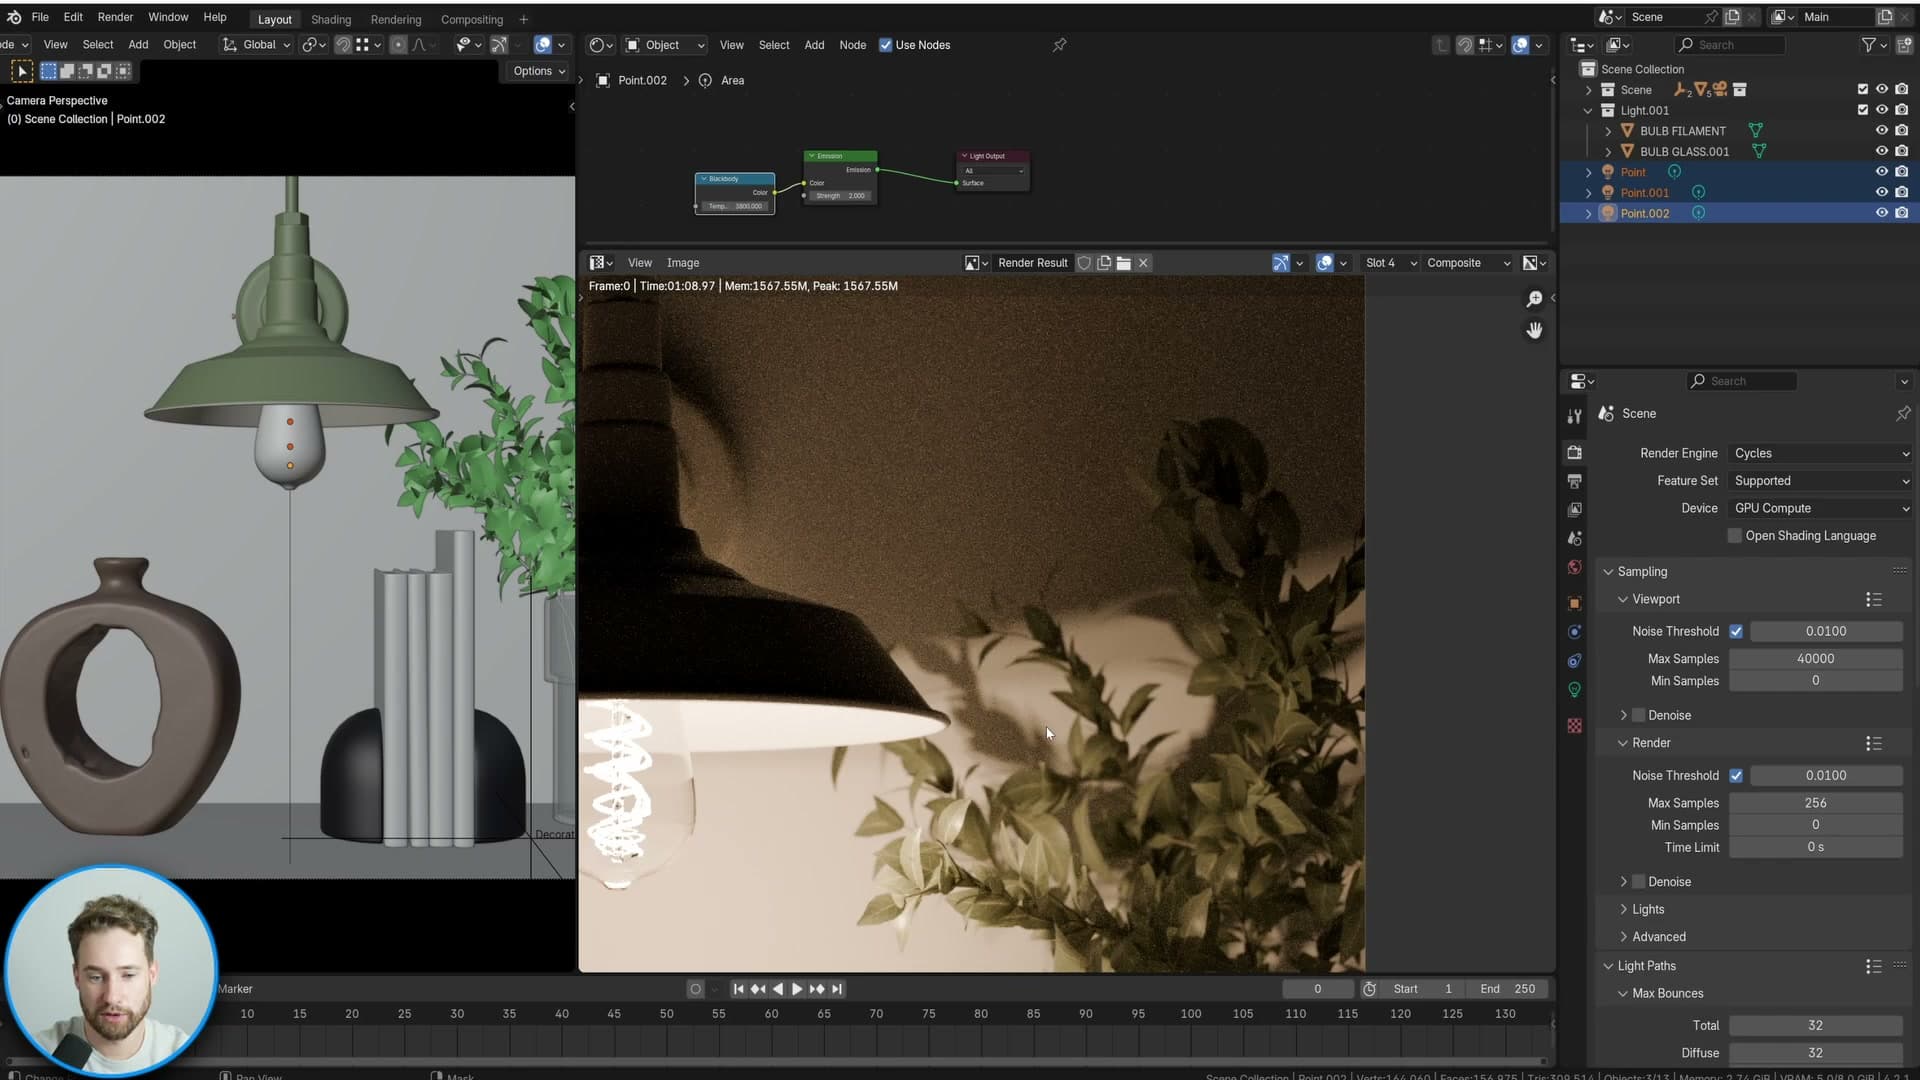
The reason this node graph is worth the complexity is control. With the filament's range and bounce count locked down, you can push glare, bloom and any other glow treatment in the compositor without fireflies creeping back in. That's a far cleaner workflow than clamping the indirect samples or splitting the bulb out onto its own render layer to patch in post.
Free download, tweaking ranges, remaining caveats
The example scene and the node group itself are available as a free download from iMeshh. The link sits in the YouTube video's description. You'll need to make a free account to grab it, but once it's downloaded you can drop the node group onto the filament material in any of your own projects.

The cut-off distance is exposed as a parameter so the setup adapts to different lamp sizes. It's set to 0.13 (13 cm) by default, which suits the bulb used in this scene. For a bigger lamp, increase that value; for a smaller fitting, decrease it until the filament's influence stops just past the glass.
There is one unresolved limitation worth flagging. When the filament is the only thing illuminating its own bulb, with no helper point light in the mix, the emission doesn't read through the glass the way you'd expect from a real lamp. In this scene the linked point light bathes the whole area in light anyway, so the eye reads it as a normal glass bulb with a glowing filament inside. It's a caveat to remember if you adapt this setup to a configuration without the point light helper.
The bottom line: a render that started as effectively unusable (fireflies that would take an enormous sample count to clean up) drops to roughly 64 samples that denoise cleanly. You can push that higher if you want extra fidelity in the final frame, but 64 is already where this technique earns its keep.
Tools and credits
Everything mentioned in this tutorial, with links.
- Blender: the renderer this entire build runs in.
- iMeshh: studio platform (project management, client review, asset library, invoicing). The asset library used in this tutorial is included with every iMeshh Pro plan.
- Poly Haven: free CC0 textures and HDRIs.
Pillar guide: Lighting hub