What's wrong with Blender's default glass shader
Why the out-of-the-box glass material looks broken (shadows blocking sunlight through windows, dark patches under glasses on tables) and why caustics aren't the answer for most archviz work.
Intro and the free node group download
Welcome to this iMeshh video. The subject for this run-through is glass in Blender: specifically what goes wrong with the out-of-the-box shader, a few ways to fix it, how to add absorption so the glass carries some realistic colour, and a handful of general tips to push the look further.
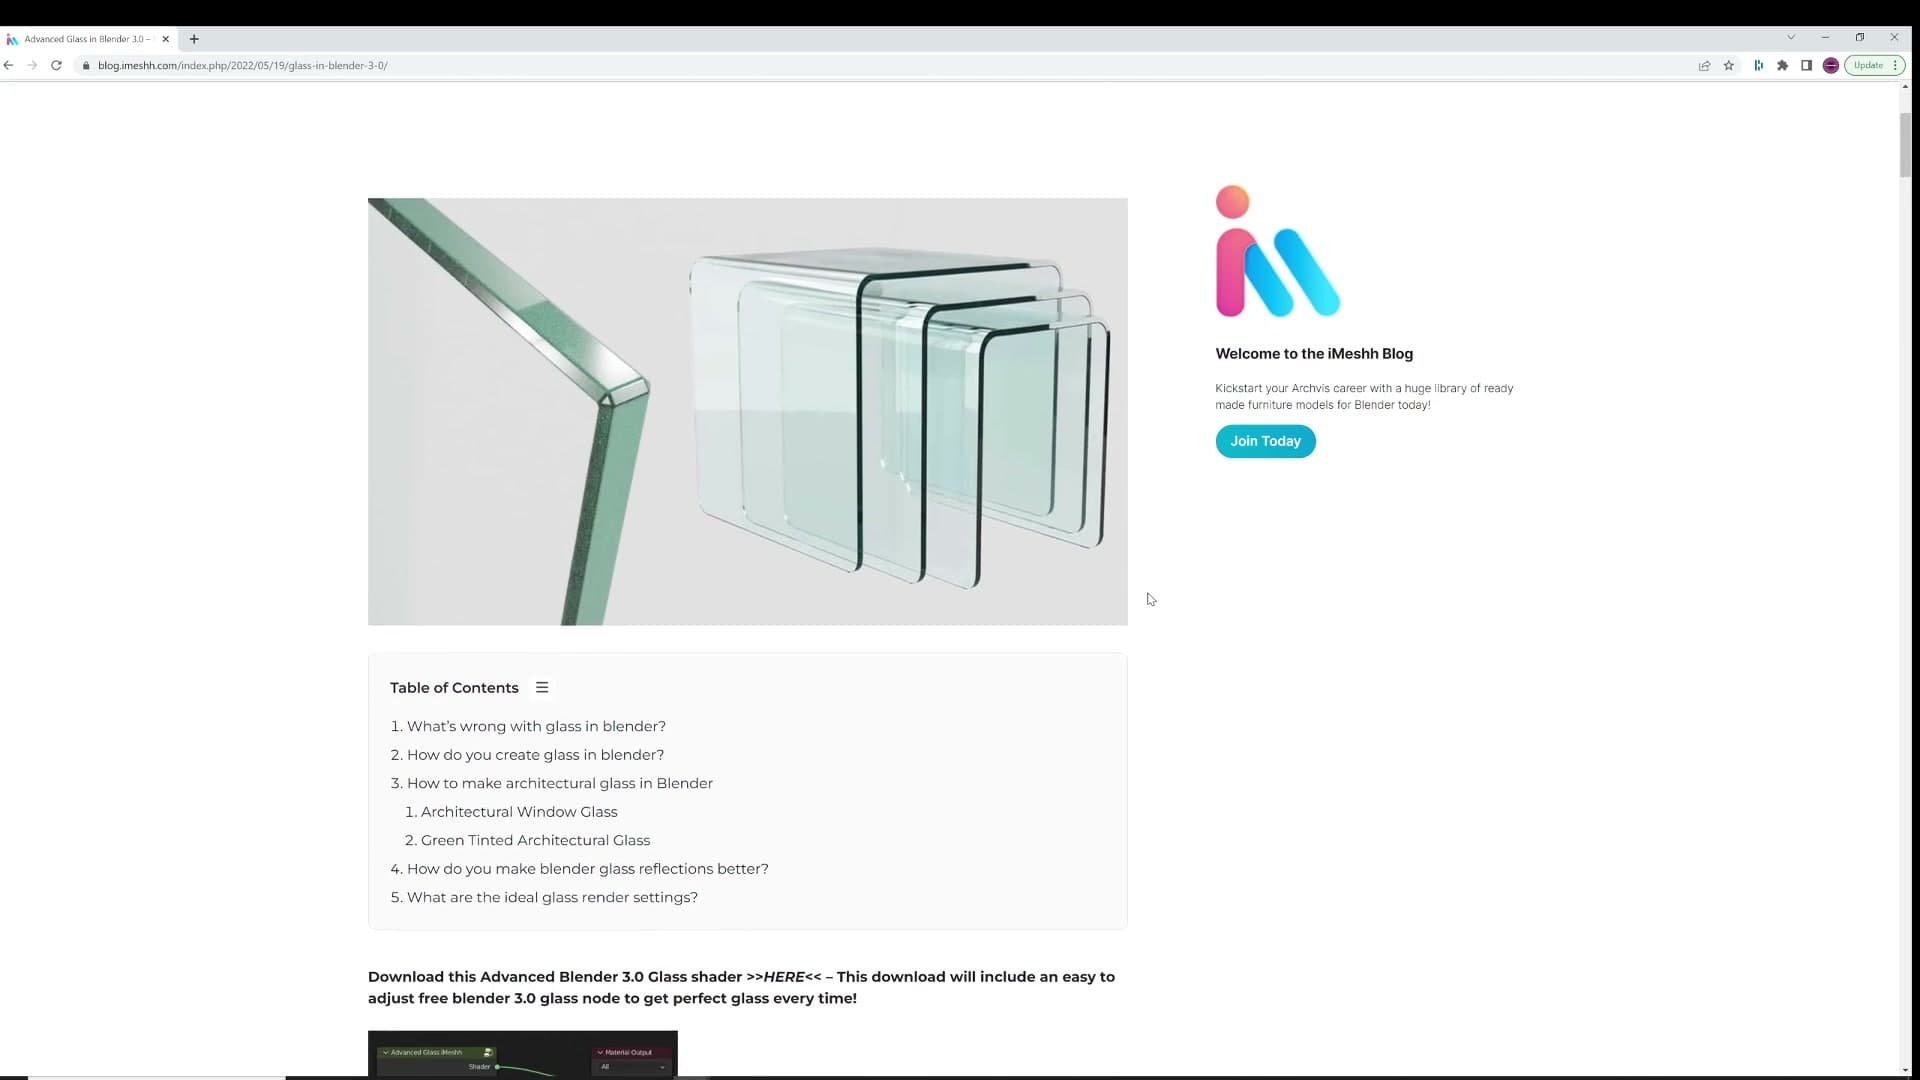
Everything covered here has been written up as a blog post on the iMeshh site, and that post includes a free node group you can drop straight into your own scenes. The node group has every setting from this video already wired up, so if you'd rather skip the walkthrough you can grab the download and move on.
There's no iMeshh sales pitch in this one. If the blog turns out to be useful, sharing it on your socials is genuinely appreciated. If you do want to know how the node group is put together and why each part is there, the rest of the video steps through the reasoning.
The shadow problem with default glass
Glass is, in honesty, a complicated material. Light passes through it, reflections bounce around inside the surface, light transports through the body of the object, and depending on the shape and lighting setup you can also end up with caustics. Those are the bright focused patches you sometimes see beneath a wine glass on a sunlit table.
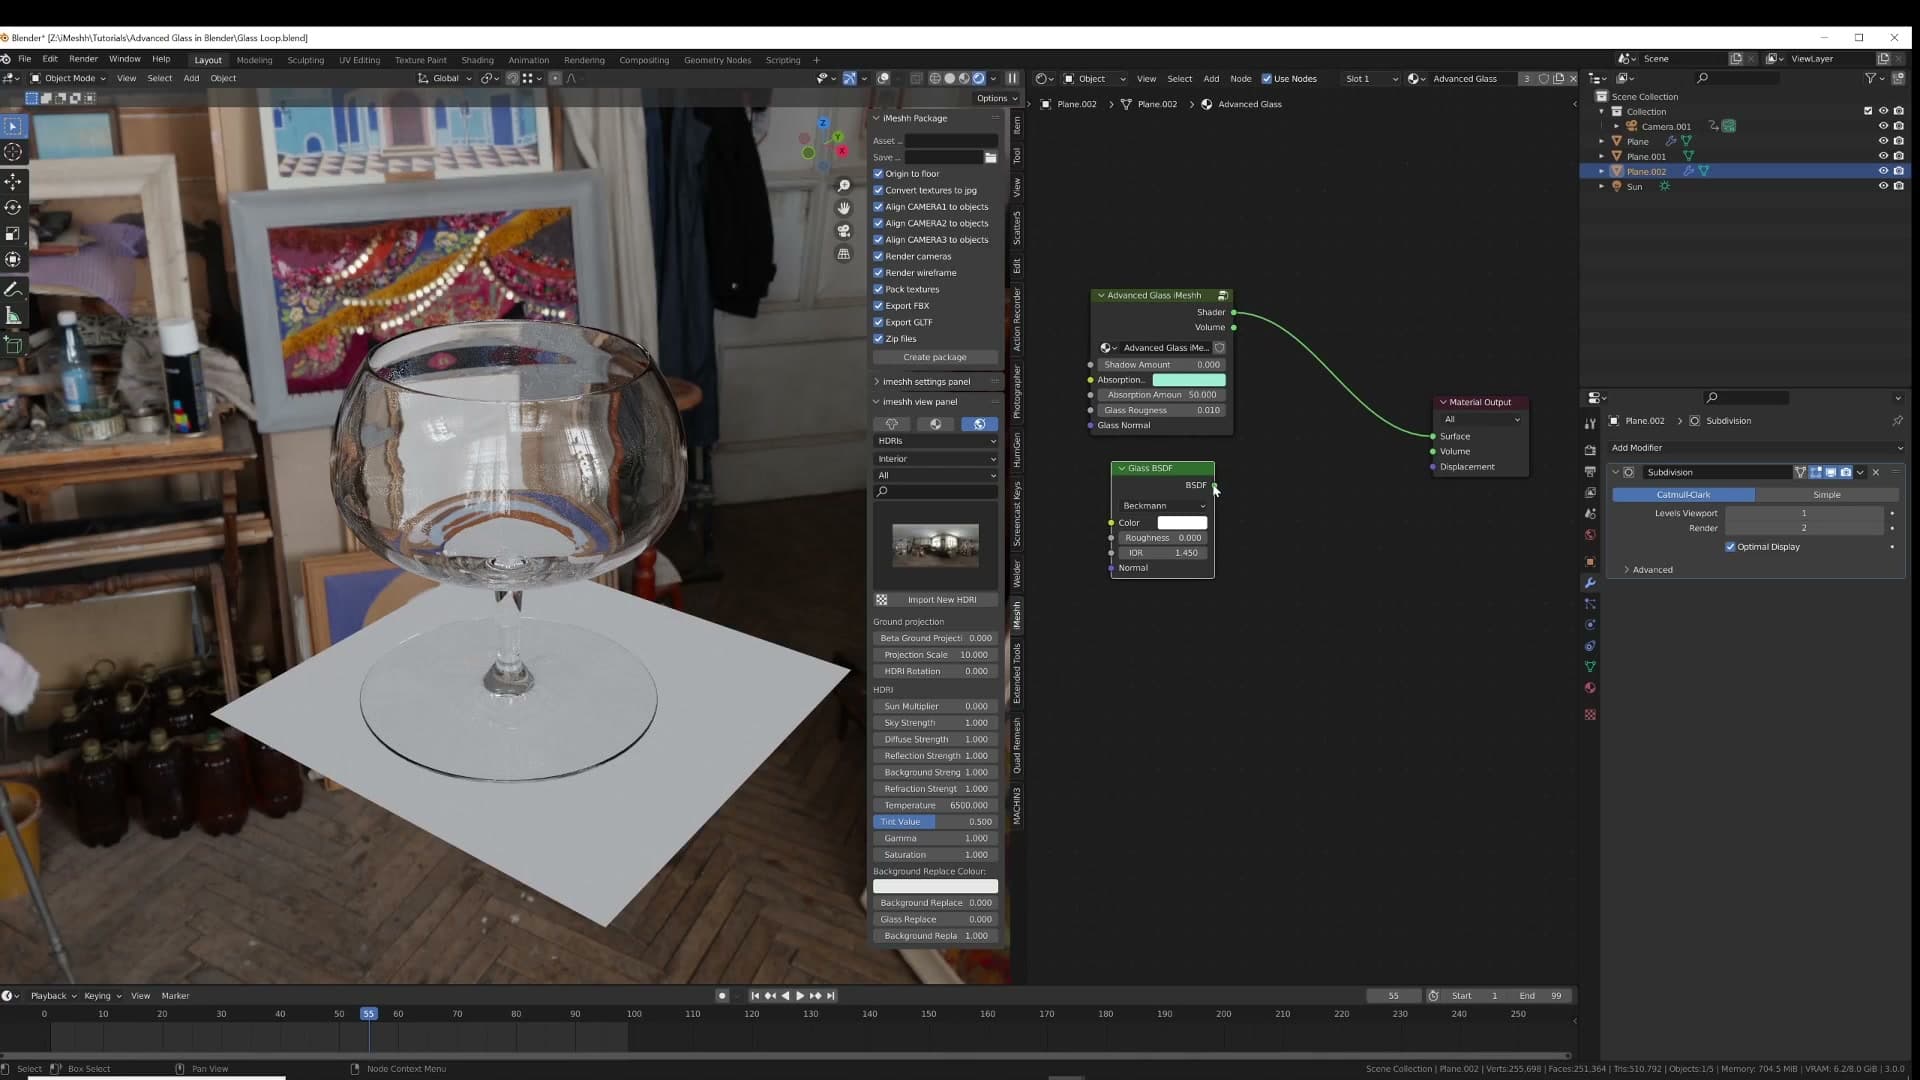
Recent versions of Blender added a setting for proper, physically-accurate caustics, but rendering them is expensive. The good news is that you can produce quick, efficient and convincingly realistic glass without ever turning that switch on. That is what the rest of this video is about.
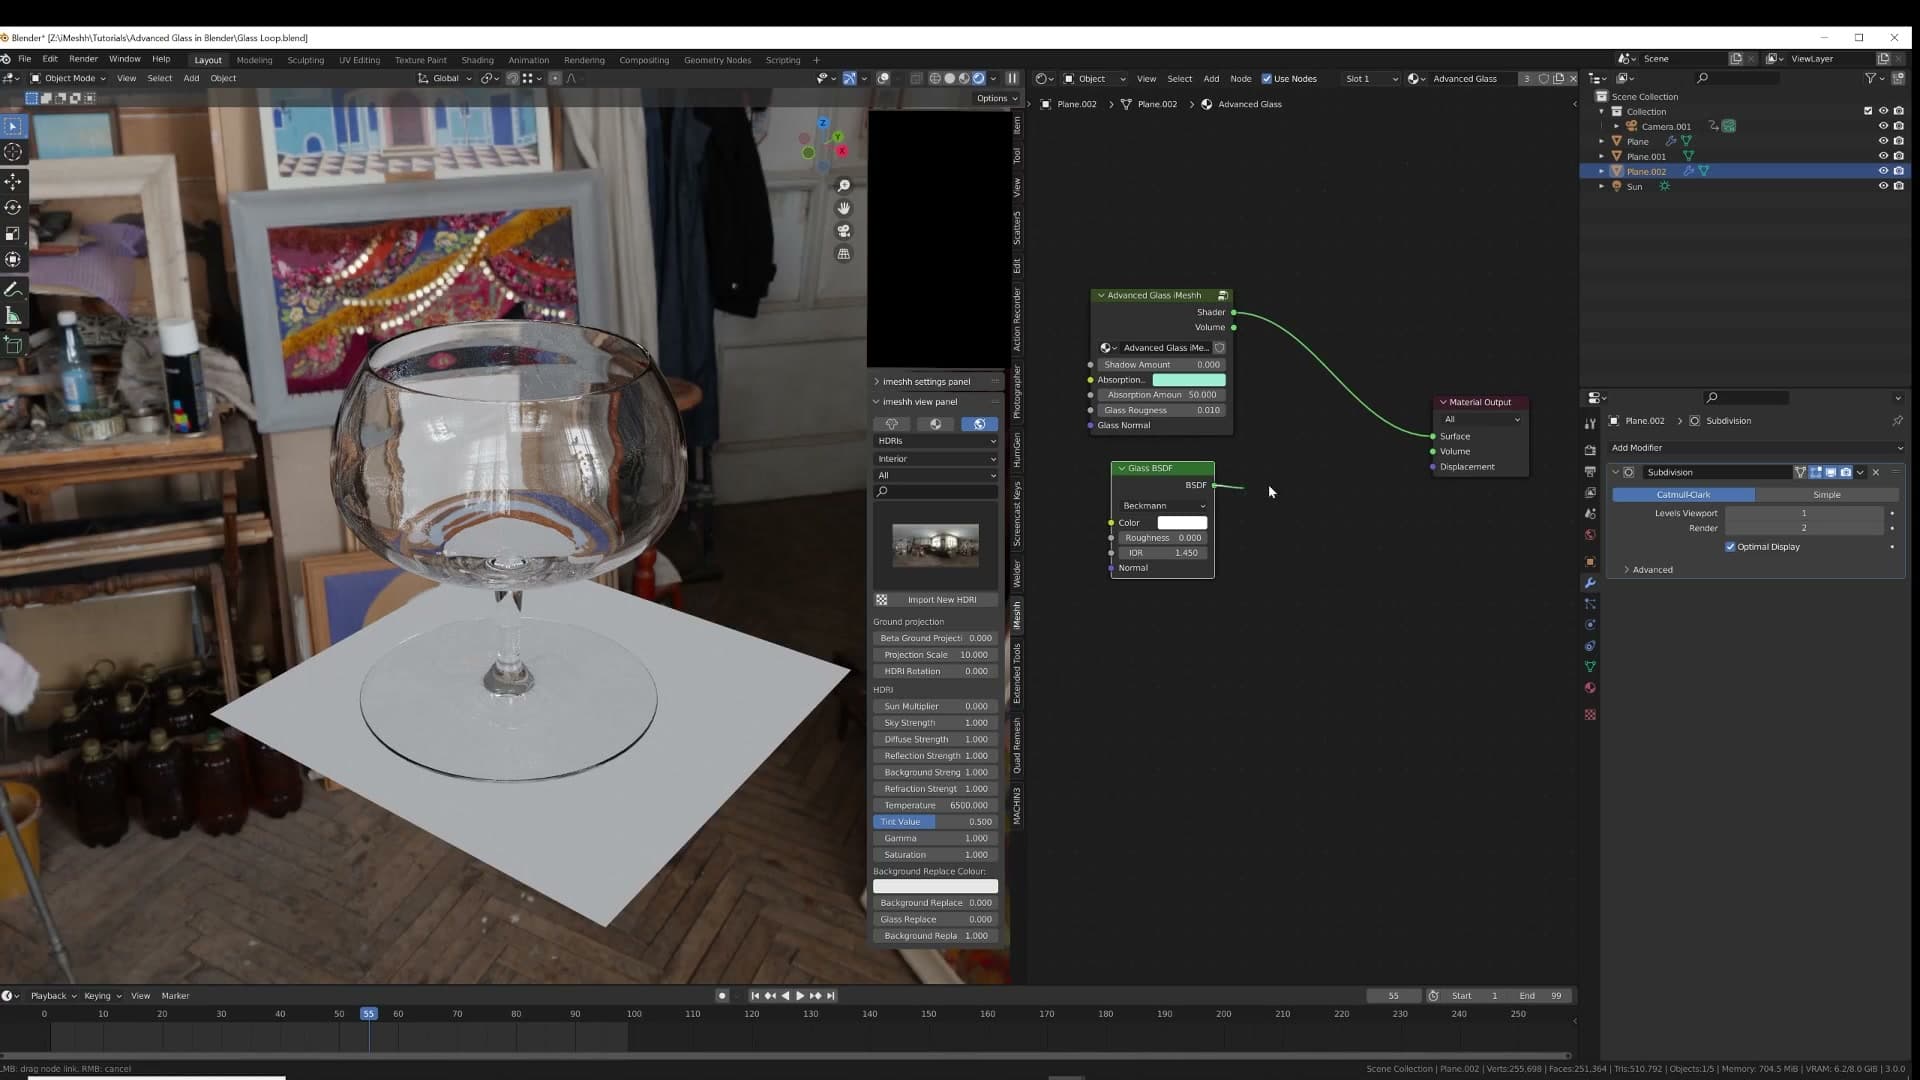
Quick fix vs a reusable node group
Why toggling object-level shadow visibility breaks down across complex scenes, and why a portable node setup is the better long-term answer.
The object properties shortcut and its limits
The fastest fix you'll find online is to head into the Object Properties panel and disable shadow visibility on the offending glass. Do that and the heavy black blob underneath your tumbler or window pane disappears, leaving something that reads as glass at a glance.
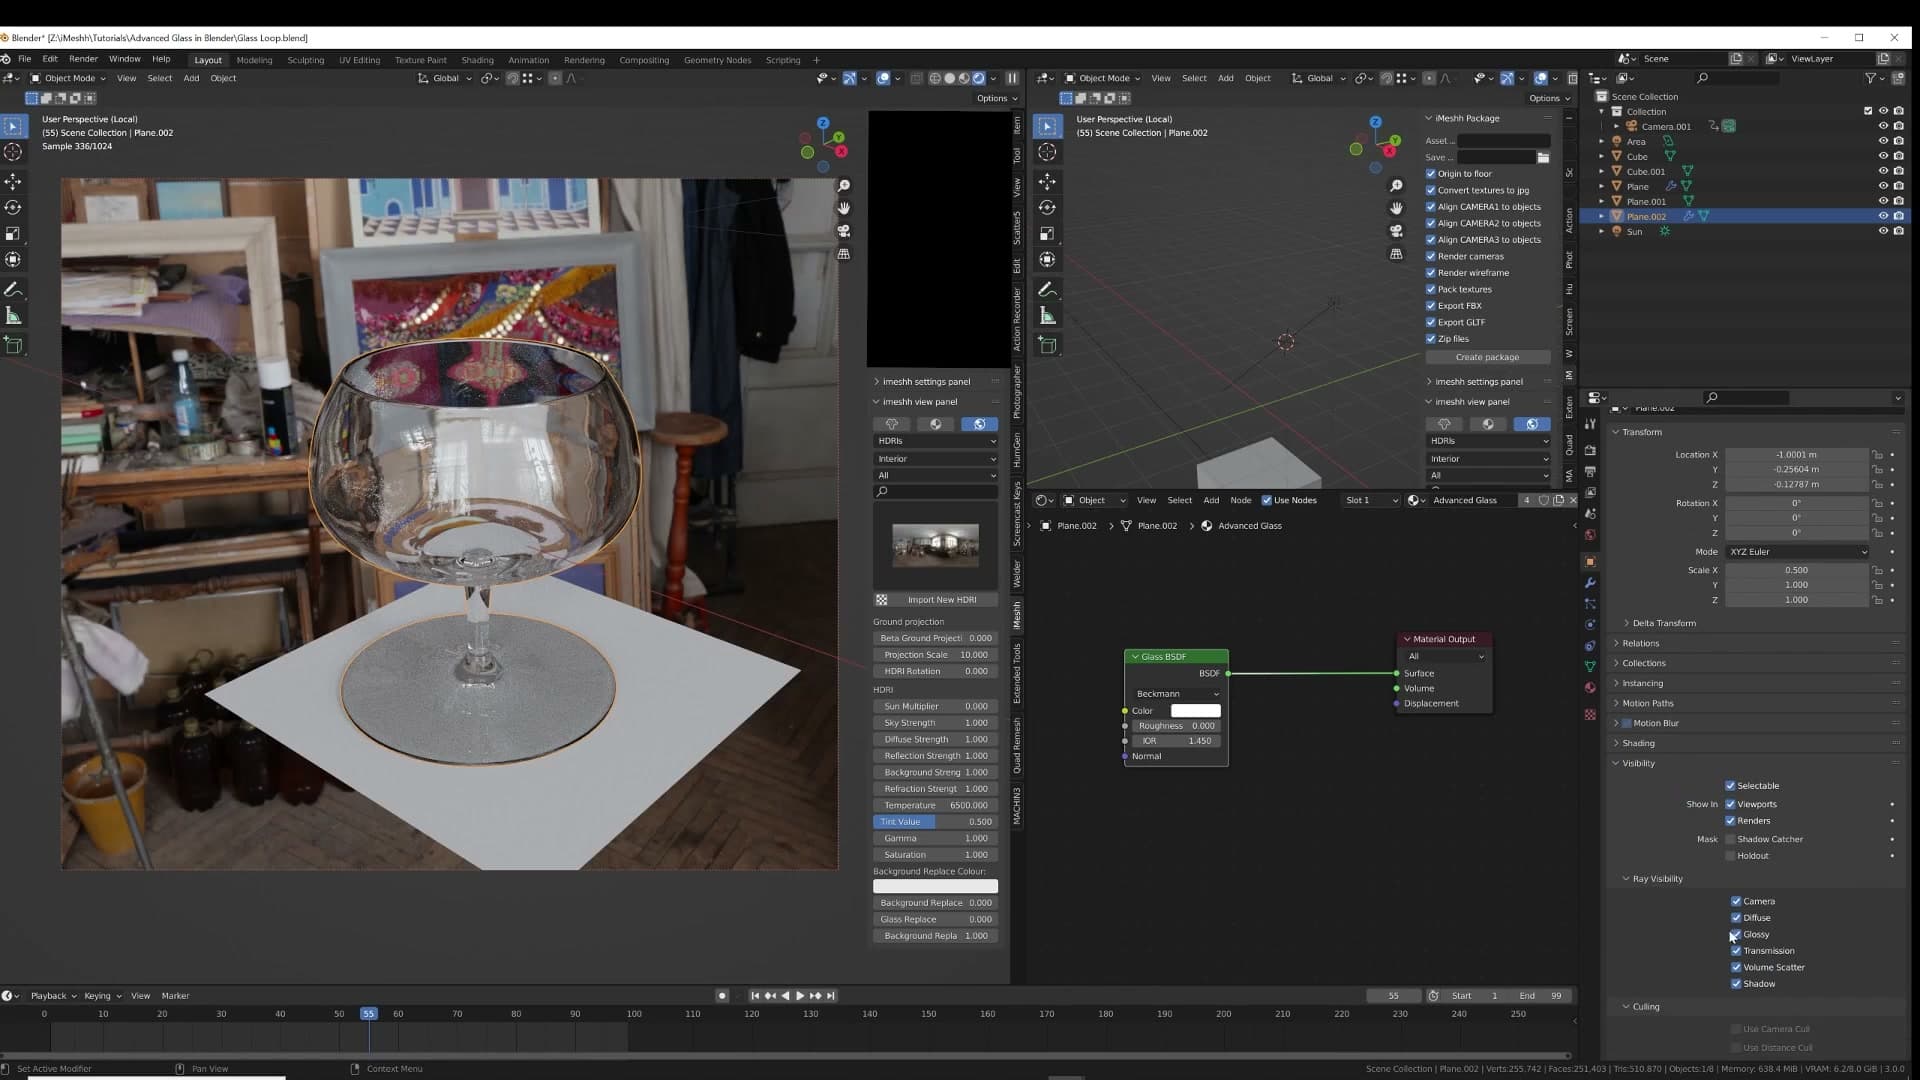
The trouble is you've thrown the baby out with the bathwater. Real glass does cast a faint shadow, and switching the object off at the property level removes every shadow it contributes. There's no dial to tune, just on or off. The result looks clean in isolation but unconvincing the moment you compare it to a reference photograph.
There's a practical headache too. The moment your glass isn't a standalone object (a window pane joined to its frame, a tumbler that shares a mesh with its contents), you have to separate it out before you can toggle the setting. On a finished archviz scene full of nested objects, that quickly turns into busywork.
A shader-level solution sidesteps both problems. Build the behaviour into a node group once and you can drop it onto any glass material in any scene without touching the object hierarchy, and you keep fine control over how much shadow the glass actually casts.
Building the advanced glass shader
Setting up a Principled BSDF with transmission, roughness and base colour to form the foundation of the new glass material.
Why Principled BSDF beats the Glass BSDF
Open the shader editor on your test object and create a brand-new material. Name it Advanced Glass so it's obvious which slot the finished node group lives in later. With the slot ready, drop in a Principled BSDF rather than reaching for the dedicated Glass BSDF.
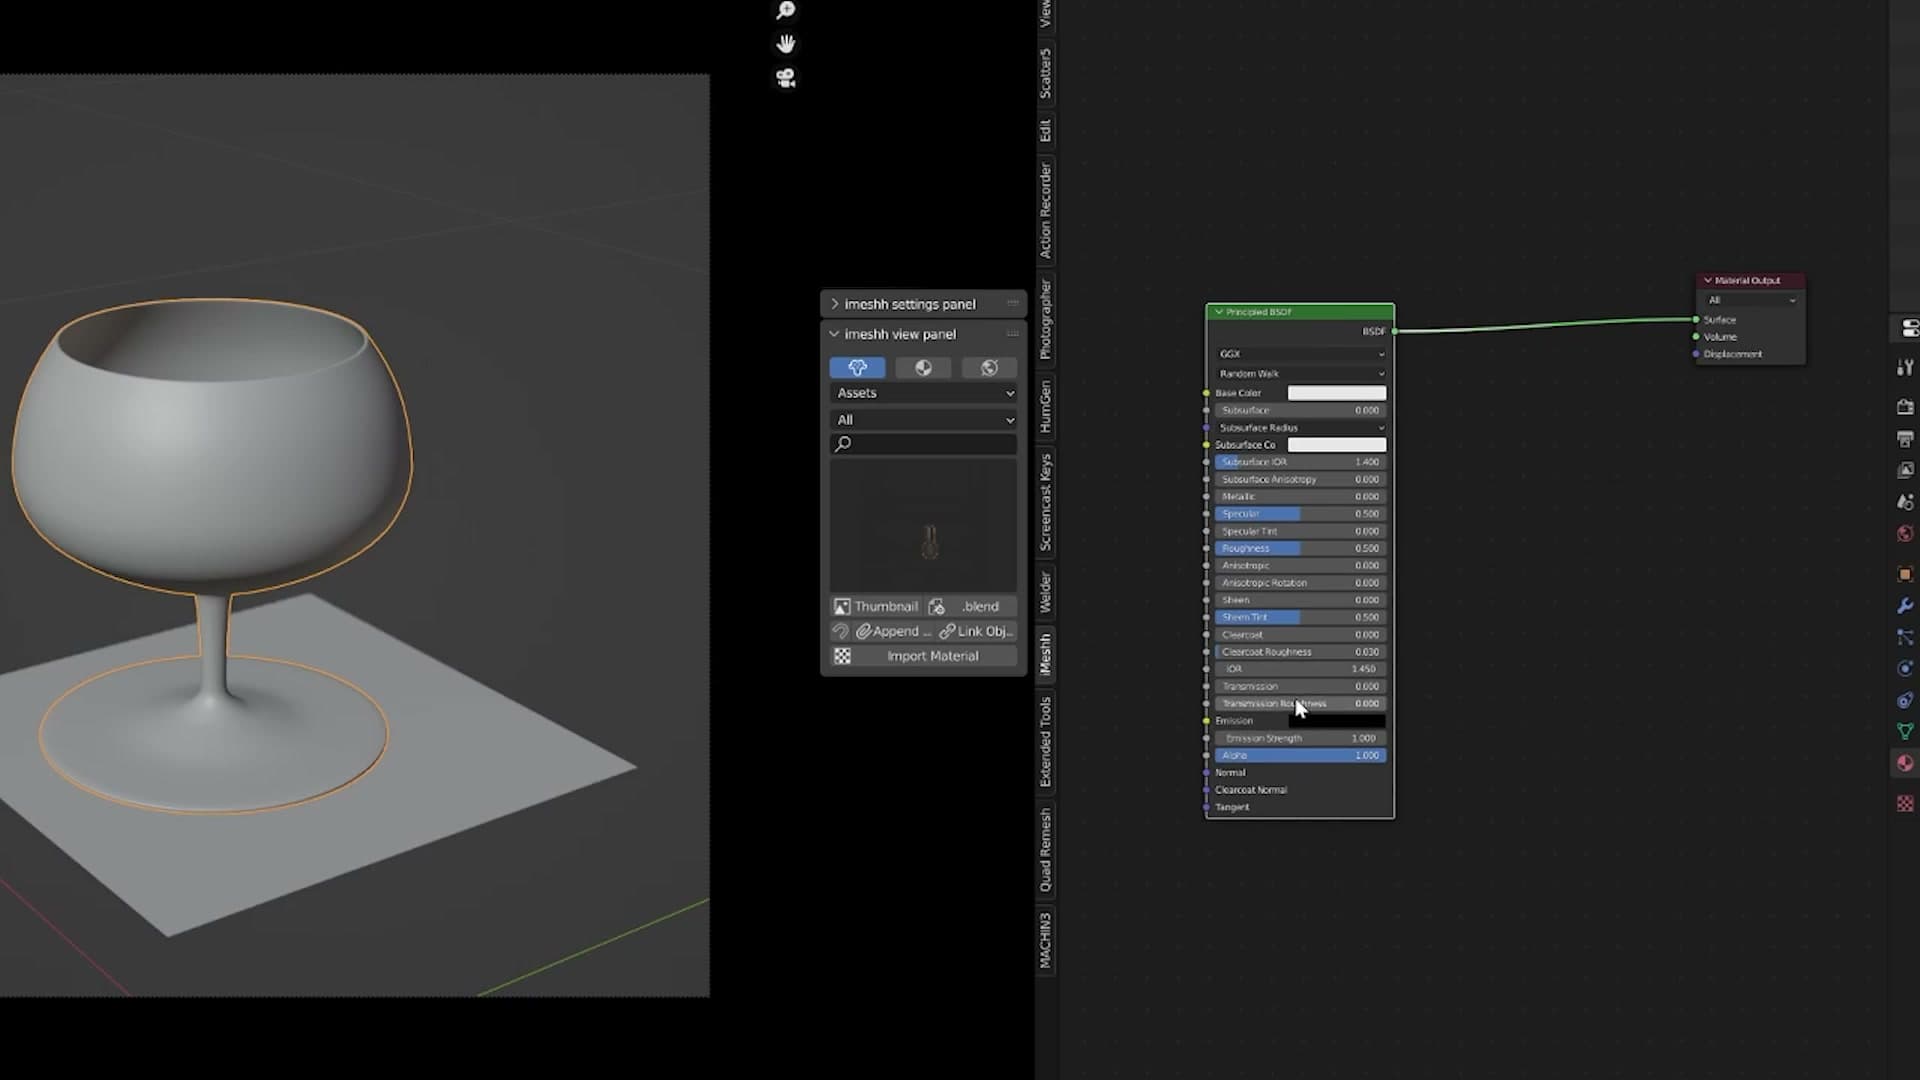
Blender does ship a purpose-built Glass BSDF, but the Principled BSDF exposes a much wider set of controls. You'll find that you can adjust the glass in far more ways with the Principled shader than with the Glass shader, and that extra flexibility is what the rest of this build leans on.
Plug the Principled BSDF straight into Material Output. At this point the test object will still read as plain white. That's expected. The defaults aren't glass yet; you'll fix that in the next step.
Setting transmission, roughness and base colour
Three quick changes turn the Principled BSDF from white plastic into clear glass. Set Transmission to 1, drop Roughness all the way to 0, and pin Base Color to pure white.
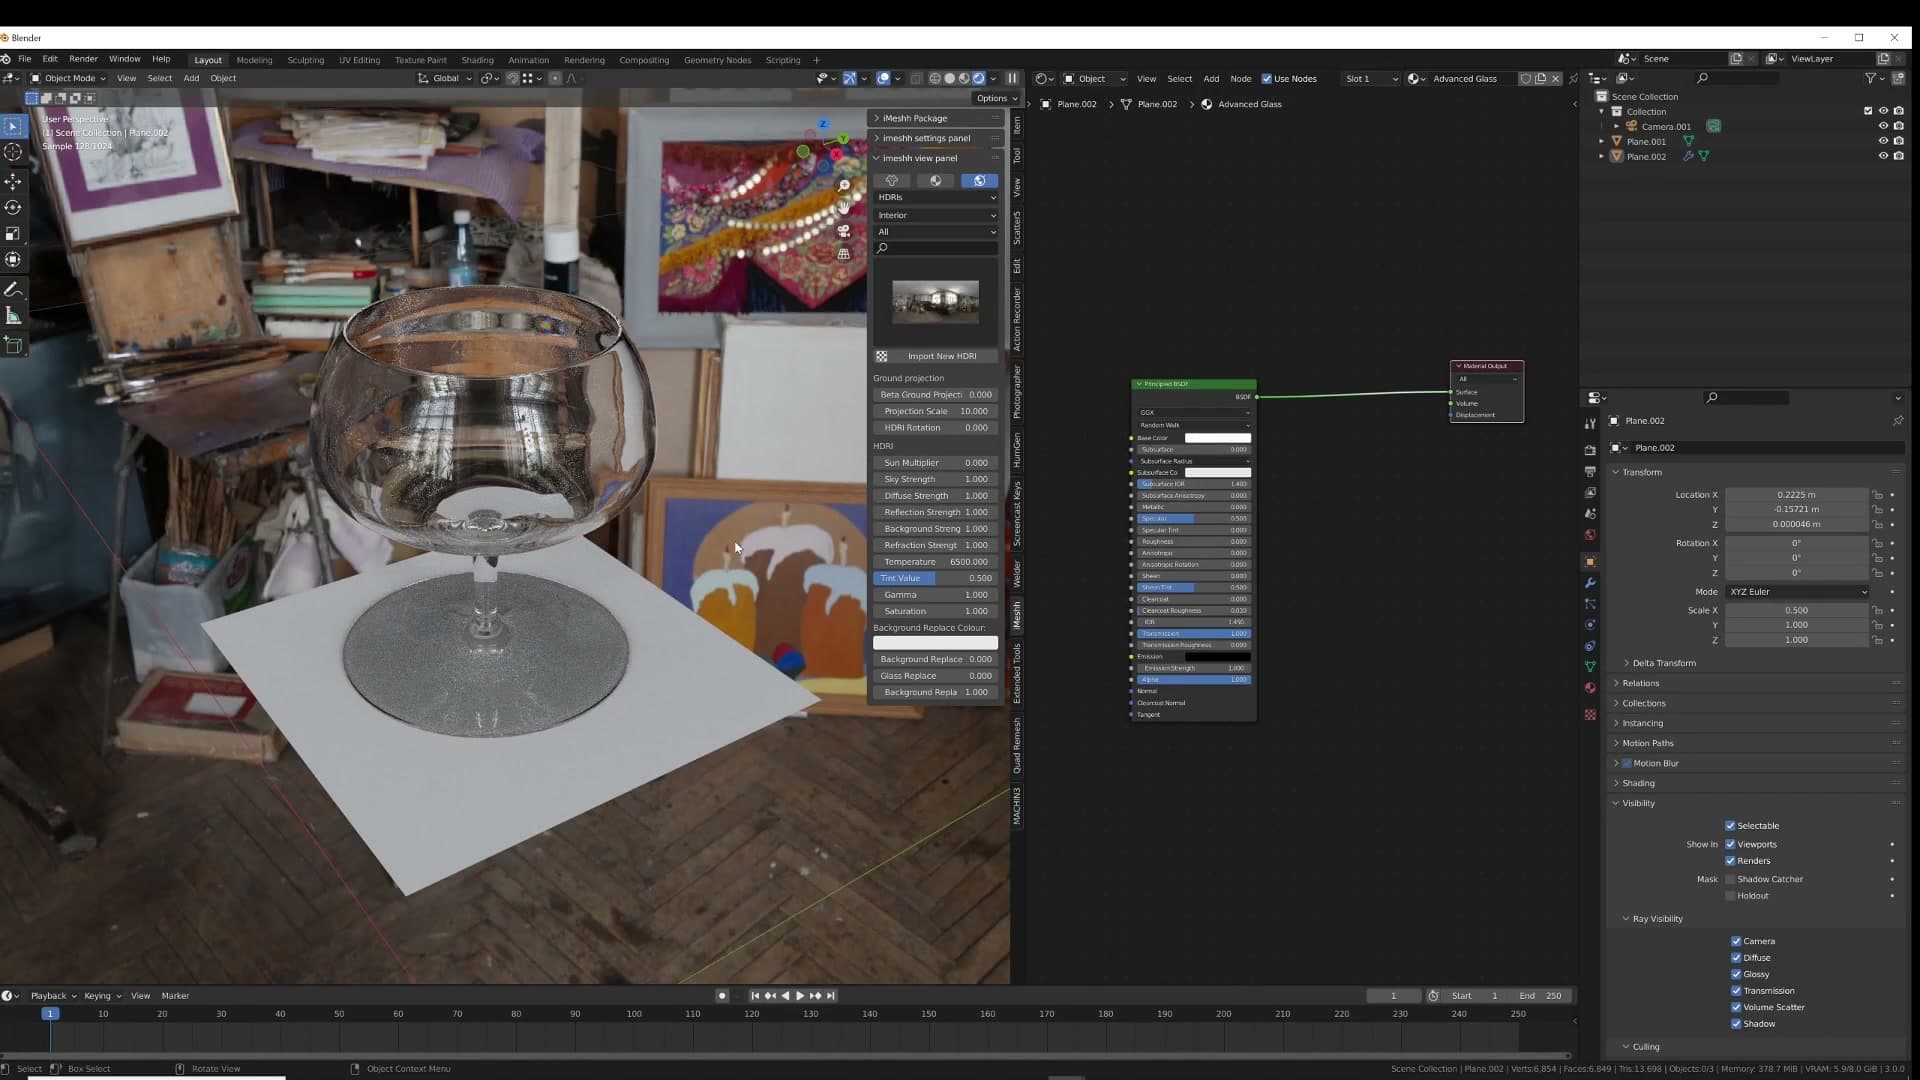
Worth flagging: no real-world material is genuinely 100% glossy, so in a production scene it's ideal to keep roughness at a very, very low value rather than an absolute 0. For the purposes of this walkthrough we'll leave it at zero so the result is unambiguous, but bear that in mind when you adapt the shader to your own work.
Confirming the shadow issue on the test object
Switch to a rendered viewport and you'll see the exact problem this entire tutorial is built around. Even with a clean Principled setup (transmission at 1, roughness at 0, white base colour) the glass still casts a shadow, and the base of the object reads as a heavy, solid dark patch. It looks unrealistic, and it's the default behaviour of every fresh glass material in Blender.
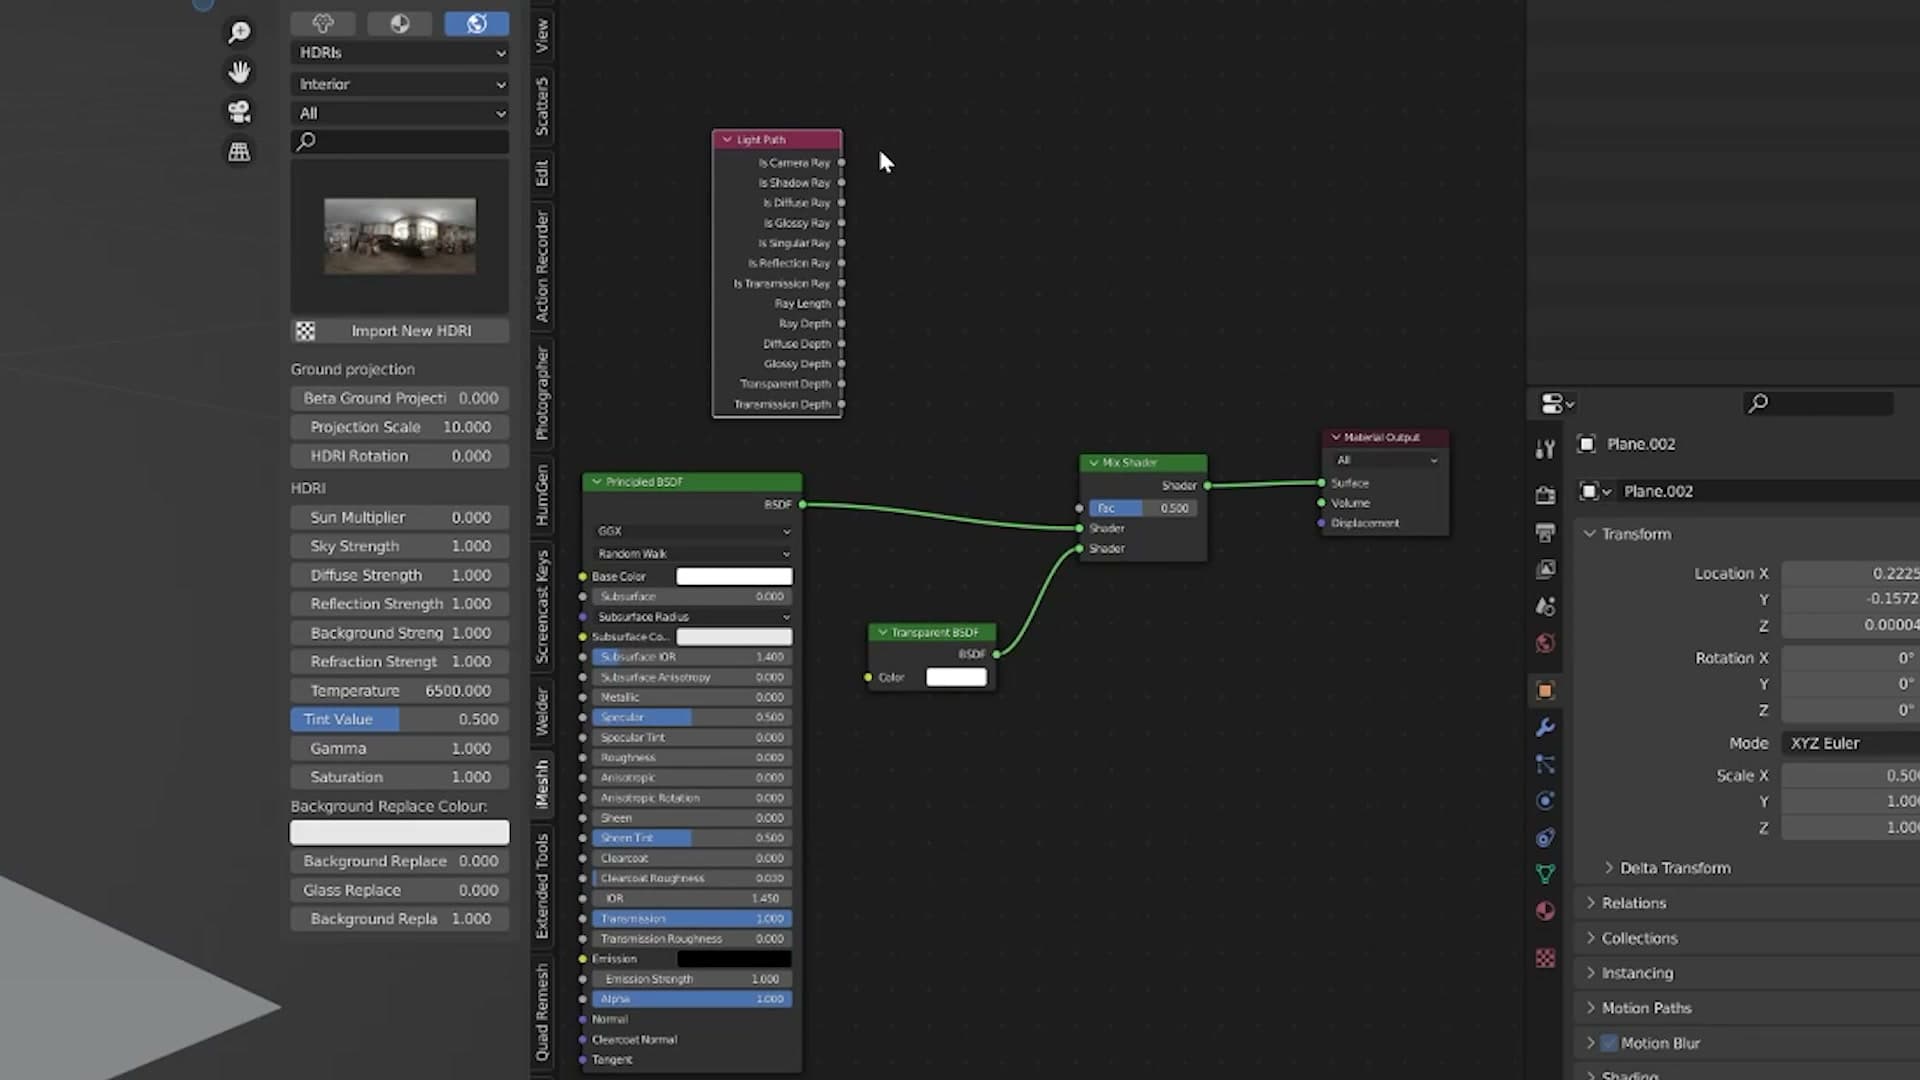
The fix is precise rather than blanket: you want to tell Blender that if a ray hitting the surface is a shadow ray, make the glass invisible to it, but still keep the glass fully visible to the camera. That selective behaviour (transparent to shadows, opaque to the lens) is what the next module wires up with a Light Path node and a Mix Shader.
Light Path node shadow control
Wiring a Light Path node into a Mix Shader so shadow and diffuse rays become transparent, then mixing the effect back to keep a subtle, realistic shadow.
Mix Shader with Shadow Ray as the factor
Before going further, take stock of the wiring built up so far: a Mix Shader sits between the Principled BSDF and a Transparent BSDF, with the Light Path node's Is Shadow Ray output feeding the factor. Whenever Cycles fires a shadow ray at the glass, the Mix Shader flips over to Transparent and the glass stops dropping that heavy dark patch on the floor.
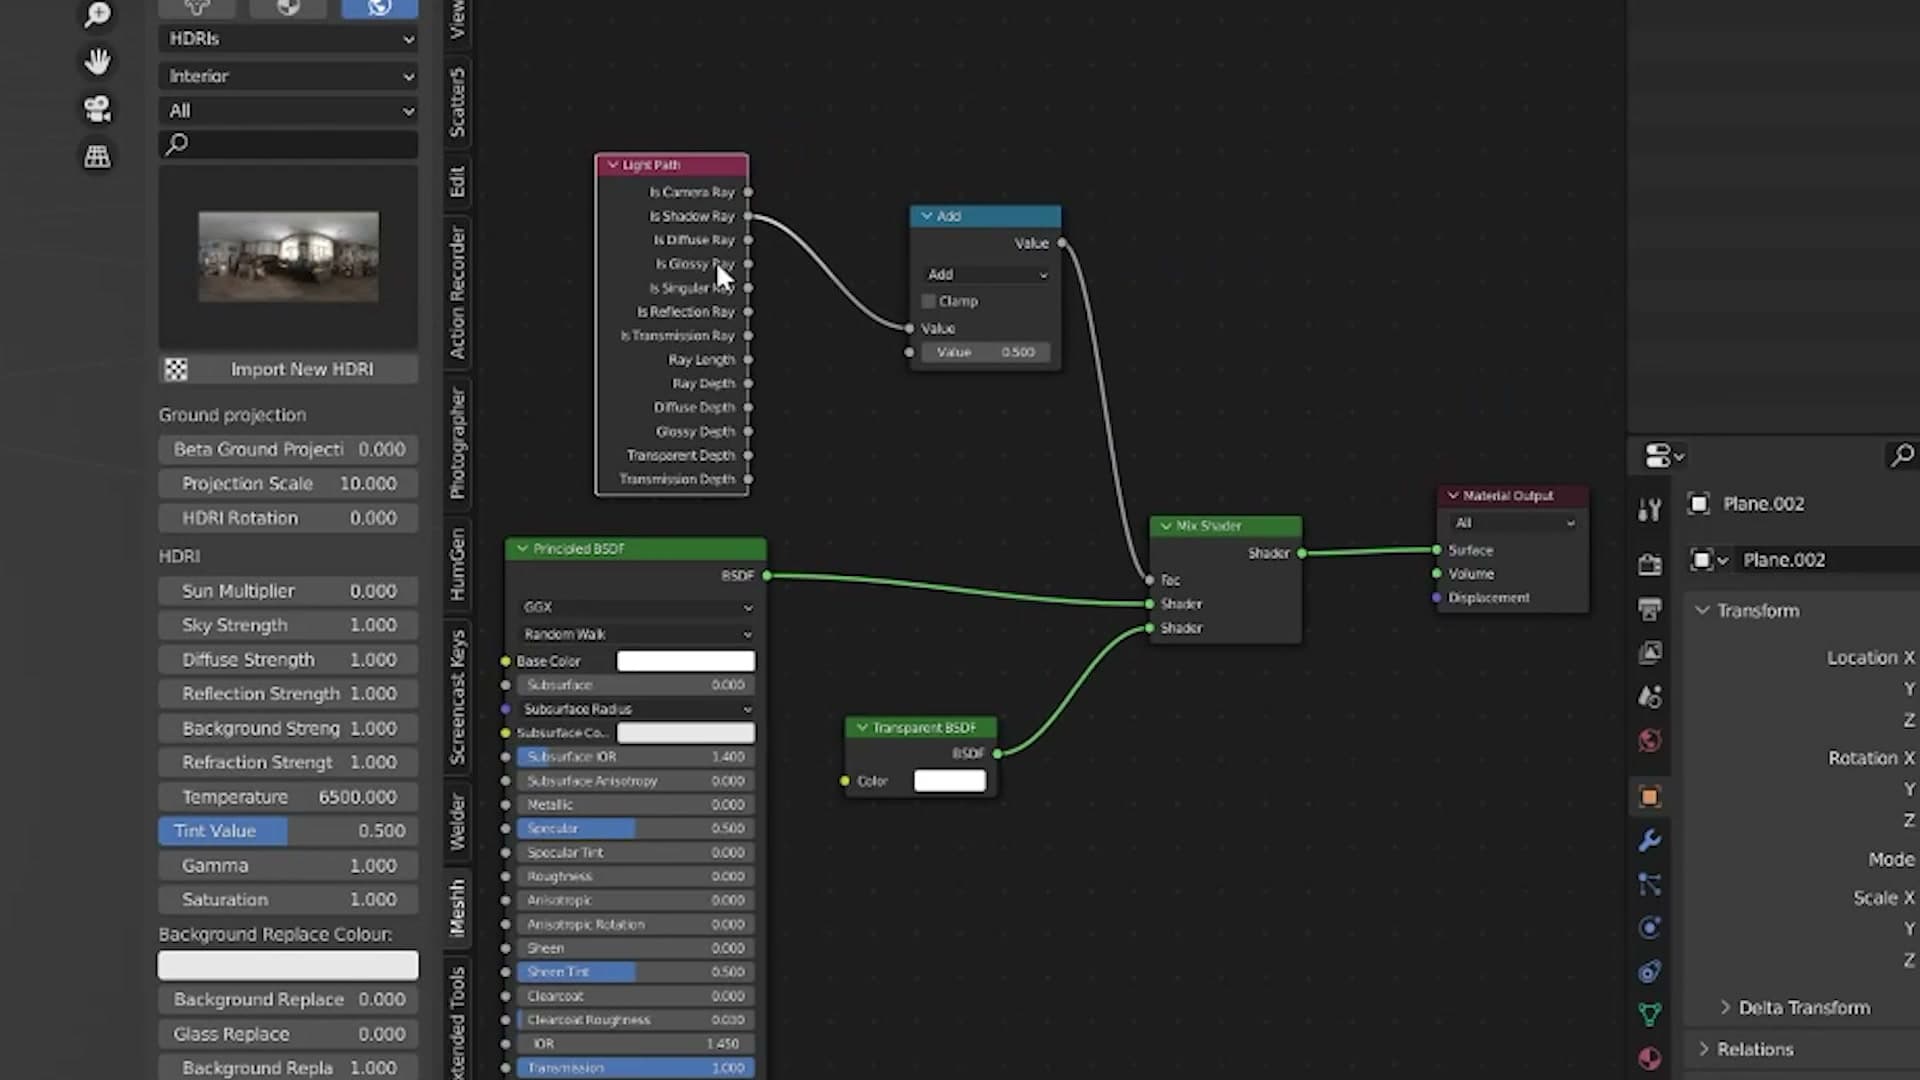
That alone deals with the worst of the shadow problem, but the next move is to extend the same masking trick to another ray type. Diffuse rays bouncing around the scene shouldn't be picking up the glass either, so they get ruled out too.
Adding Diffuse Ray to the mix
To hide more than just shadow rays, you need to combine two Light Path outputs before they reach the Mix Shader factor. The component that does this is an Add math node.
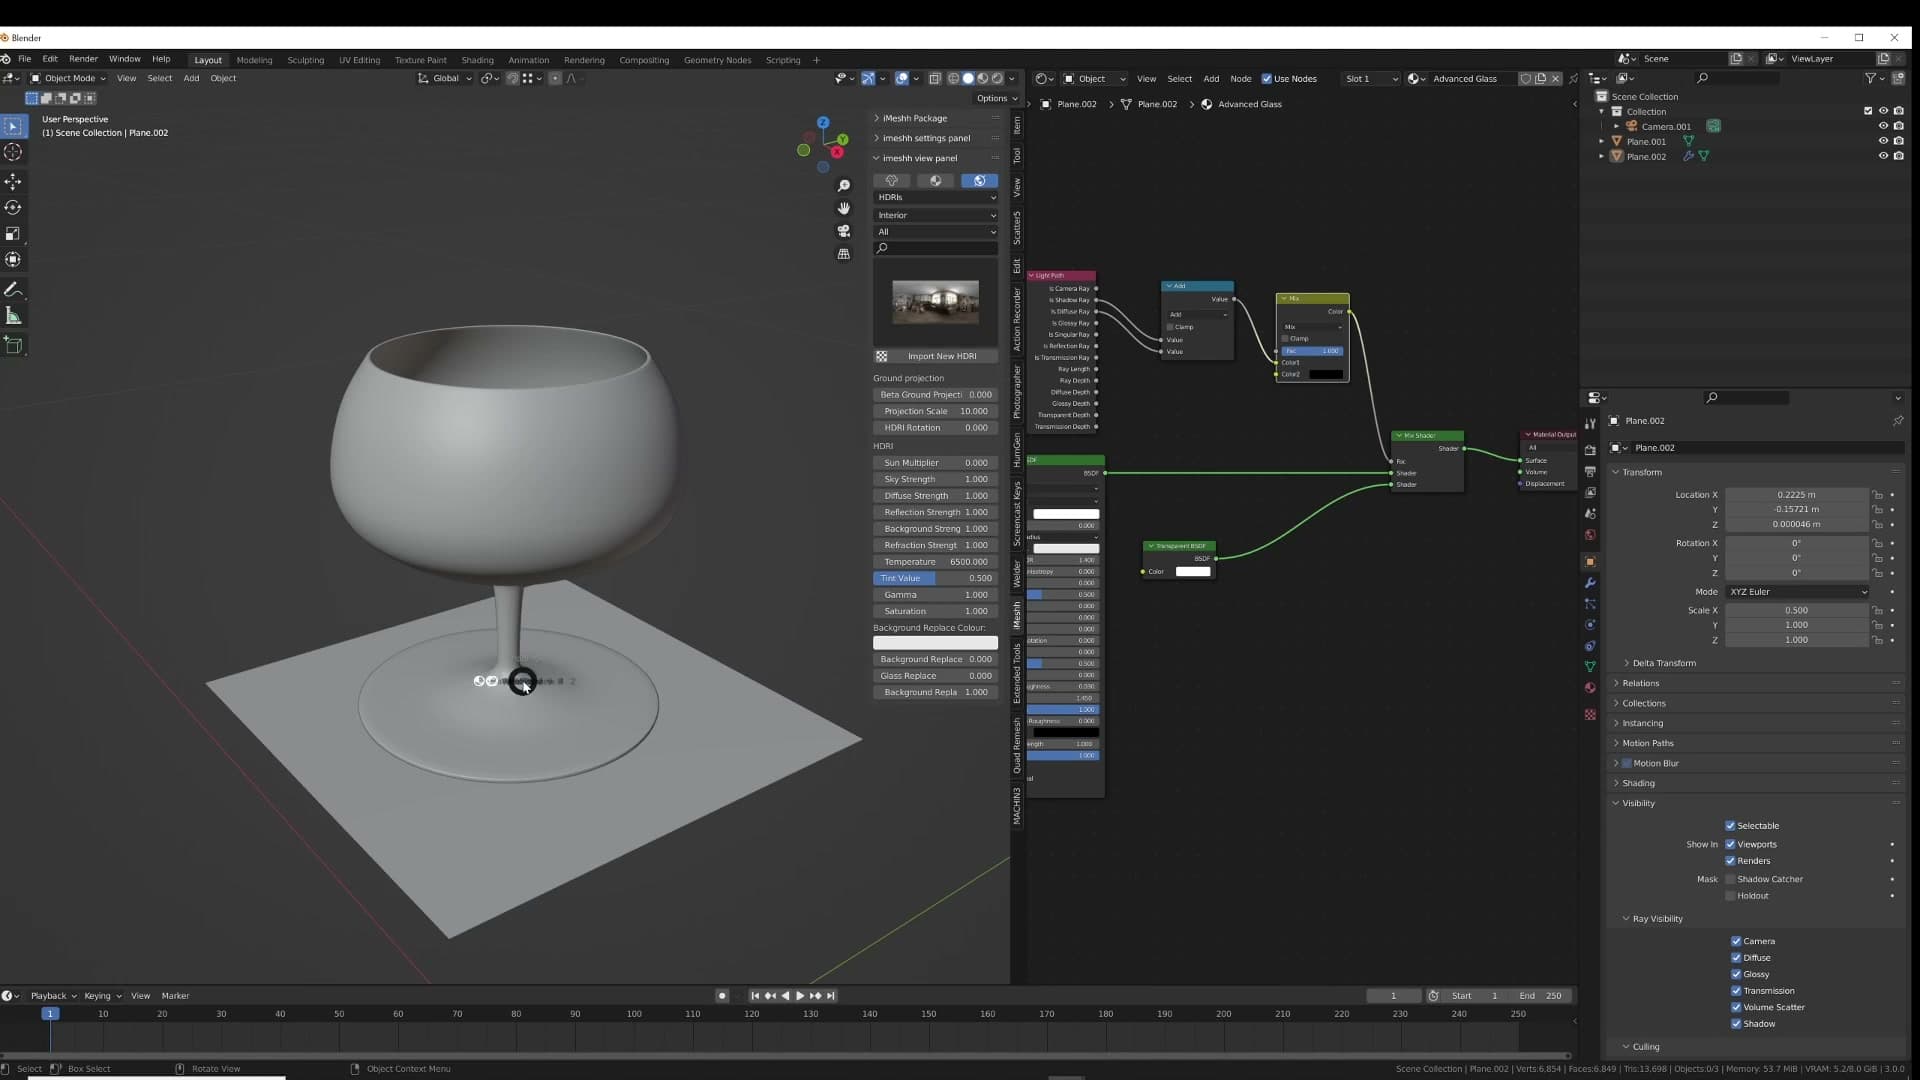
Drop an Add node between the Light Path and the Mix Shader. Wire Is Shadow Ray into the first input, Is Diffuse Ray into the second, and send the Add node's output into the Mix Shader's factor socket.
With both ray types feeding the mask, any ray Cycles classifies as a shadow ray or a diffuse ray gets routed through the Transparent BSDF branch and passes straight through the glass. That cleans up diffuse contamination around the glass. It also swings the shadow problem too far the other way, which is what the next step fixes.
Mix node for partial shadow strength
With shadow and diffuse rays both being passed through transparently, the glass now casts no shadow at all, and that isn't realistic either. The Light Path effect needs dialling back rather than removing entirely.
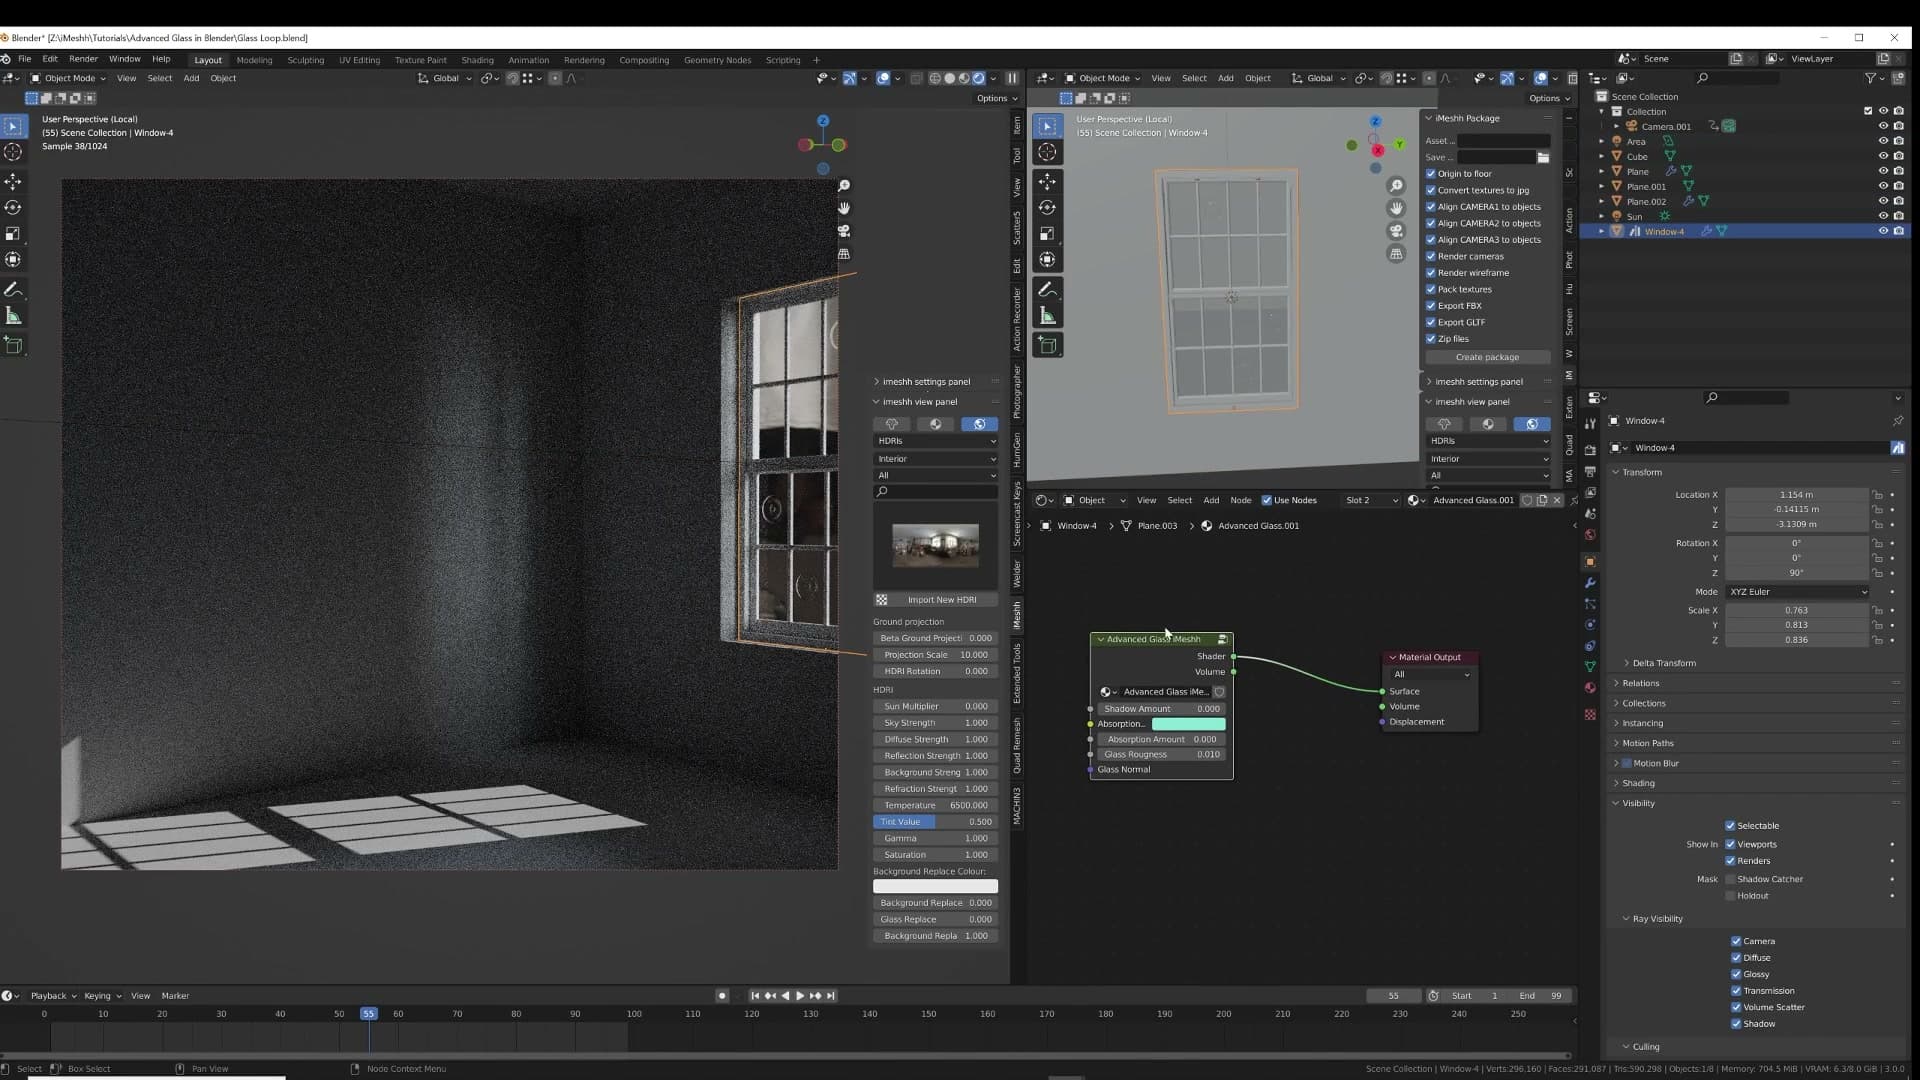
Add a Mix node sitting before the Mix Shader factor so you can blend between the default shadow behaviour and the Light Path masking. At a factor of 1, the Light Path node is ignored completely and the glass behaves with normal shadows. As you bring the factor down, the Light Path effect is gradually brought in and the shadow gets progressively reduced.
Slide the value until the shadow reads right. I land on around 0.3 as the sweet spot. Enough of the shadow comes through to give a believable soft contact patch under a tumbler or vase, without the solid black blob the default Principled BSDF produces.
When to zero this out for window glass
There's one important exception to the 0.3 recommendation: window glass. Real window panes are thin enough that the light transport through them is minimal anyway, so there's no meaningful shadow to recover. Forcing one in will read as wrong.
For any window in the scene, drop the Mix factor to 0. The glass then casts no shadow whatsoever, which is how a thin pane actually behaves under sunlight or a key light.
Green-edged glass with Principled Volume
Why selecting outer edges and painting them green is the wrong approach, and how Principled Volume gives you thickness-dependent absorption for free.
Why painting outer edges green is the wrong approach
Real glass has a characteristic green or blue tint that shows up most strongly at the edges. The instinctive fix is to select the outer faces of the model and paint them with a separate green material, but that gives you a flat, fixed colour that doesn't respond to viewing angle or wall thickness. The right tool for the job is Cycles' Principled Volume, which lets the tint build up naturally based on how far the light has had to travel through the glass to reach your eye.
Density, absorption colour and anisotropy
With a Principled Volume node connected to the glass material, leave the Color input at white. That's the scatter colour, and white keeps the glass itself clean. Set Density to 100, then set Absorption Color to a turquoise. The exact hue depends on the kind of glass you're imitating; some real glass leans more blue, some more green. Finally, set Anisotropy to 1.
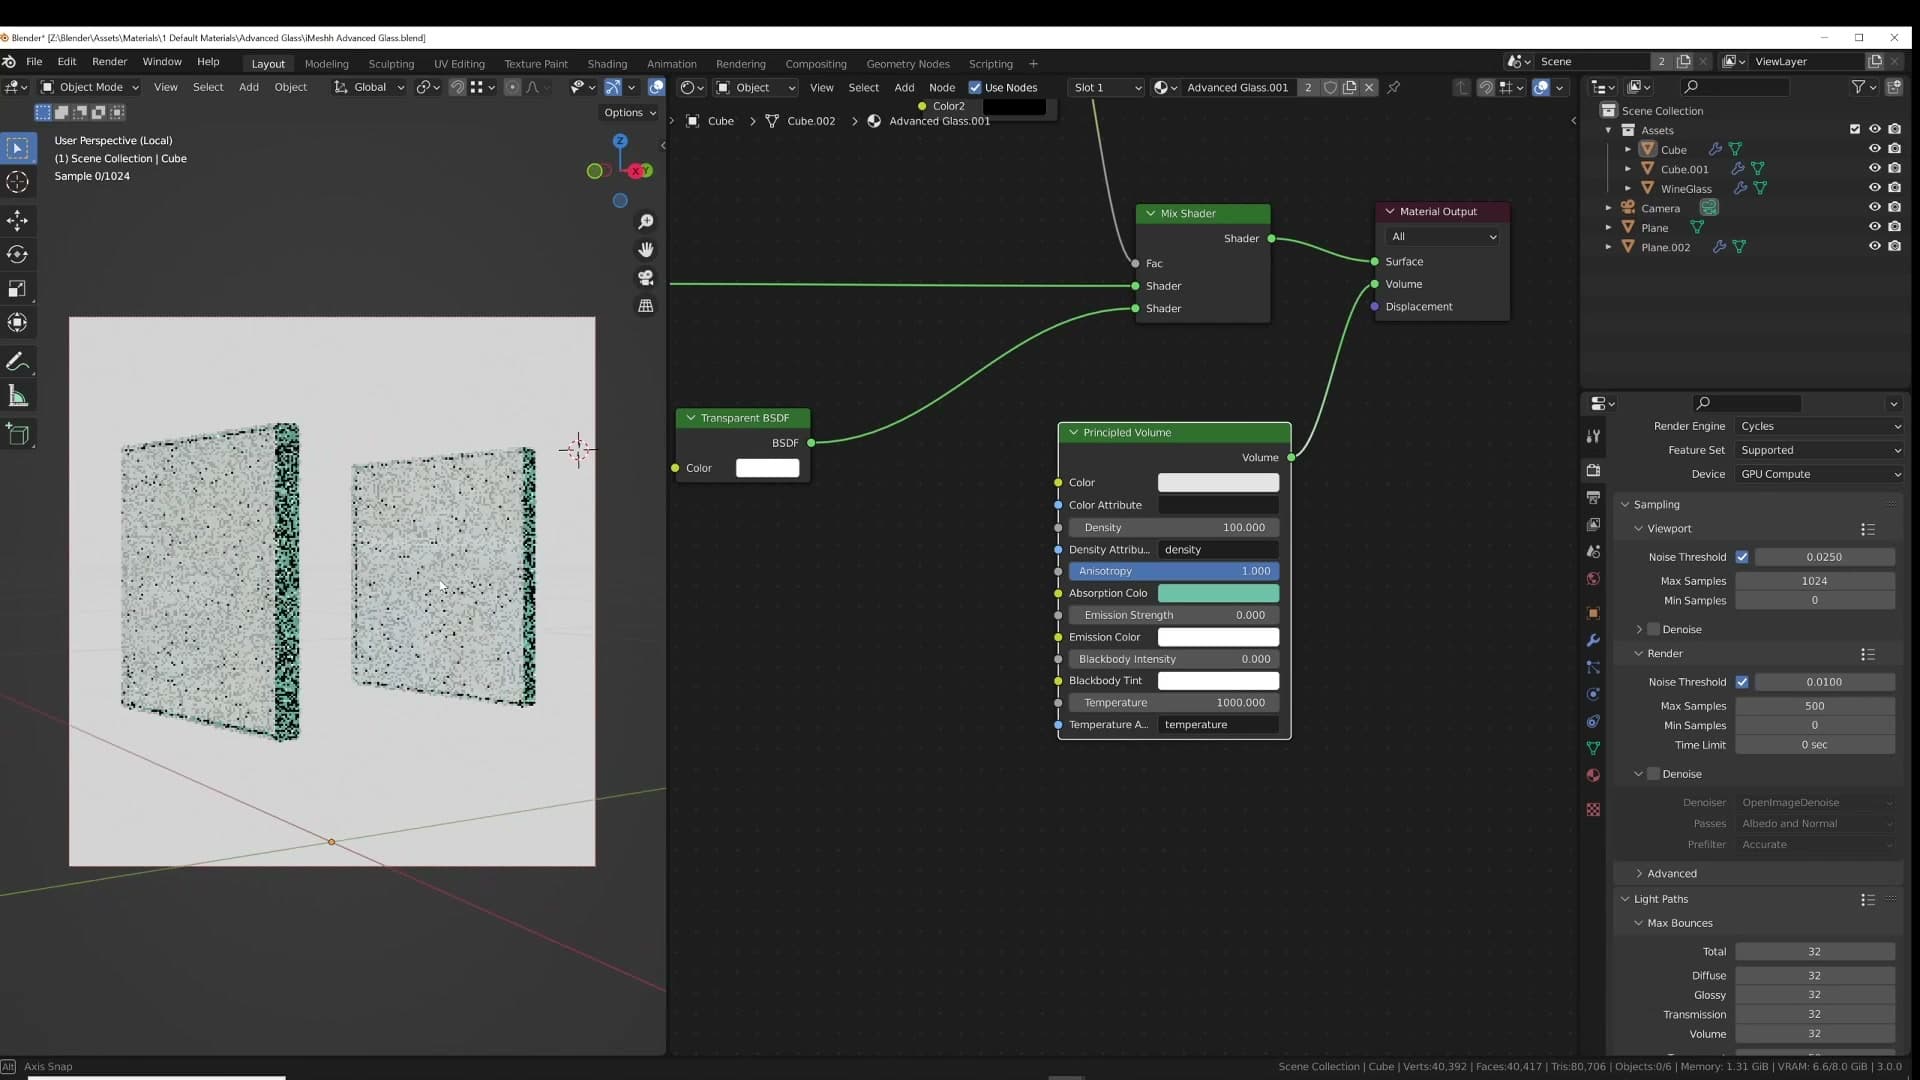
The result is a glass that still reads as clean and clear face-on, but where any light passing through it picks up a subtle, physically-motivated tint.
Thickness-dependent tint in practice
What that volume is really doing is giving the glass itself a density that affects light passing through it. Where the light has to travel through more material to reach your eye, it picks up more of the absorption colour; where it travels through less, the tint stays very subtle. That's exactly why a real drinking glass looks nearly clear from the front but green at the rim. Your line of sight at the edge passes through far more glass.
The same trick handles objects with varying wall thickness for free. A vase with a thick base and thin walls will look more saturated at the bottom and almost clear higher up, with no separate material or vertex paint needed. The volume sees the geometry directly, so thickness translates straight to colour intensity.
There are several other inputs on the Principled Volume node worth experimenting with on your own. Color, Density, Absorption Color and Anisotropy on their own are enough to deliver a convincing architectural glass that you can drop into almost any object in your scene.
Zero density for window glass
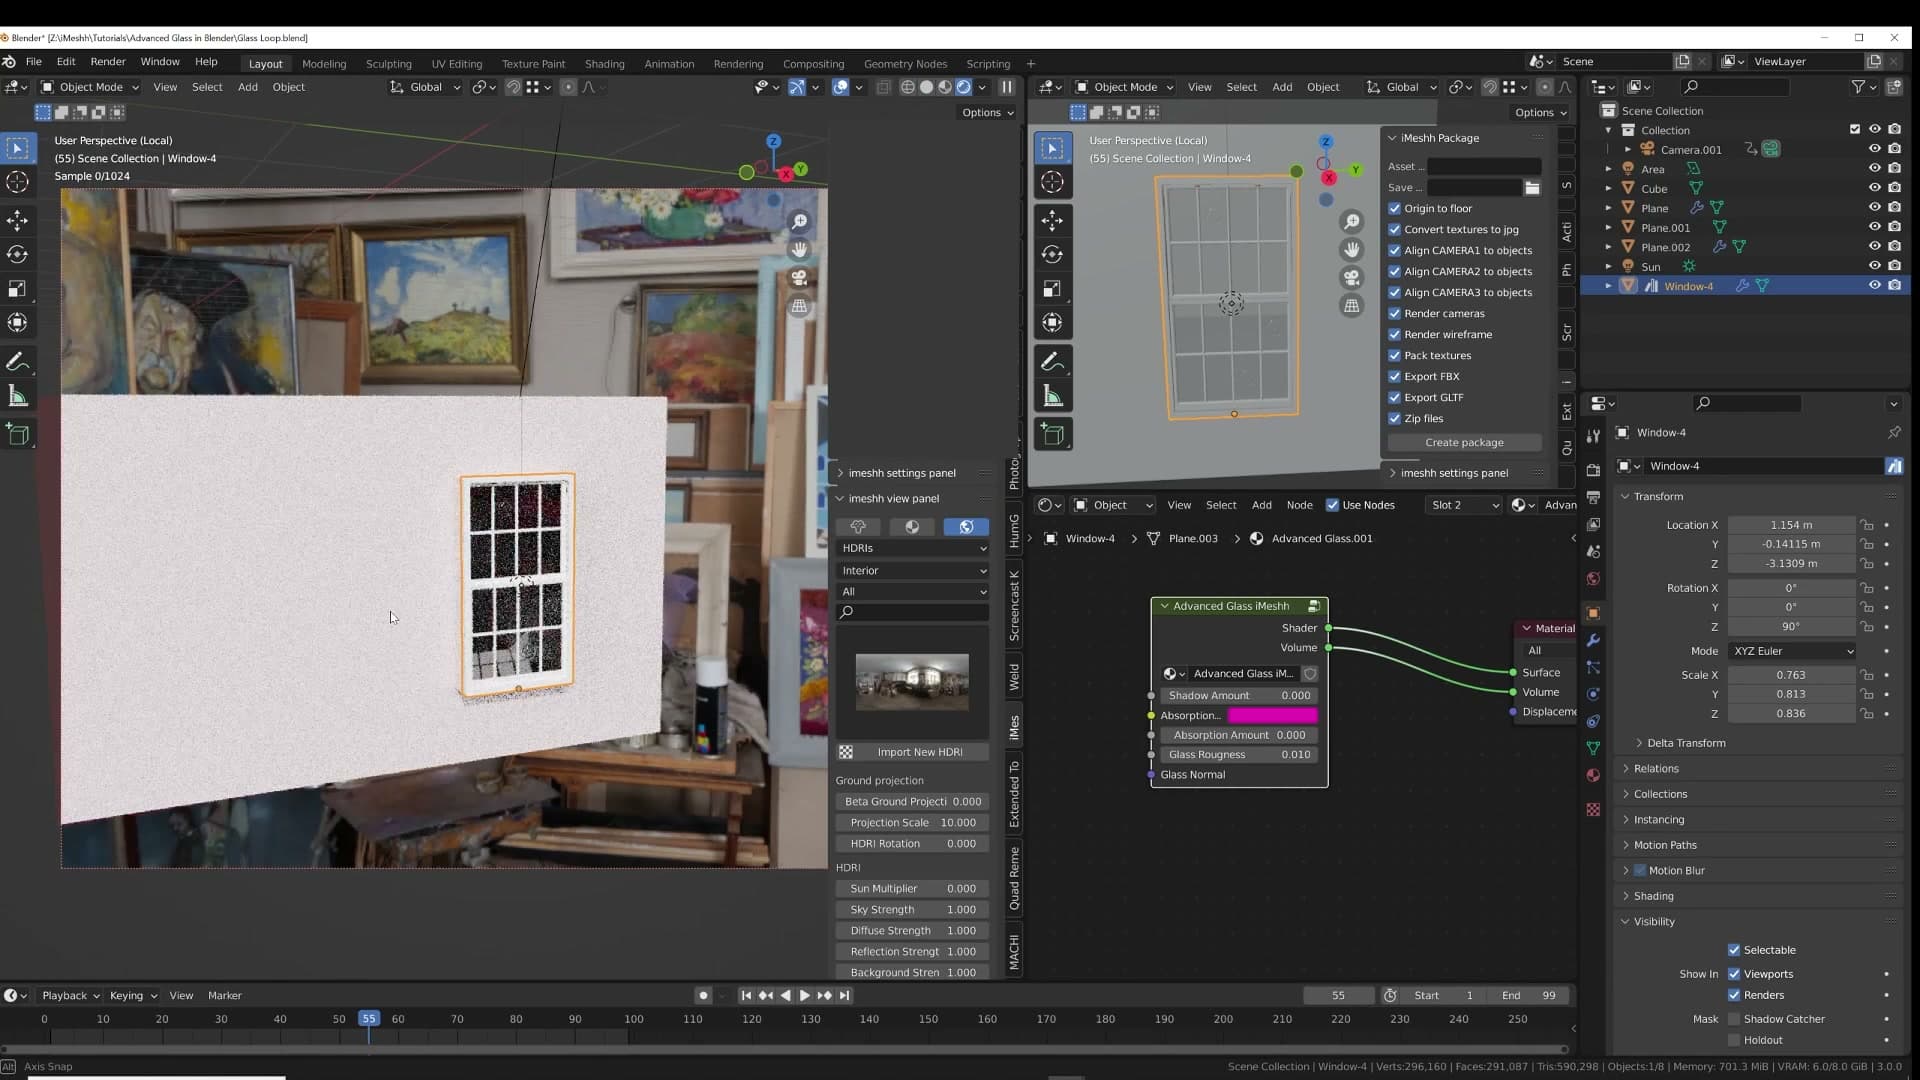
Window glass is the exception to all of the above. The whole effect works because there's enough material for the absorption colour to build up across the light path. A window pane is so thin that there's barely any volume to absorb anything. Worse, leaving density on a thin pane means every ray of sunlight that passes through it gets tinted, and that quietly recolours your entire interior.
For windows, drop Density to 0 and clear the Absorption Color entirely. Real window glass does have a very faint tint, but you'll find it much easier to light an interior when you keep full control over the colour of the daylight coming in.
Cycles light path settings for glass
Bumping transmission, glossy and transparency bounces high enough to handle overlapping glass and pampas grass without going black.
Bounce counts: 32 across the board, 50 for transparency
With the shader finished, jump into Render Properties and open the Light Paths panel. Glass is a transport-heavy material: every refraction and reflection costs a bounce. The Cycles defaults are not generous enough once you start stacking tumblers, vases and windows in the same shot. The starting point is to raise Transmission, Glossy and Transparency bounces to 32 across the board, then push transparency higher if the scene demands it.
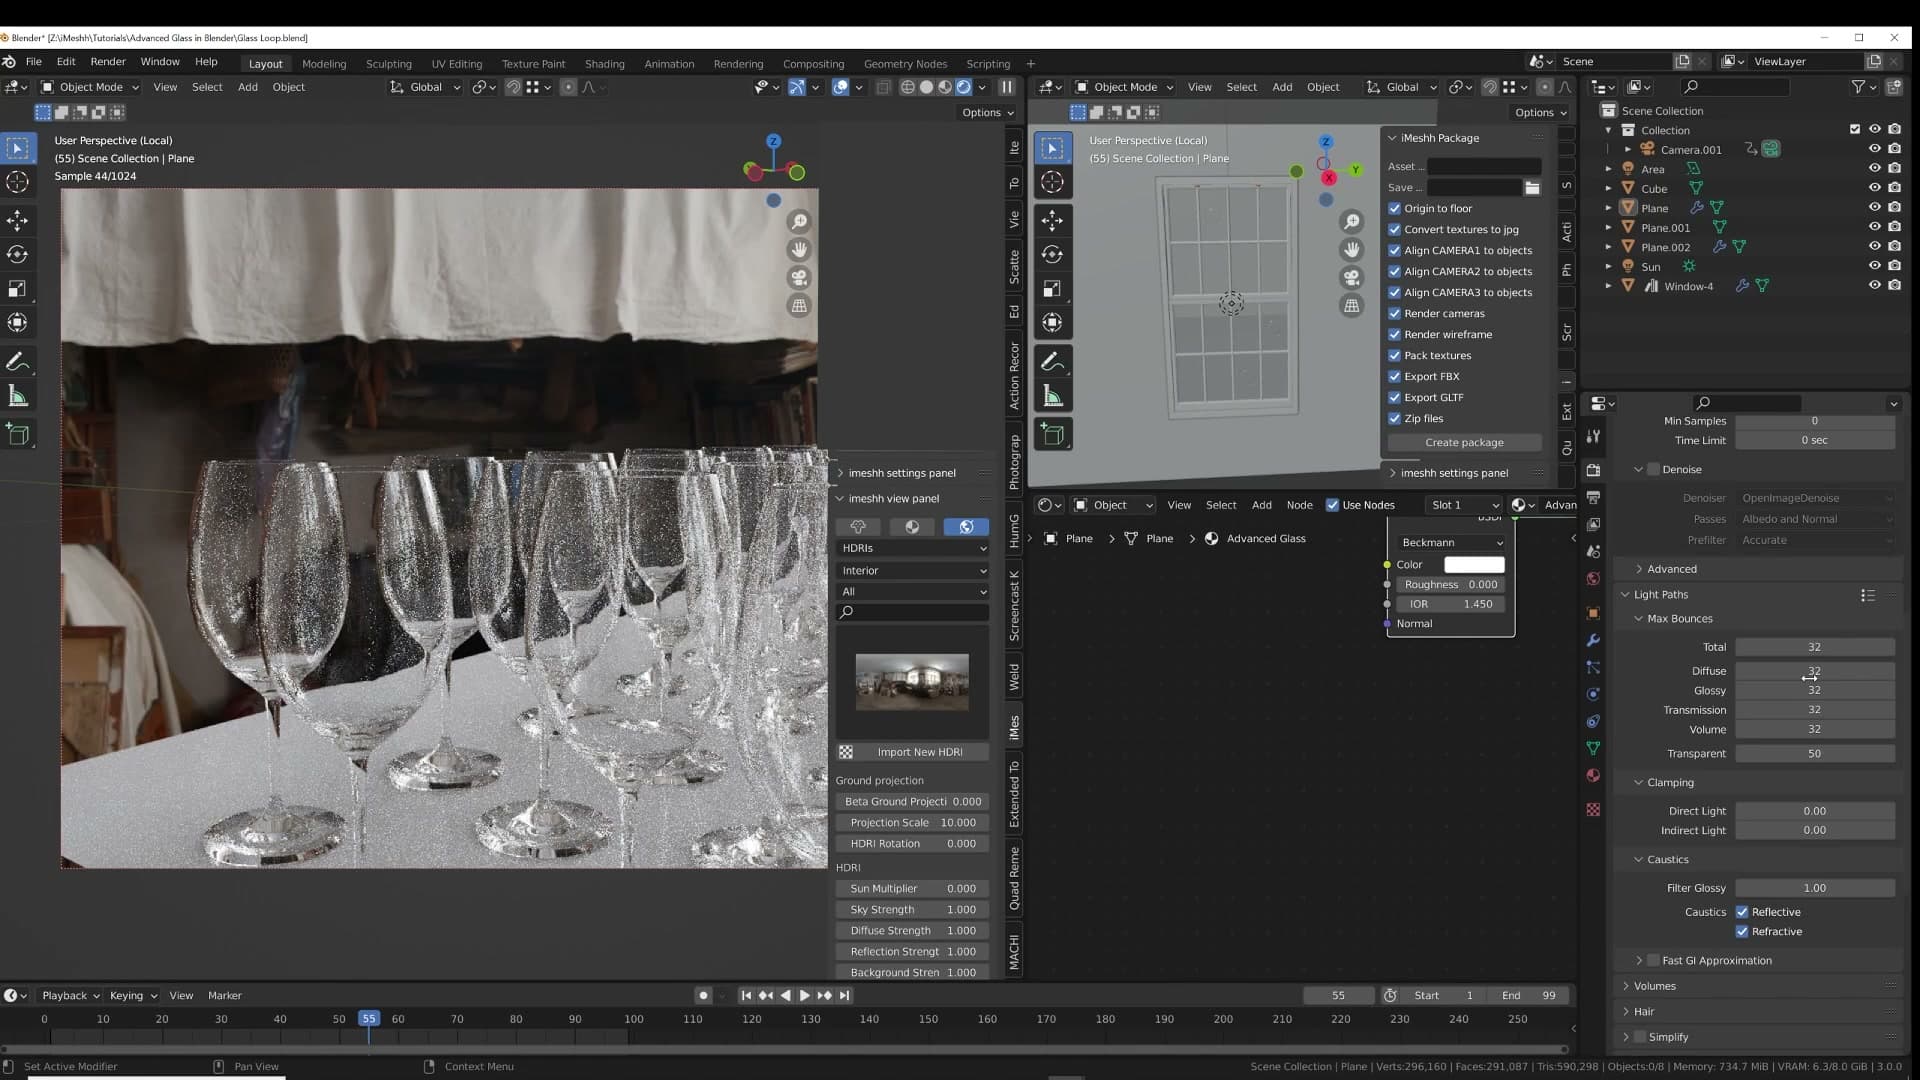
Transparency is the one to watch. Set it to 50 if your scene includes pampas grass, foliage or any other dense alpha-mapped geometry where rays have to punch through dozens of overlapping faces before they hit anything solid. For a tidier scene without all that overlap, 12 is plenty and you can leave it there.
Glossy sits at 32 so reflections on the glass, and on every other reflective surface bouncing light back onto it, read as realistically as possible. You can push the value higher, but in practice there is very little visible difference past 32, so the extra render time is rarely worth it.
Transmission also goes to 32 by default. You only really need that much when you have lots of overlapping glass in a single line of sight; the Blender default usually copes. The tell that you have set it too low is glass turning black in the render. When that happens, bump transmission up until the darkness clears.
Caustics, pixel filter and clamping
Enabling reflective and refractive caustics, sharpening the pixel filter to 1.0 or 1.15, and why clamping should stay at zero for glass-heavy scenes.
Enabling caustics and tightening the pixel filter
With the bounces sorted, switch on Reflective Caustics and Refractive Caustics under the Light Paths panel. Glass is exactly the case these toggles exist for. The bright pools of light that gather behind a tumbler or under the rim of a vase only resolve properly when both are enabled.
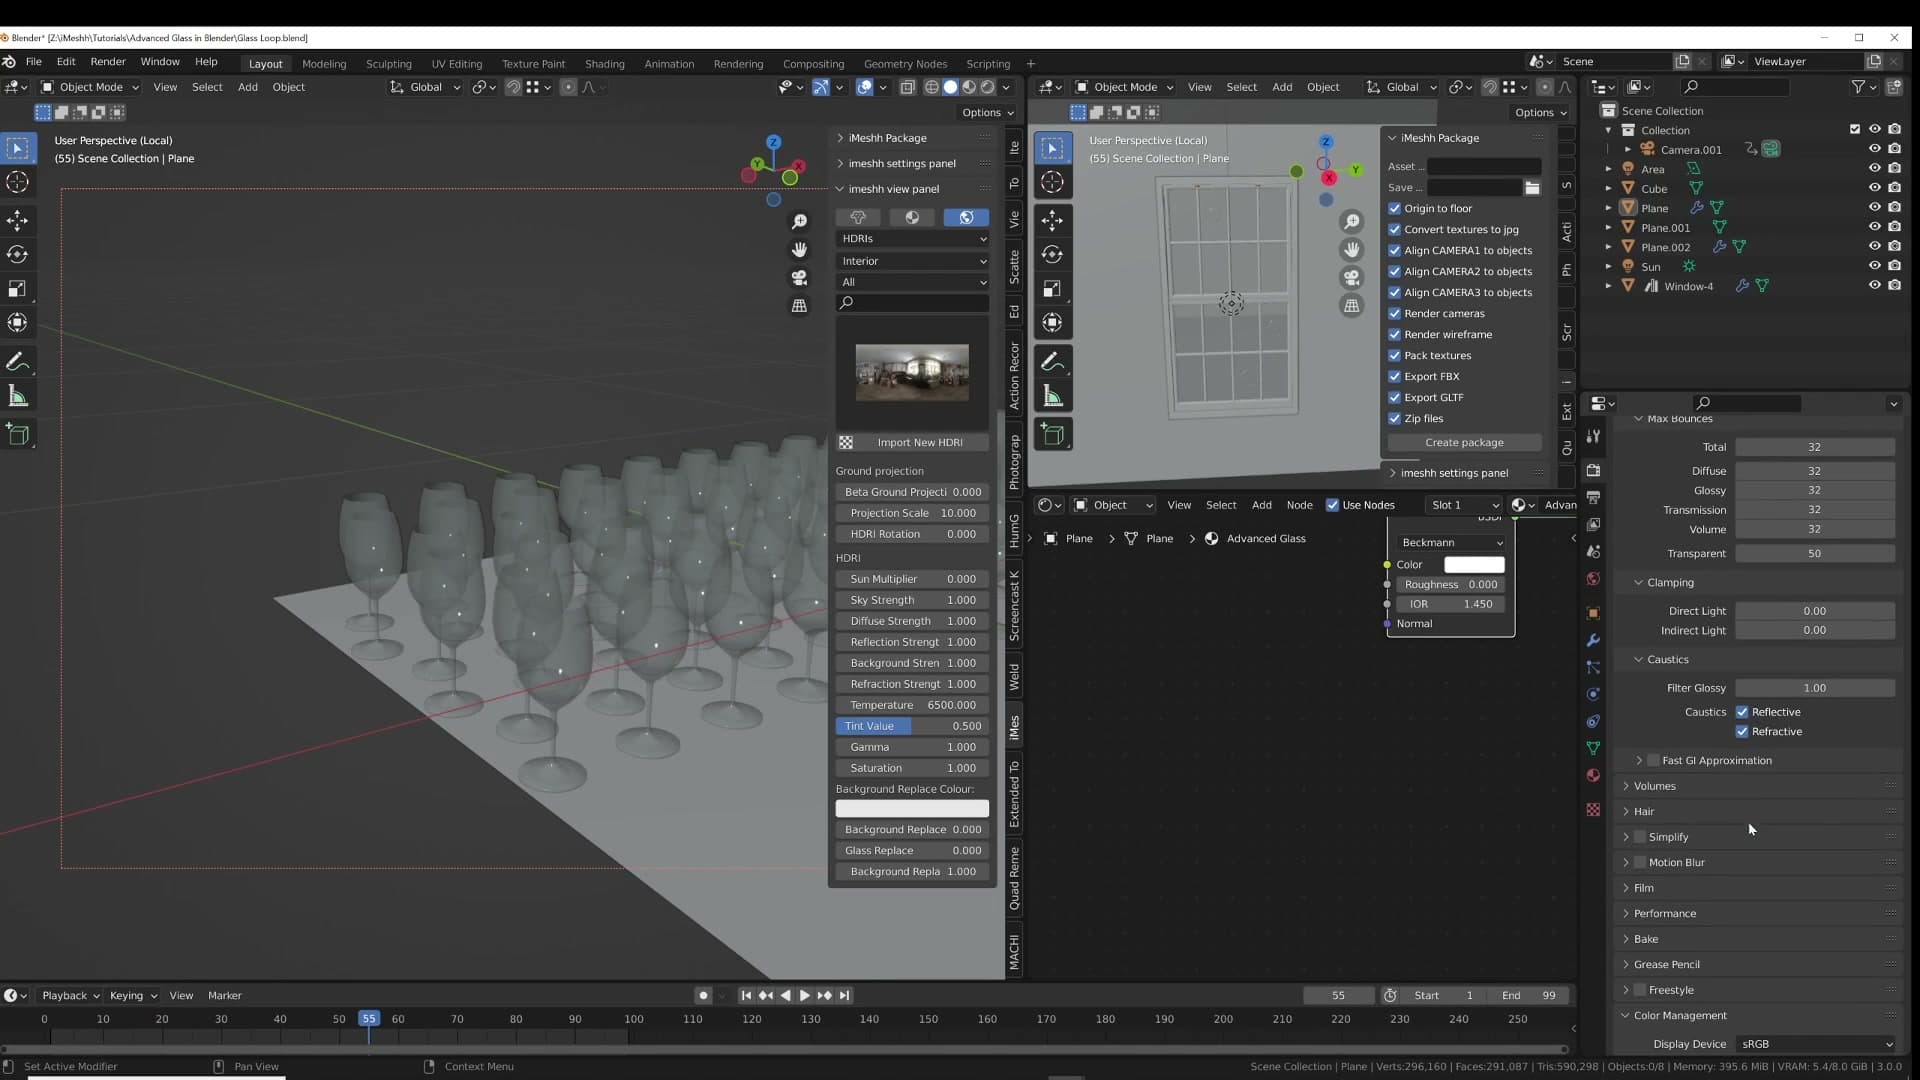
While you are in the render settings, drop the Pixel Filter width down to 1.0 or 1.15. The default sits higher, and tightening it gives a noticeably sharper image without changing anything else about the render.
Why indirect-light clamping stays at zero
Next, look at the clamping values. By default, Direct Light clamping sits at 0 and Indirect Light clamping sits at 10. Leave direct alone (that one you really don't want to touch) and set indirect to 0 as well.
Indirect clamping is useful when you have fireflies popping in the render. Setting it to 10 will knock a lot of them out, and if the fireflies are particularly intense you can push it lower (any value above 0) for a stronger reduction. A value of 0 turns clamping off entirely.
The reason to leave it off is that clamping rewrites the light values in the scene: it tells Cycles that any very bright area should be pulled down. On glass specifically, that brightness is the highlight you want. Switching clamping on tends to flatten the lovely specular pops you'd otherwise get on the rim of a glass or a polished edge.
So the recommendation is to keep both clamping sliders at 0 across the board. If fireflies do appear, treat it as a signal to find and fix the source rather than masking it with clamping.
Compositor highlight boost with Cryptomatte
Enabling the Cryptomatte and Glossy Direct passes, then mixing the glossy pass back over the beauty render through a material-specific mask.
Enabling Cryptomatte Material and Glossy Direct
The final step is a small compositor hack to add some nice highlights back onto the glass. It is not strictly physical, but the result is pleasing and works well as a finishing touch. Before you render, you need to enable two extra passes so the compositor has something to work with.
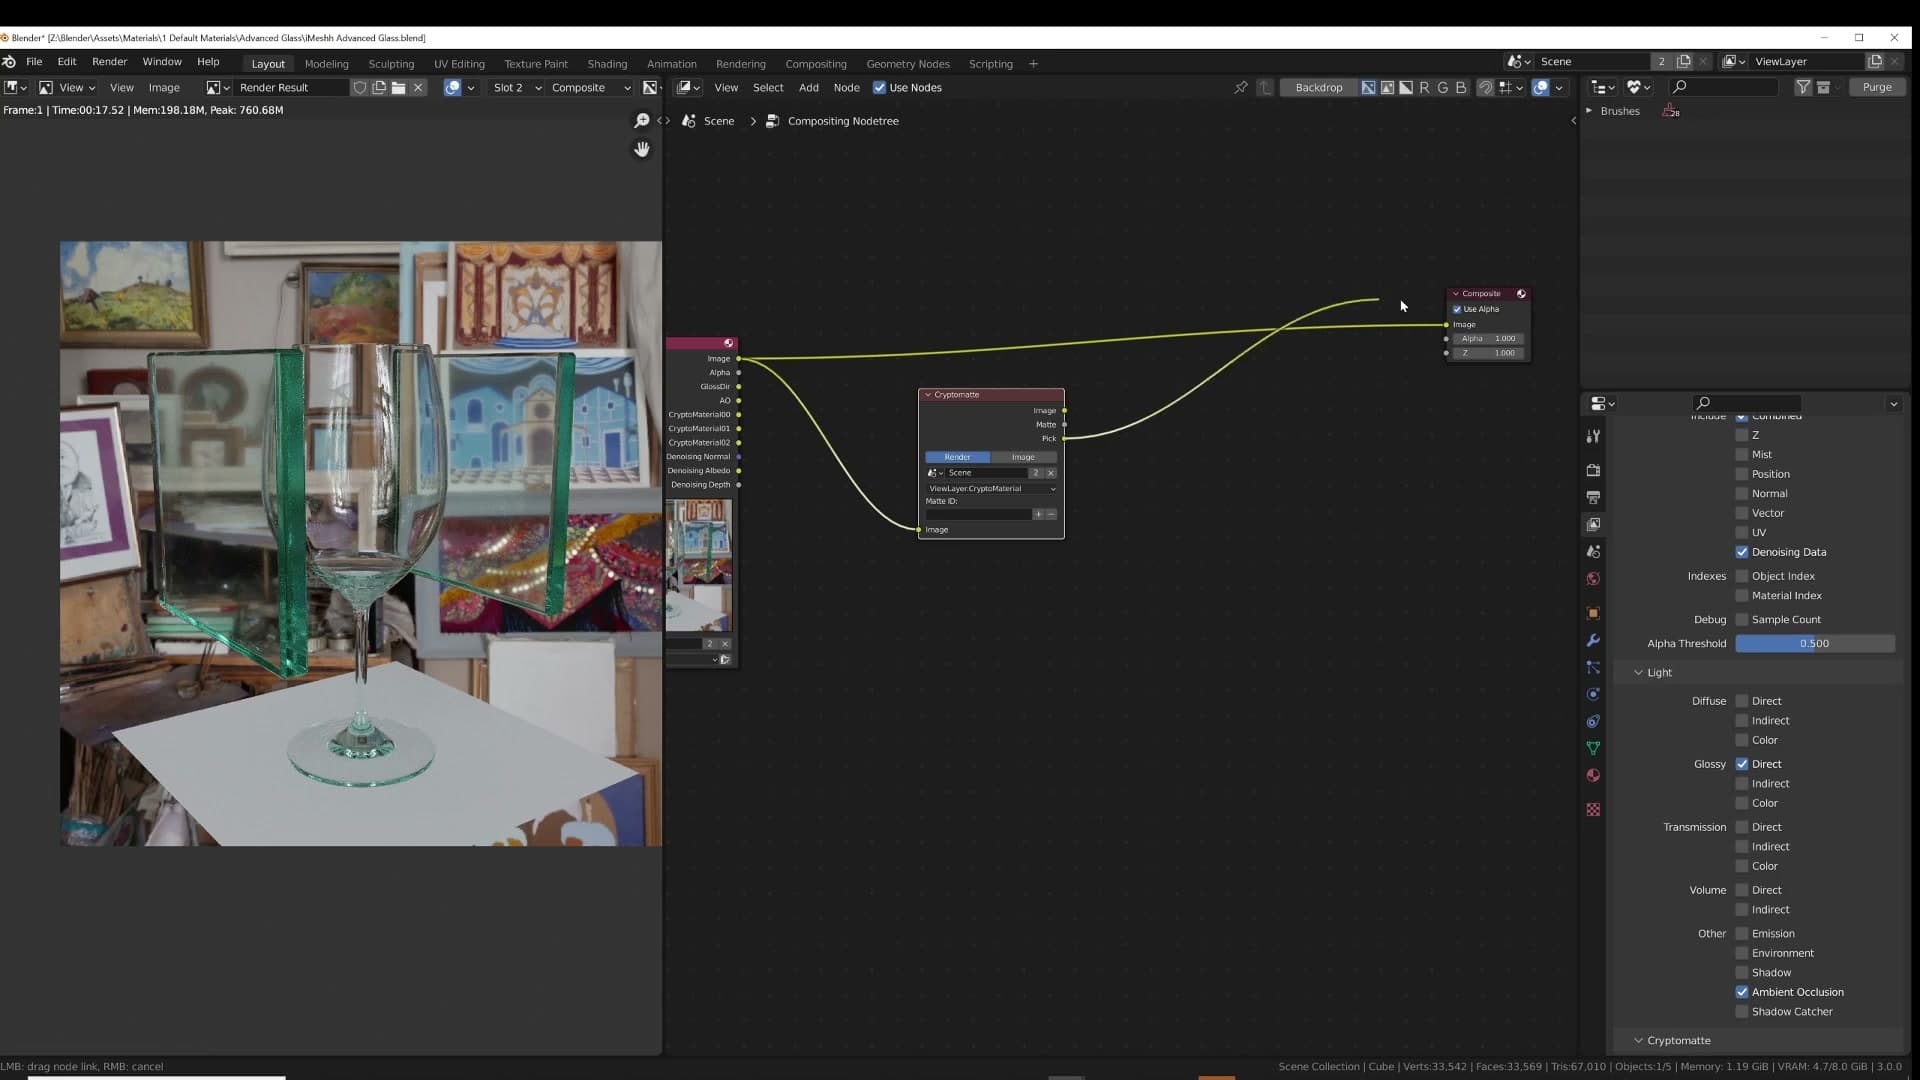
Open the View Layer Properties tab. Under the Cryptomatte section, tick Material so each material in the scene can be isolated later. Then, under the Light passes, enable Glossy Direct so the pure specular reflections on the glass are saved out as their own pass. Hit render so both passes are baked into the result, then switch to the Compositor.
Picking the glass material with Cryptomatte
In the Compositor, add a Cryptomatte node. Plug the rendered Image into the node's Image input, then plug the Pick output into the Composite output so you can see what the node is looking at. The viewer will show a strange multi-coloured visualisation. Every unique colour represents a different material in the scene.
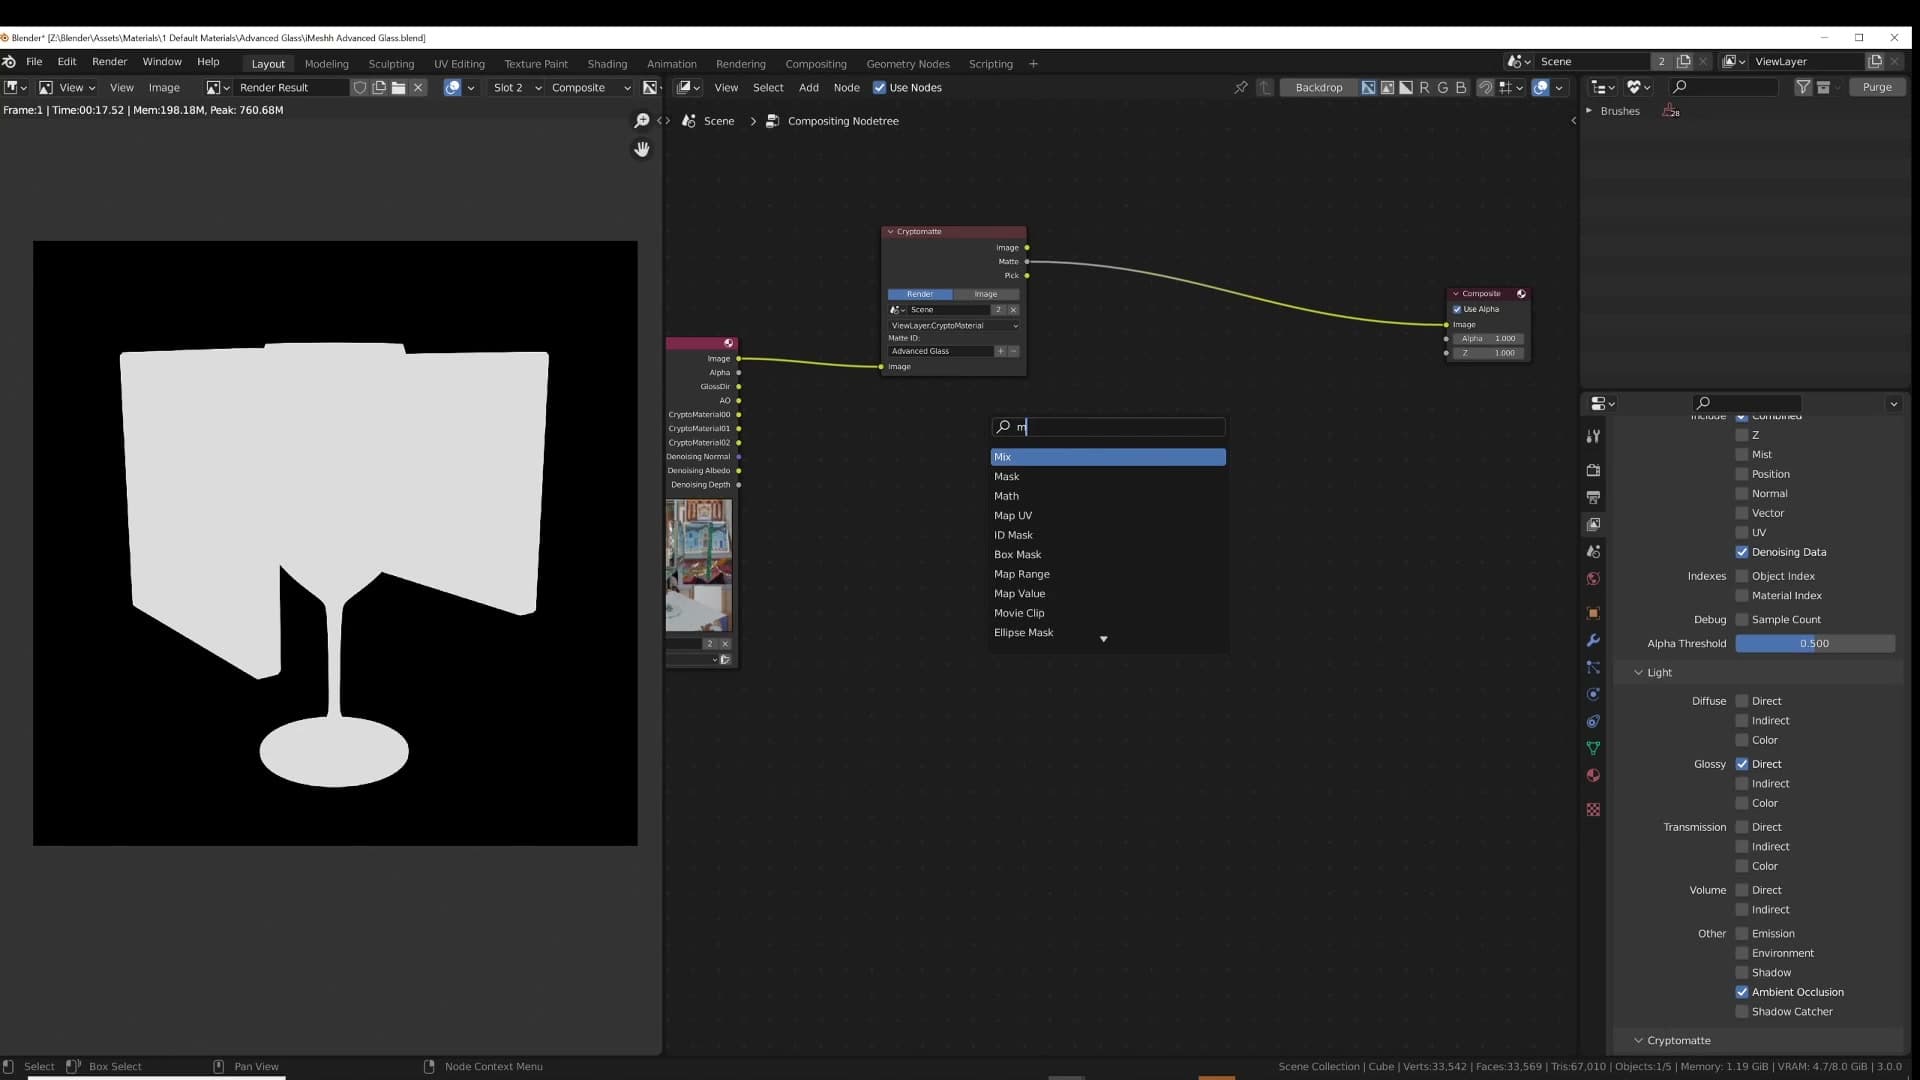
To isolate the glass, click the small plus icon on the Cryptomatte node and use the eyedropper to click directly on the Advanced Glass material in the preview. That tells the node which material to mask.
To confirm the mask is correct, temporarily plug the Matte output into the Composite output. You should see a clean black-and-white mask where only the glass is white. Everything else is excluded.
Mixing the Glossy Direct pass back over the beauty
With the mask sorted, the next step is to layer the Glossy Direct pass back over the beauty render. Add a Mix node and feed the main rendered image into the first Image input. Plug the Glossy Direct pass into the second Image input.
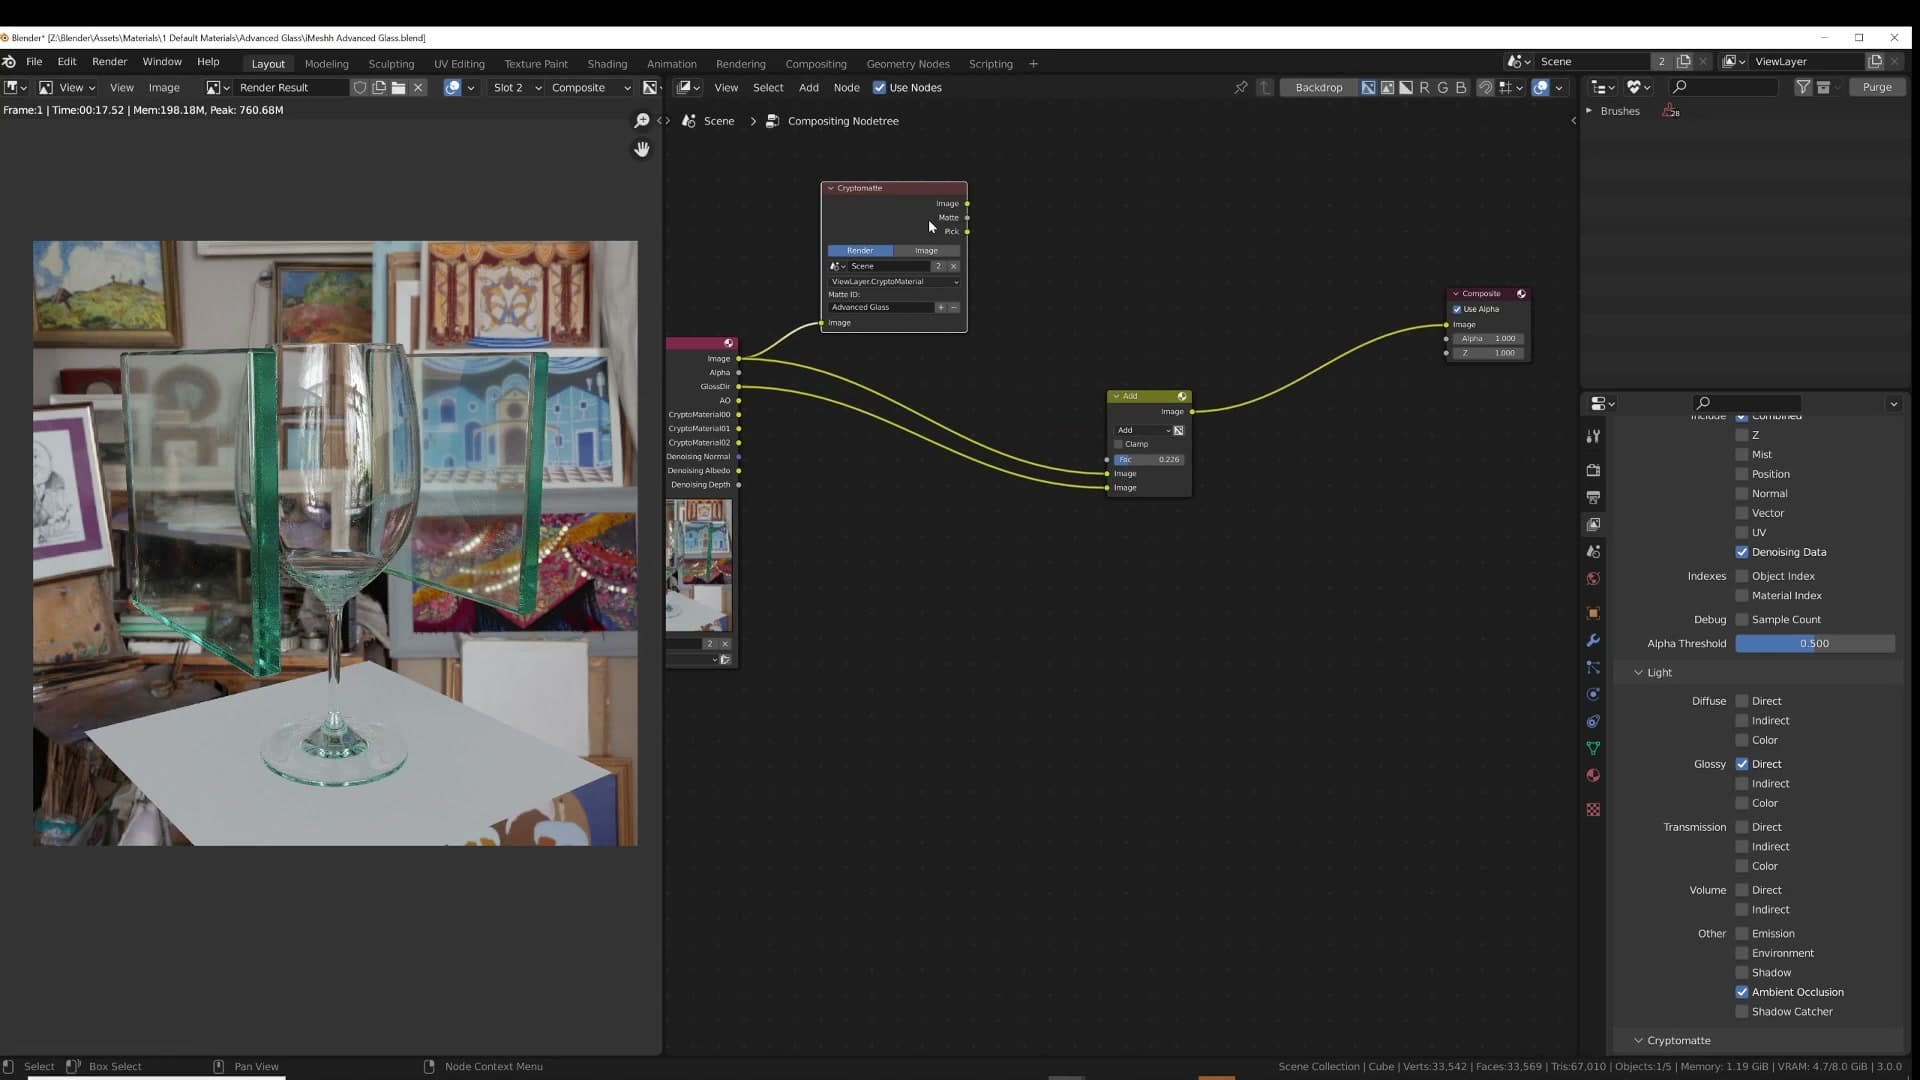
If you preview the Glossy Direct pass on its own, it looks like chrome. It is the pure glossiness landing on every surface in the scene. Sent through a default mix, the blend looks strange because it is averaging the two images together.
Change the Mix node's blend mode to Add. That layers the extra glossiness on top of the beauty render rather than averaging it. Pull the Fac slider down so only a small amount of the pass is being added. You only want a hint of extra highlight, not a chrome-plated scene.
The problem at this stage is that the Add is brightening the whole scene's reflections, not just the glass.
Masking the effect to glass and tuning strength
To restrict the boost to glass only, take the Cryptomatte node's Matte output and plug it into the Fac input of the Add Mix node. Because the mask is white on glass and black everywhere else, the extra highlights are now applied only where the glass material lives.
The catch is that driving Fac directly from the mask leaves you no way to dial the effect up or down. To get that control back, slot a second Mix node between the Matte output and the Add node's Fac input. Set its second colour to pure black, then use its Fac slider to decide how much of the mask reaches the Add.
At pure black there are no extra reflections at all. Pulling the slider toward 0.8 brings the highlights back, noticeably stronger on the glass. Adjust to taste. Keep this subtle so the glass picks up a little extra pop without screaming chrome.
Applied lightly at the end of a render, this little compositor trick can lift the glass enough that it feels like it is really catching the light, and pairs nicely with the absorption work you did inside the shader itself.
Wrap-up and next steps
Why this node group is worth keeping in your asset library, and a reminder to play with the absorption settings on real scenes.
Final thoughts on the advanced glass workflow
With the node group built and the render settings tuned, the most useful thing you can do now is drop the shader onto real geometry and start playing with the absorption settings. Thin window panes, thick tumblers, a chunky glass vase and a green bottle all want different density values, and the only way to dial in what looks right for a given scene is to push the sliders and compare.
Save the node group into your asset library so it travels between projects, and treat the defaults as a starting point rather than a finished recipe. Once you're comfortable with how the shadow mix and the volume absorption interact, you'll find yourself reaching for this group instead of the default Principled BSDF every time a scene calls for glass.
Tools and credits
Everything mentioned in this tutorial, with links.
- Blender the renderer this entire build runs in.
- iMeshh studio platform (project management, client review, asset library, invoicing). The asset library used in this tutorial is included with every iMeshh Pro plan.
- Poly Haven free CC0 textures and HDRIs.
Pillar guide: Materials Shaders hub