Why model your own archviz rugs
The case for being able to build a rug from scratch even when an asset library is available: clients sometimes request unusual shapes or sizes, and rugs are one of the trickier asset types to make convincingly.
Asset libraries versus bespoke modelling
This tutorial grew out of an earlier video on building an interior with Eevee Next. That scene worked better than expected, and the question that came back most often was how the rug on the floor was made. Rather than rush through it as part of a wider scene breakdown, this is a slow, deliberate walk through every step, with a few extra tricks layered on so you can tweak the rug to suit different projects.

If you are getting into archviz seriously, an asset library is worth having. Clients do not pay you to model every chair, lamp, and rug from scratch. Time is money, and a good library lets you focus on the shots that actually need bespoke work. iMeshh ships over 2,200 individual archviz assets, including a healthy selection of rugs, and works out to a few pence per asset across a subscription.
Even with a library in hand, you still need to be able to model on demand. Sooner or later a client asks for a particular chair, a round rug, or something with an unusual silhouette that simply does not exist online. When that happens, you either turn the job down or build the asset yourself. The rest of this tutorial walks you through doing exactly that for a rug: base mesh, fur guides, modifiers, geometry nodes, and the hair shader, so you have the option whenever it comes up.
Building the rug base mesh
Starting from a plane, the base rug shape is built up with extrudes, bevelled edges, loop cuts and a slight upward lift on the corner vertices to mimic a real rug's silhouette.
Plane, extrude, and edge bevels
Add a plane to a fresh scene, tab into edit mode and press S Y to squash it along the Y axis until the footprint reads as a rug rather than a square. With everything still selected, press E to extrude the plane upward and give the rug some thickness to work with.
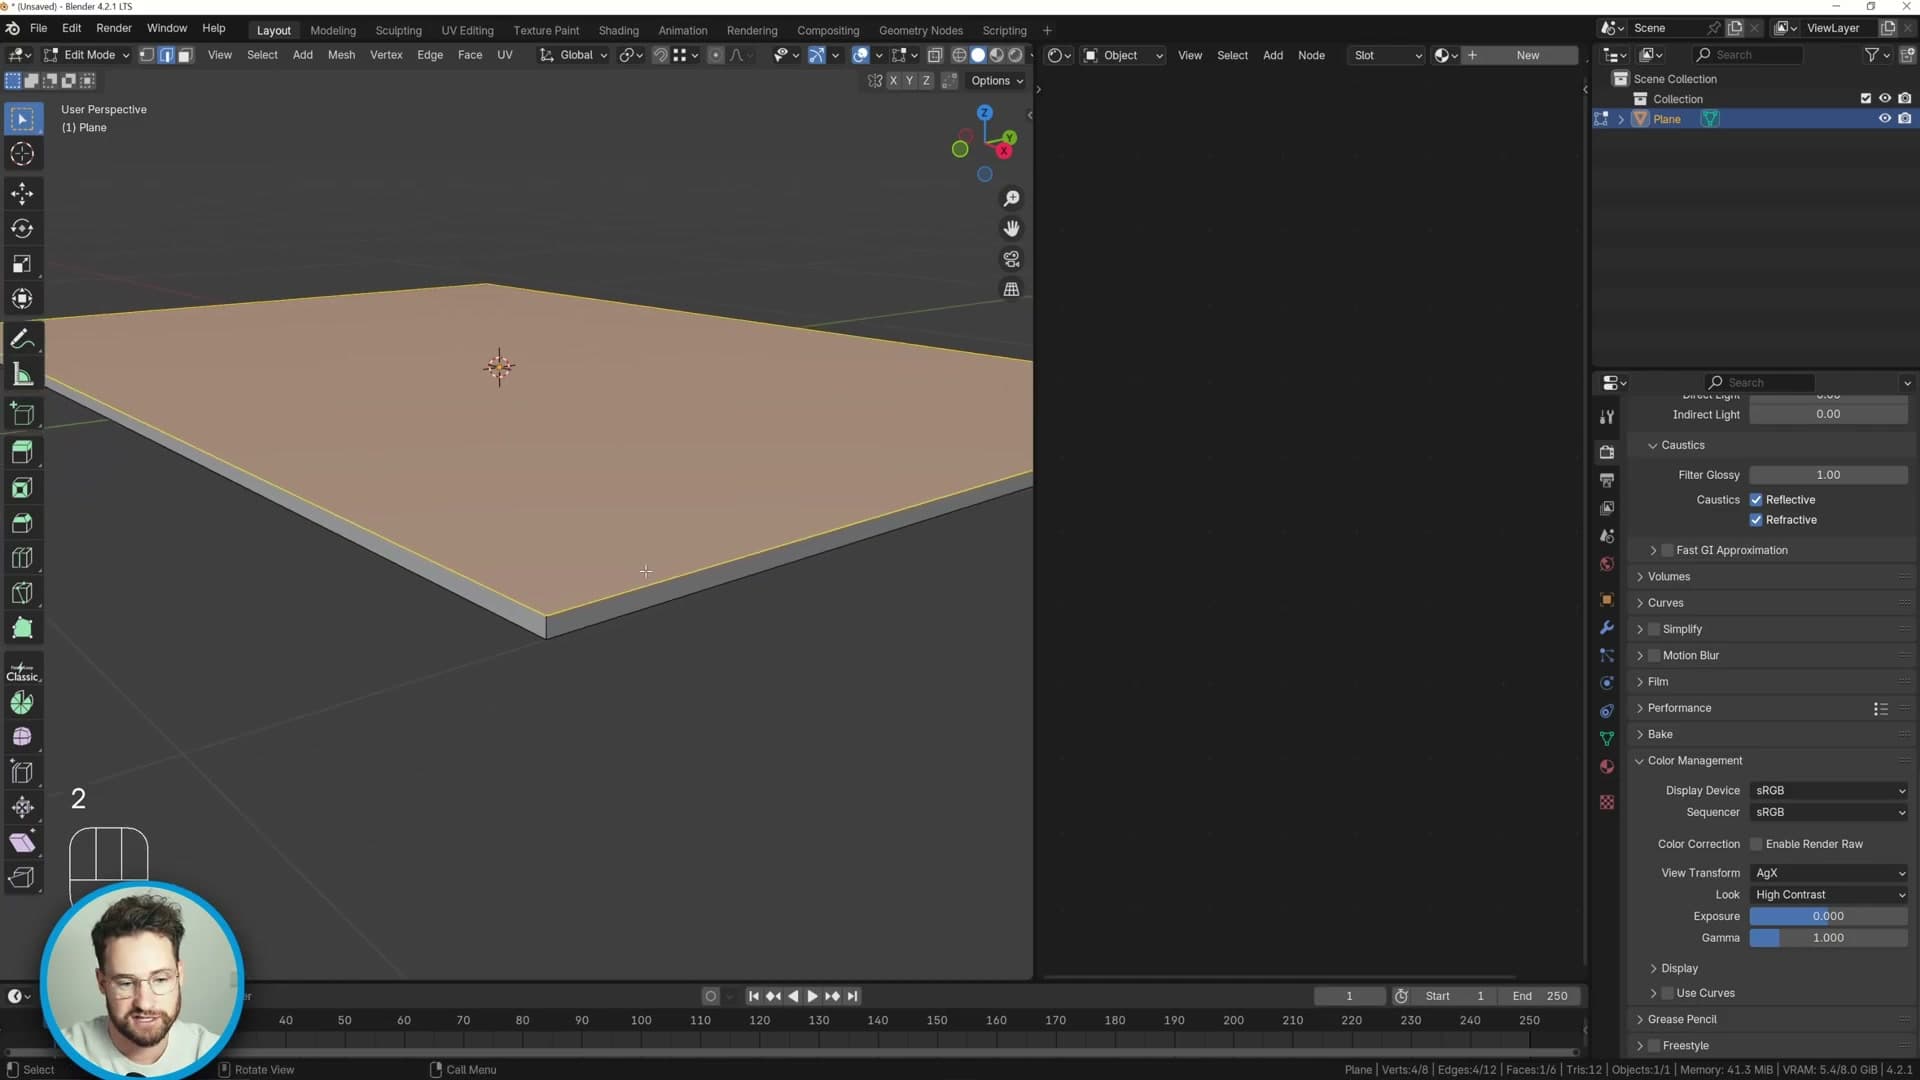
Switch to edge mode with 2, then ring-select the band of top edges that runs all the way around the rug. Press Ctrl+B to bevel that ring, and scroll the mouse wheel during the bevel to add a couple of segments so the corner softens into a rounded radius rather than a hard chamfer.
Select the bottom of the form and bevel its edges in the same way to take the hardness off that side too. The face on the very base can then be deleted. It'll sit flush against the floor in the final scene and isn't worth carrying as geometry.
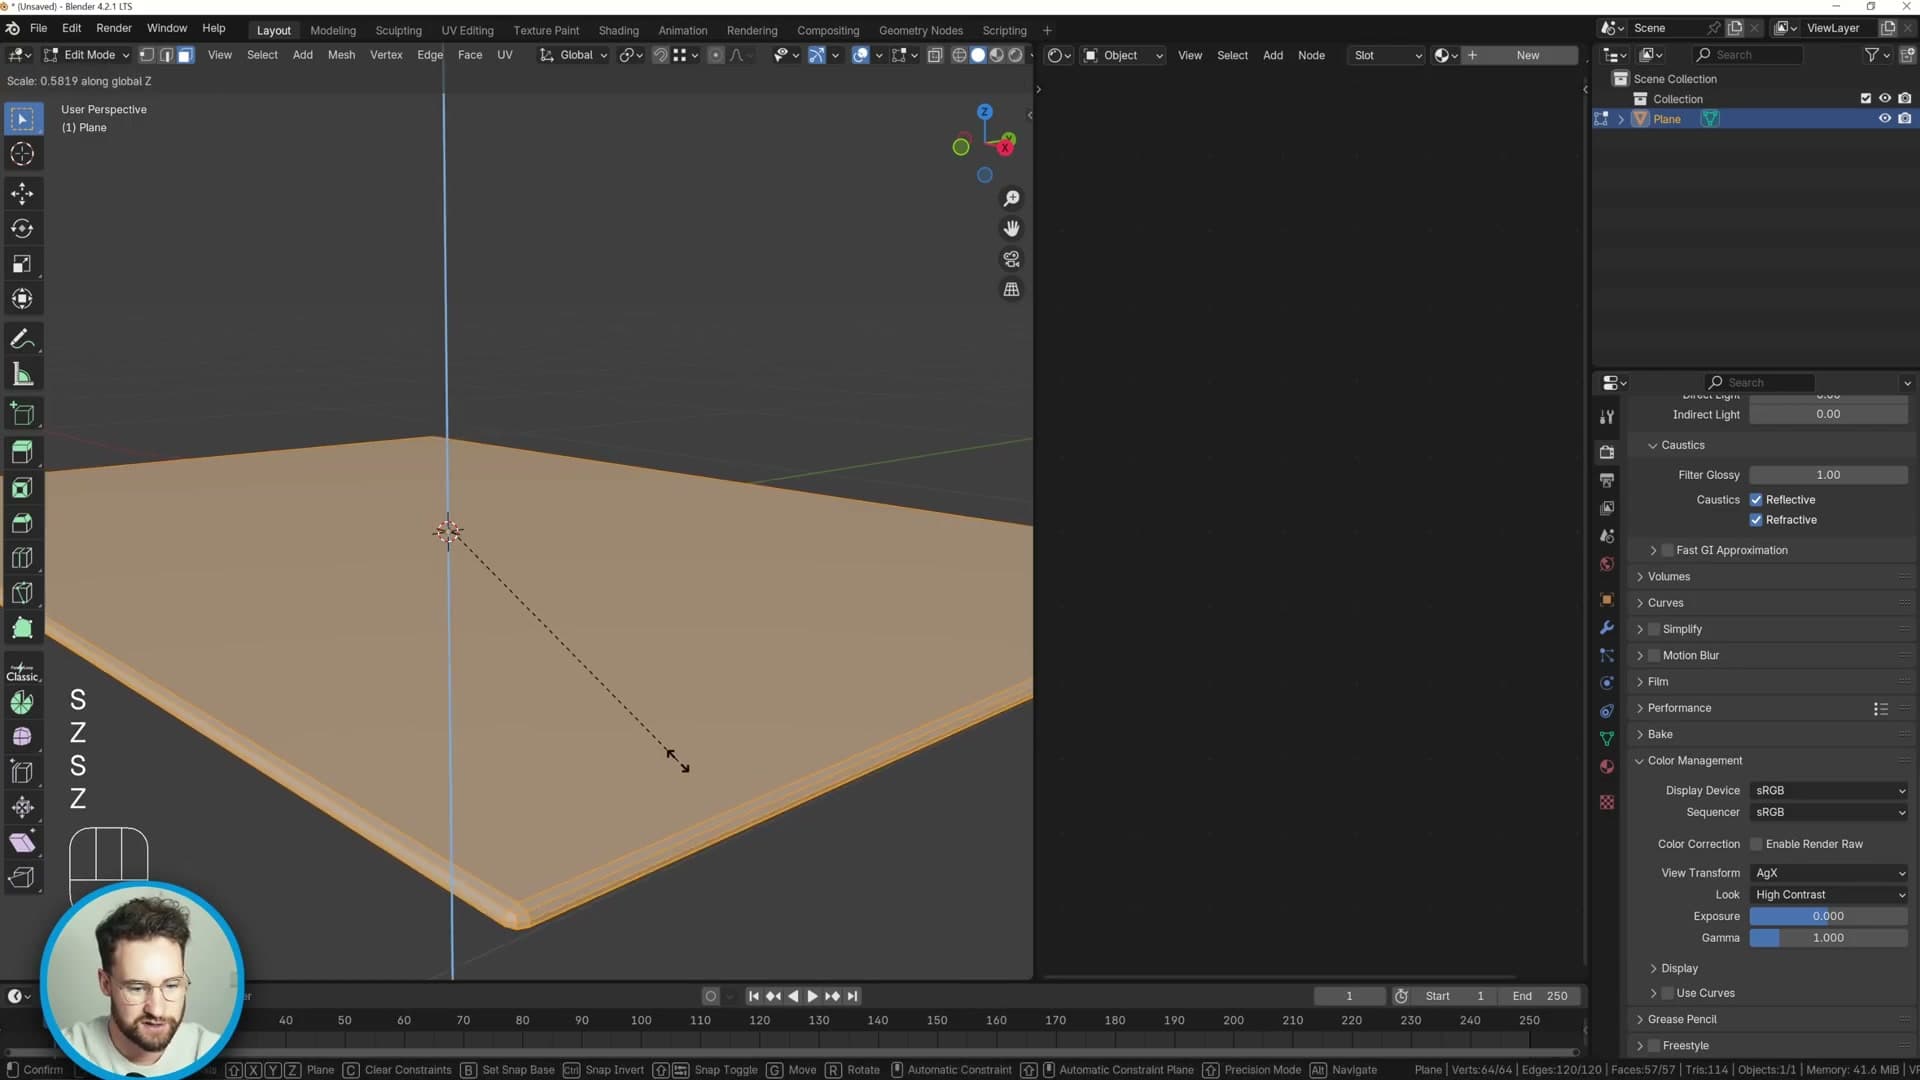
If the rug feels too thick, press A to select everything and scale it down on the Z axis. Finish the base by running a handful of horizontal loop cuts through the side wall. They give the next step somewhere to push and pull against.
Shade smooth and lift the corners
Right-click and shade smooth so the bevels read as soft curves rather than faceted segments. In an earlier version of this scene a Displacement modifier was layered on at this point to add some macro variety, but you can skip it here. The fur sitting on top will introduce all the variation the rug needs.
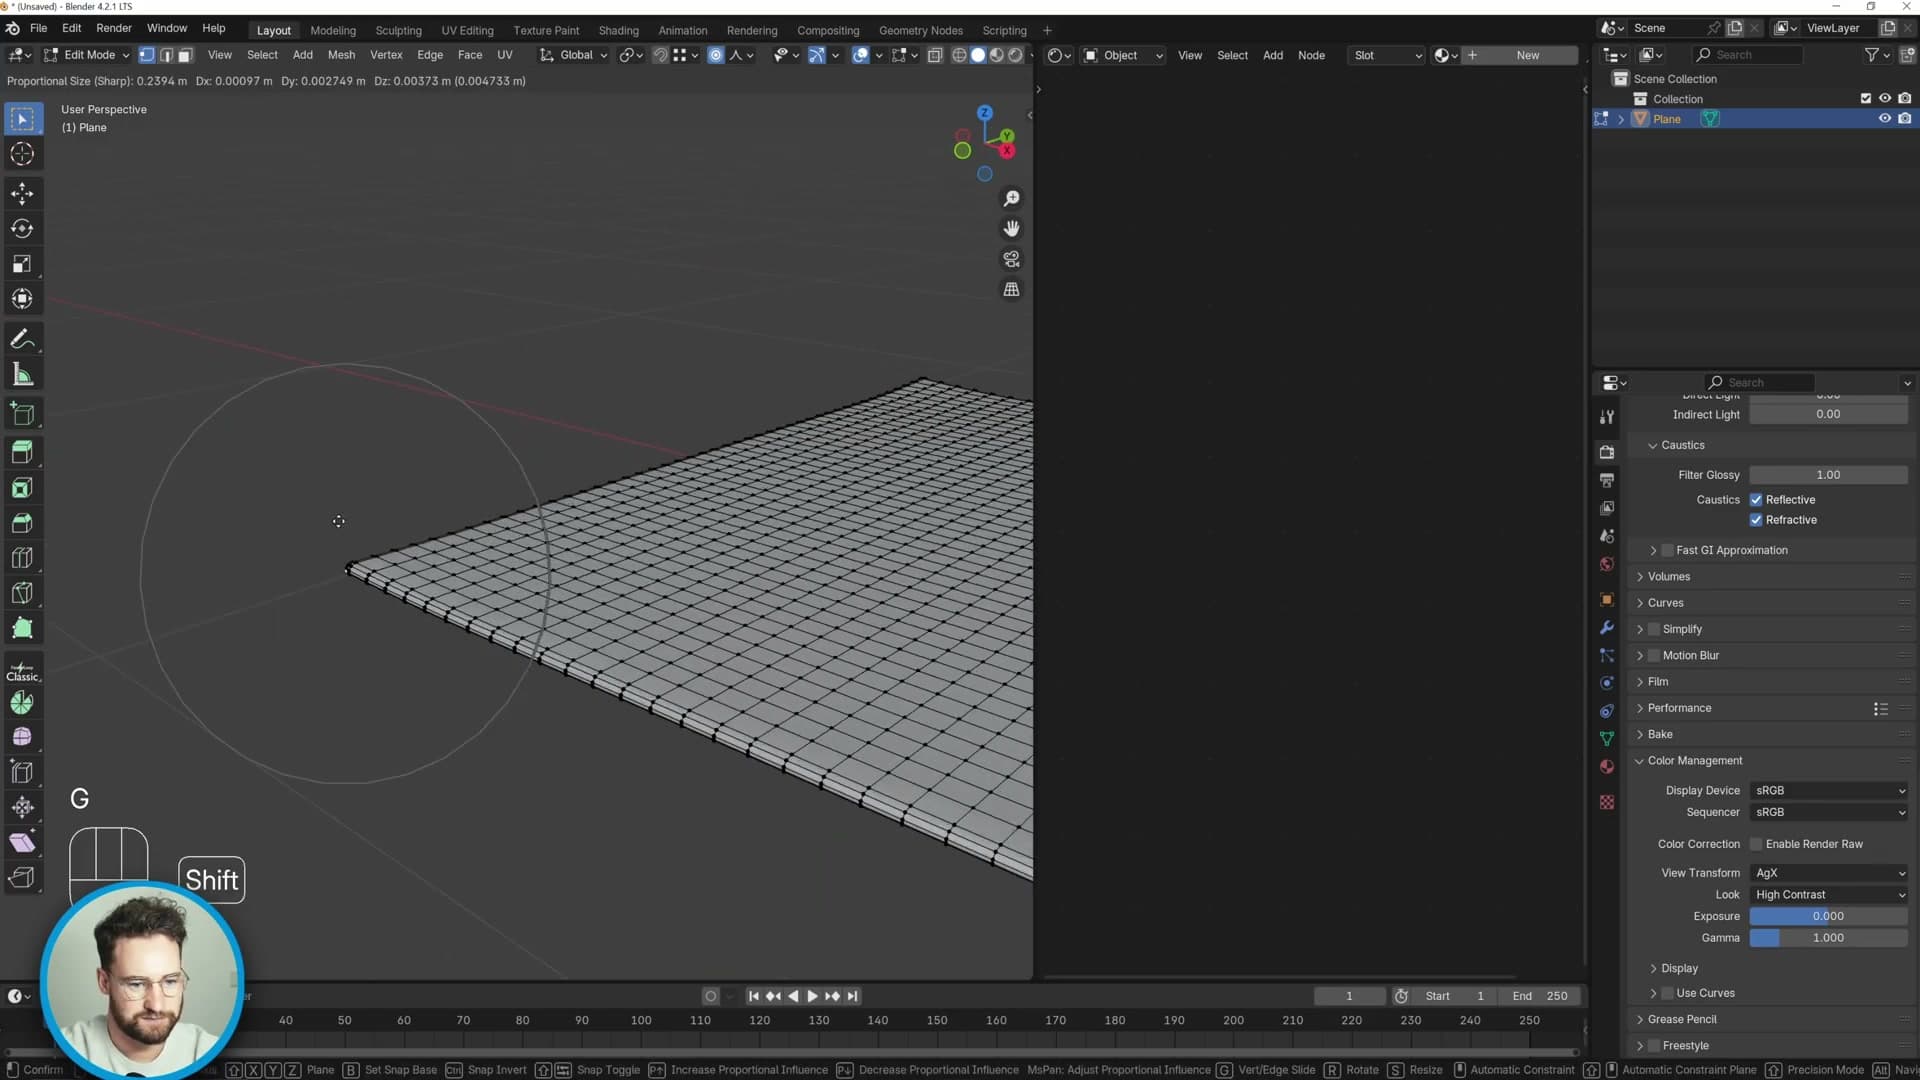
Drop back into edit mode and press O to enable proportional editing, then set the falloff to Sharp. Hit 1 for vertex select, grab the corner vertices and nudge them upward by a tiny amount. Real rugs rarely lie perfectly flat against the floor, so this small lift at the corners reads as natural the moment the fur is sitting on top.
Rename the object to rug in the outliner so it's easy to spot once the fur, modifiers and geometry nodes start stacking up.
Adding the Curves > Fur system
Adding the built-in fur curve, fixing the 'invalid UVs' warning by unwrapping the rug mesh, and scaling the UVs to cover the full surface so the fur emits evenly.
Shift+A > Curve > Fur
With the base mesh ready, you can drop the built-in fur system onto it. Hit Shift+A, hover over Curve, and click Fur. Blender drops in a long, chaotic-looking cloud of strands. That wild default is expected. The guides, modifiers, and brush settings haven't been tuned yet, so every surface variable is at its initial value.
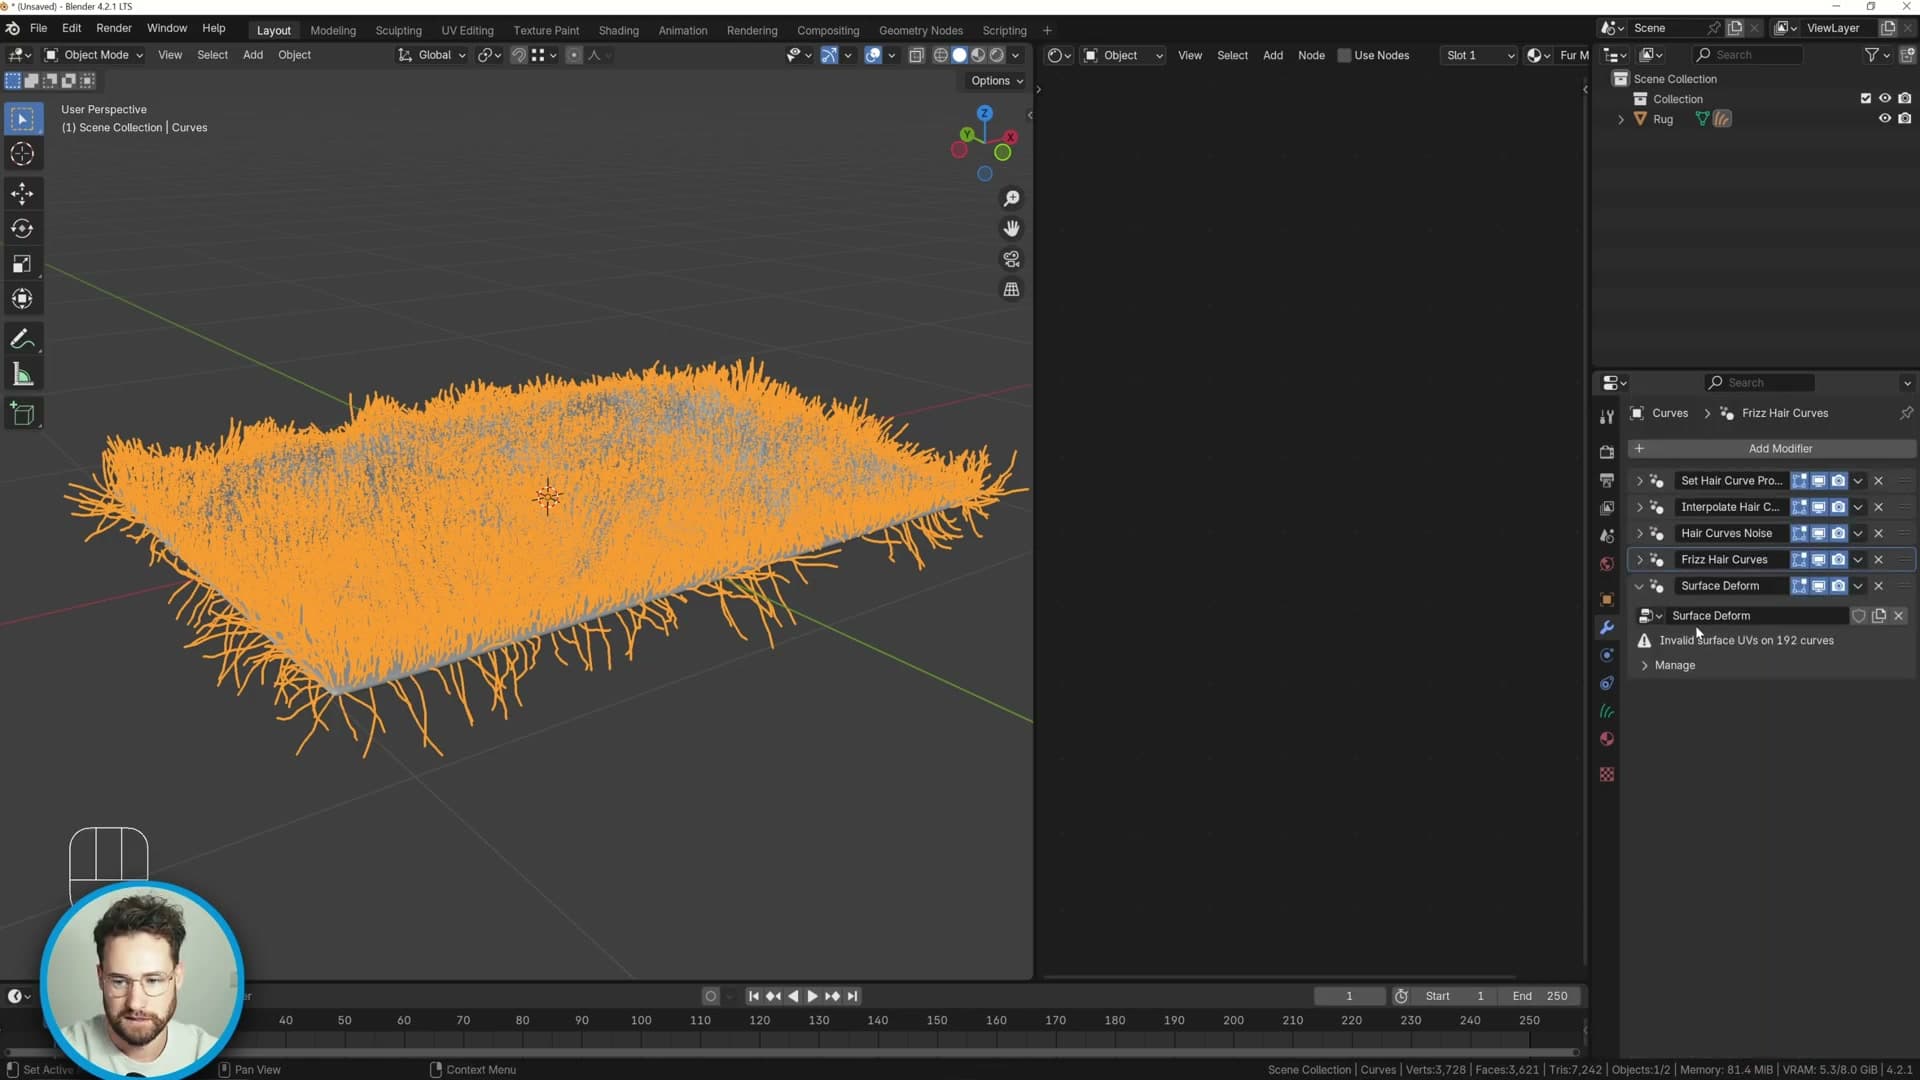
Open the modifier stack on the new curves object and you'll see Blender has already wired up the full chain of essentials modifiers that ship with the fur asset. That's the toolkit you'll be reaching into for the rest of the build: noise, frizz, clump, interpolate hair curves, and the rest.
Look closely at the top of that stack and you'll notice a warning: invalid UVs on 192 curves. The fur curves expect a UV map on the underlying mesh so they can sample a surface coordinate, and the rug plane hasn't been unwrapped yet. That's the next thing to fix before doing anything else.
Unwrap and scale the UVs
Jump back to the rug mesh and tab into edit mode. Press A to select everything, then U and choose Unwrap. That immediately clears the invalid-UV warning on the curves object. The surface now has coordinates the fur system can read.
The unwrap on its own isn't enough though, because the UV island sits in a small region of UV space by default and the 2D cursor lives at the origin. Open the UV editor and press A to select all the UVs. Set the pivot point to 2D Cursor, then press S, X and scale the island outward so it covers the full UV bounds. With the UVs stretched across the surface, the fur emits evenly across the whole rug rather than bunching up in a corner.
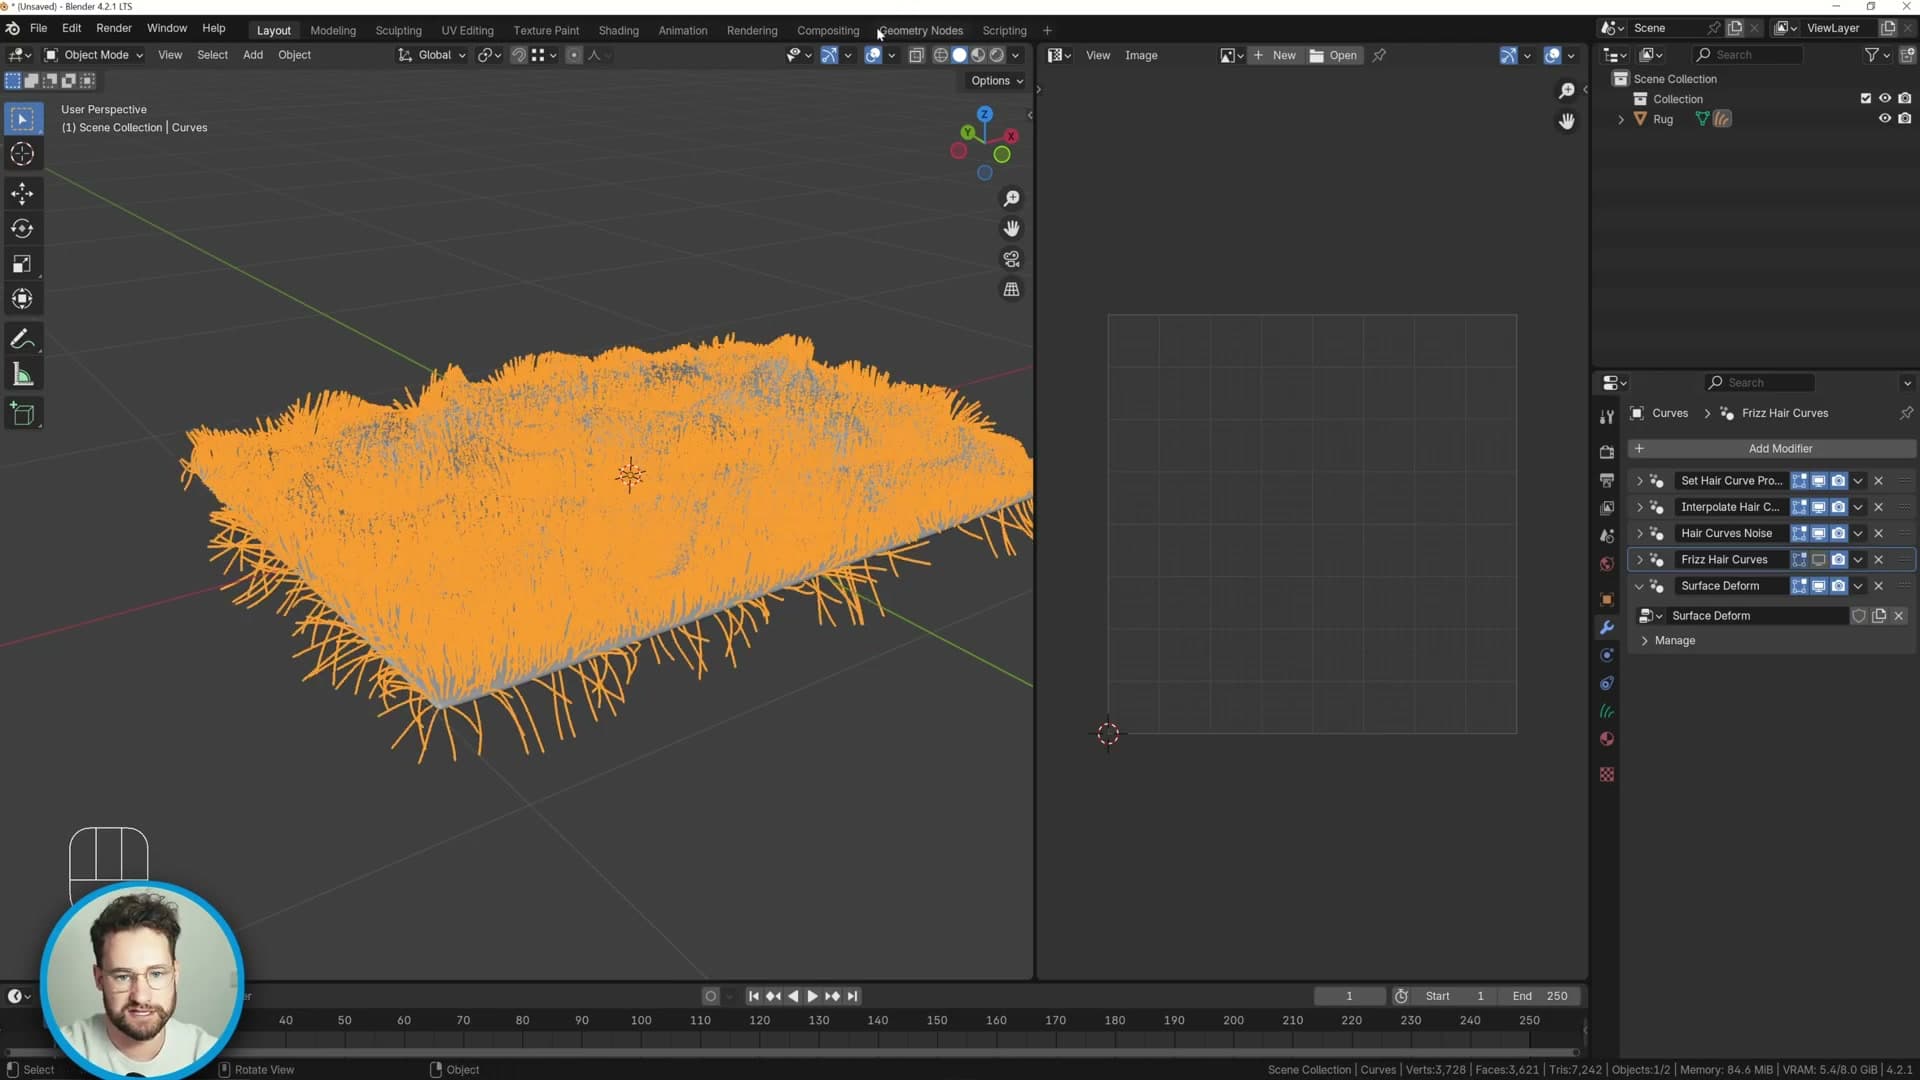
Back on the curves object, you can now toggle the modifier checkboxes to see what each one does in isolation. Disable Frizz and the strands settle down; disable Noise on top of that and the surface becomes completely flat. That's the starting point (100% flat fur) before you start dialling in guides and tuning the modifier stack.
Understanding fur guides
Each guide drives the surrounding hairs when you comb. Reducing to a single guide, then incrementally painting more, makes it clear how guide density determines how much control you have.
Reduce to one guide and comb
Drop into sculpt mode with the fur turned on and you'll see a scatter of tiny white markers sitting on the rug surface. These markers are the guides. They're what you actually paint and brush in sculpt mode, not the densely interpolated hairs that get rendered around them. The cleanest way to understand what a guide does is to strip the rug back to just one.
Pick up the delete-curves brush, set its size so it covers plenty of ground in a single stroke, and switch the viewport to wireframe so the markers are easier to spot against the geometry. Sweep across the rug until only a single guide is left. As a side effect, removing the offending guides clears any lingering invalid-UV warnings from earlier. The system is happy again with only one valid guide on the surface.
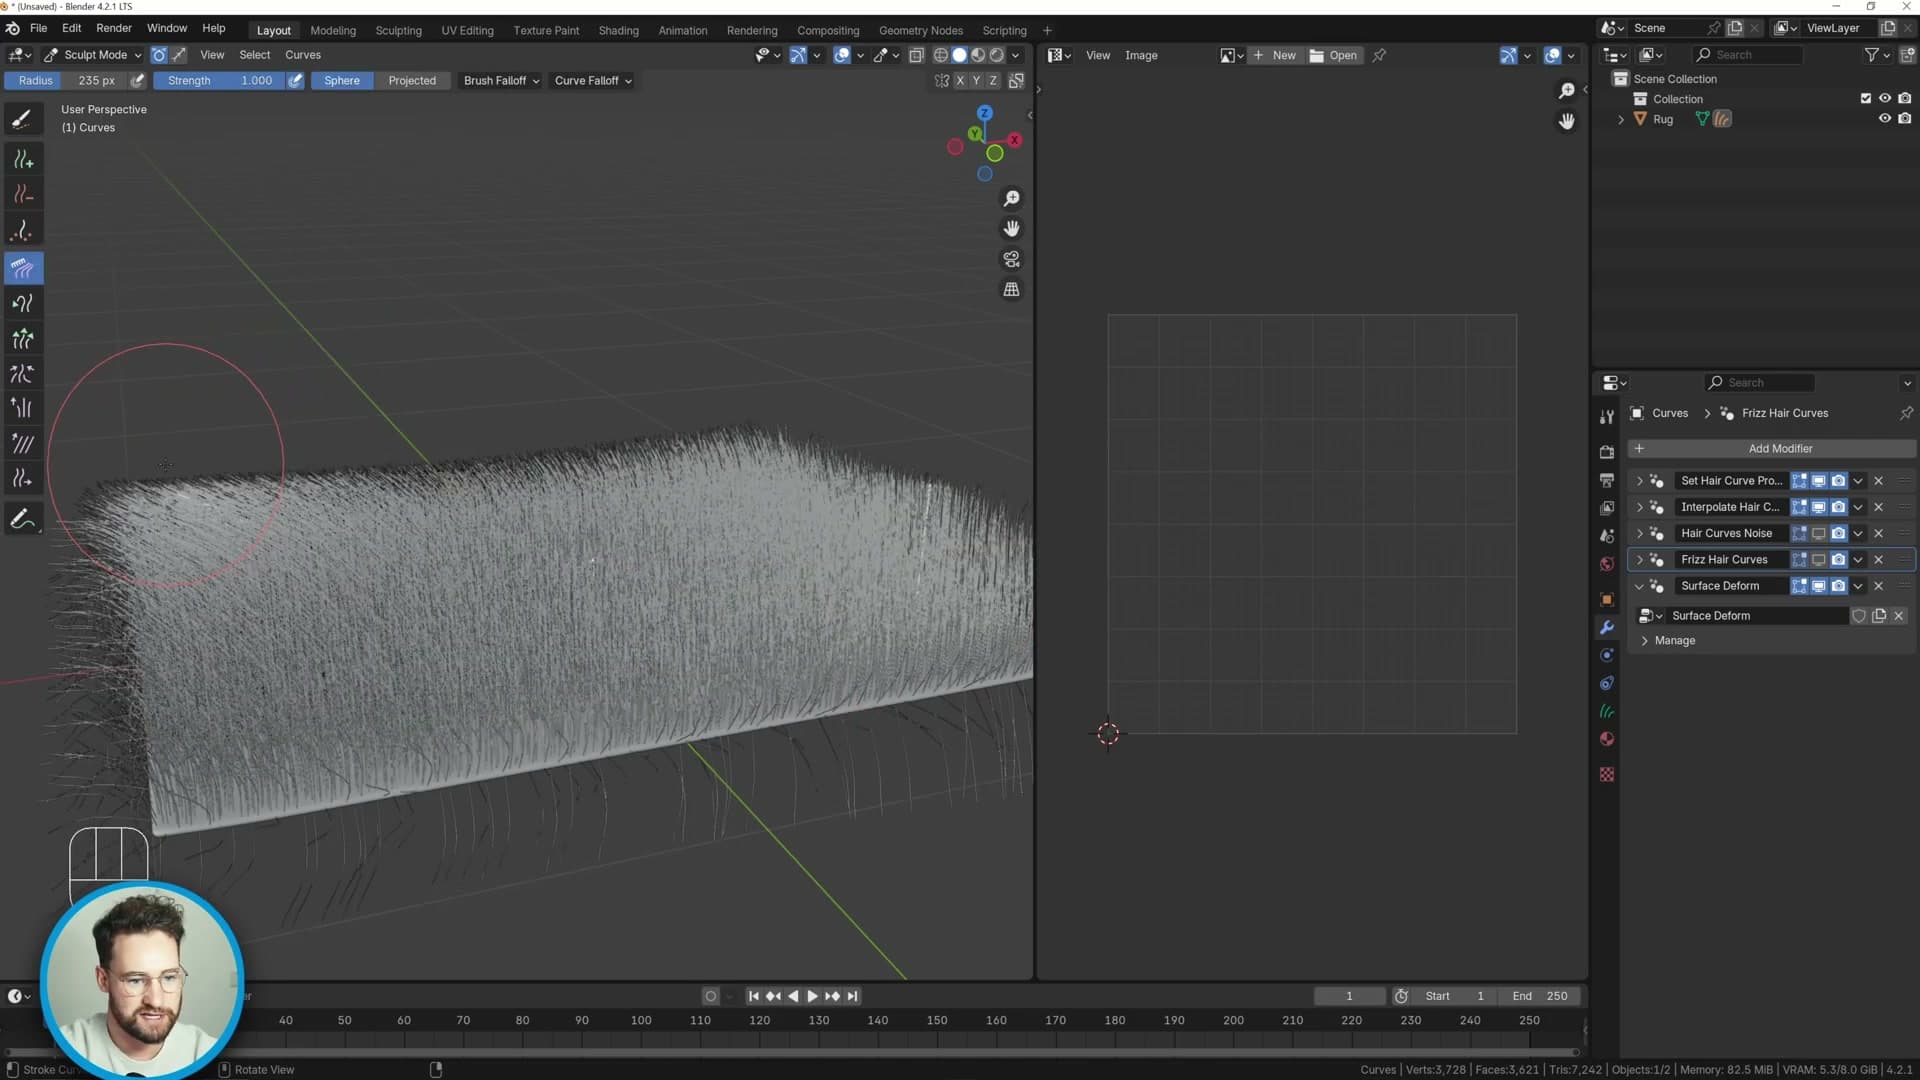
Switch back to solid view and pick up the comb brush. Run it over the lone guide and you'll see every hair in the surrounding patch follow along: that one guide is telling all of the interpolated hairs around it which way to lie. Click in another spot to add a second guide, then a third, and comb each one in a different direction. Each new guide owns its own area of influence. The hairs near it follow it, and the hairs near the next guide follow that one instead.
The takeaway is that combing always happens through the guides. The more guides you paint, the more independently you can steer the fur from one part of the rug to another. Too few and large areas of the surface have nothing to follow; just the right number and you can comb the rug patch by patch with confidence.
Add density with a count of 50
With the principle understood, clear the rug back to nothing and start the guide layer properly. Before painting anything new, drop the Add Curves brush's length down to 0. For a rug you don't want long fur grown manually from each click, because the modifiers further down the stack will be doing the lengthening for you.
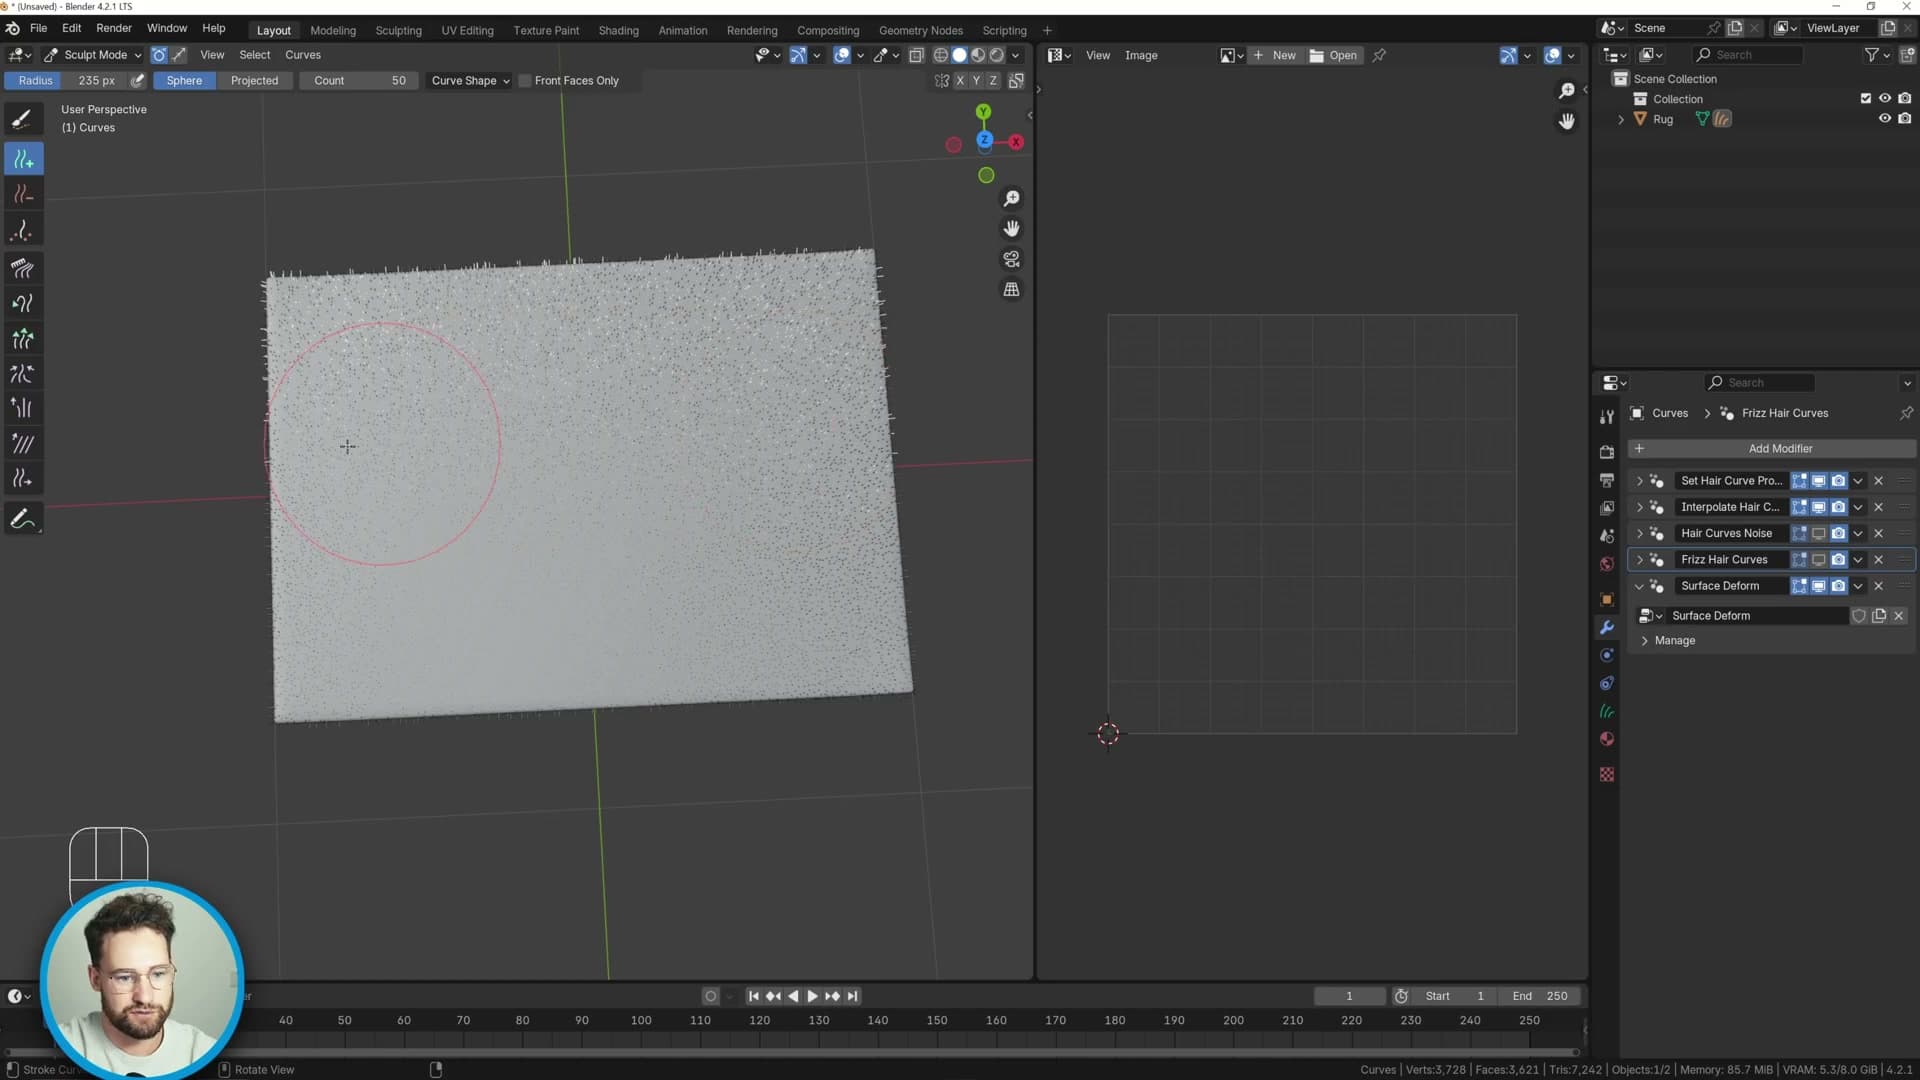
Set the brush count to 50 and paint evenly across the top of the rug. Aim for a uniform spread rather than thick patches in one corner and bare ground in another: a consistent scatter everywhere is what gives the comb brush something to bite into across the whole surface later.
Once the rug has an even layer of guides across it, swap back to the comb brush. You'll find it now responds wherever you brush. Every part of the rug has enough guides nearby to translate your stroke into a coherent direction for the hairs around them.
Edge guides and density
The default brush leaves the rug sides under-served. Using line stroke mode and orthographic side views, extra guides are painted along the edges so the fur on the rim has something to comb against.
Orthographic view with line stroke
Once you start combing from above, you'll notice the fur along the rug's outer edges barely reacts. The reason is geometric: when you brush across the top face, the cursor footprint is small relative to the rug surface, but the same brush hovering over a thin edge band suddenly dwarfs it, so the density of guides along the rim ends up far lower than across the middle. Without extra guides hugging those edges, the fur on the perimeter has nothing local to comb against and stays stuck to the ground.
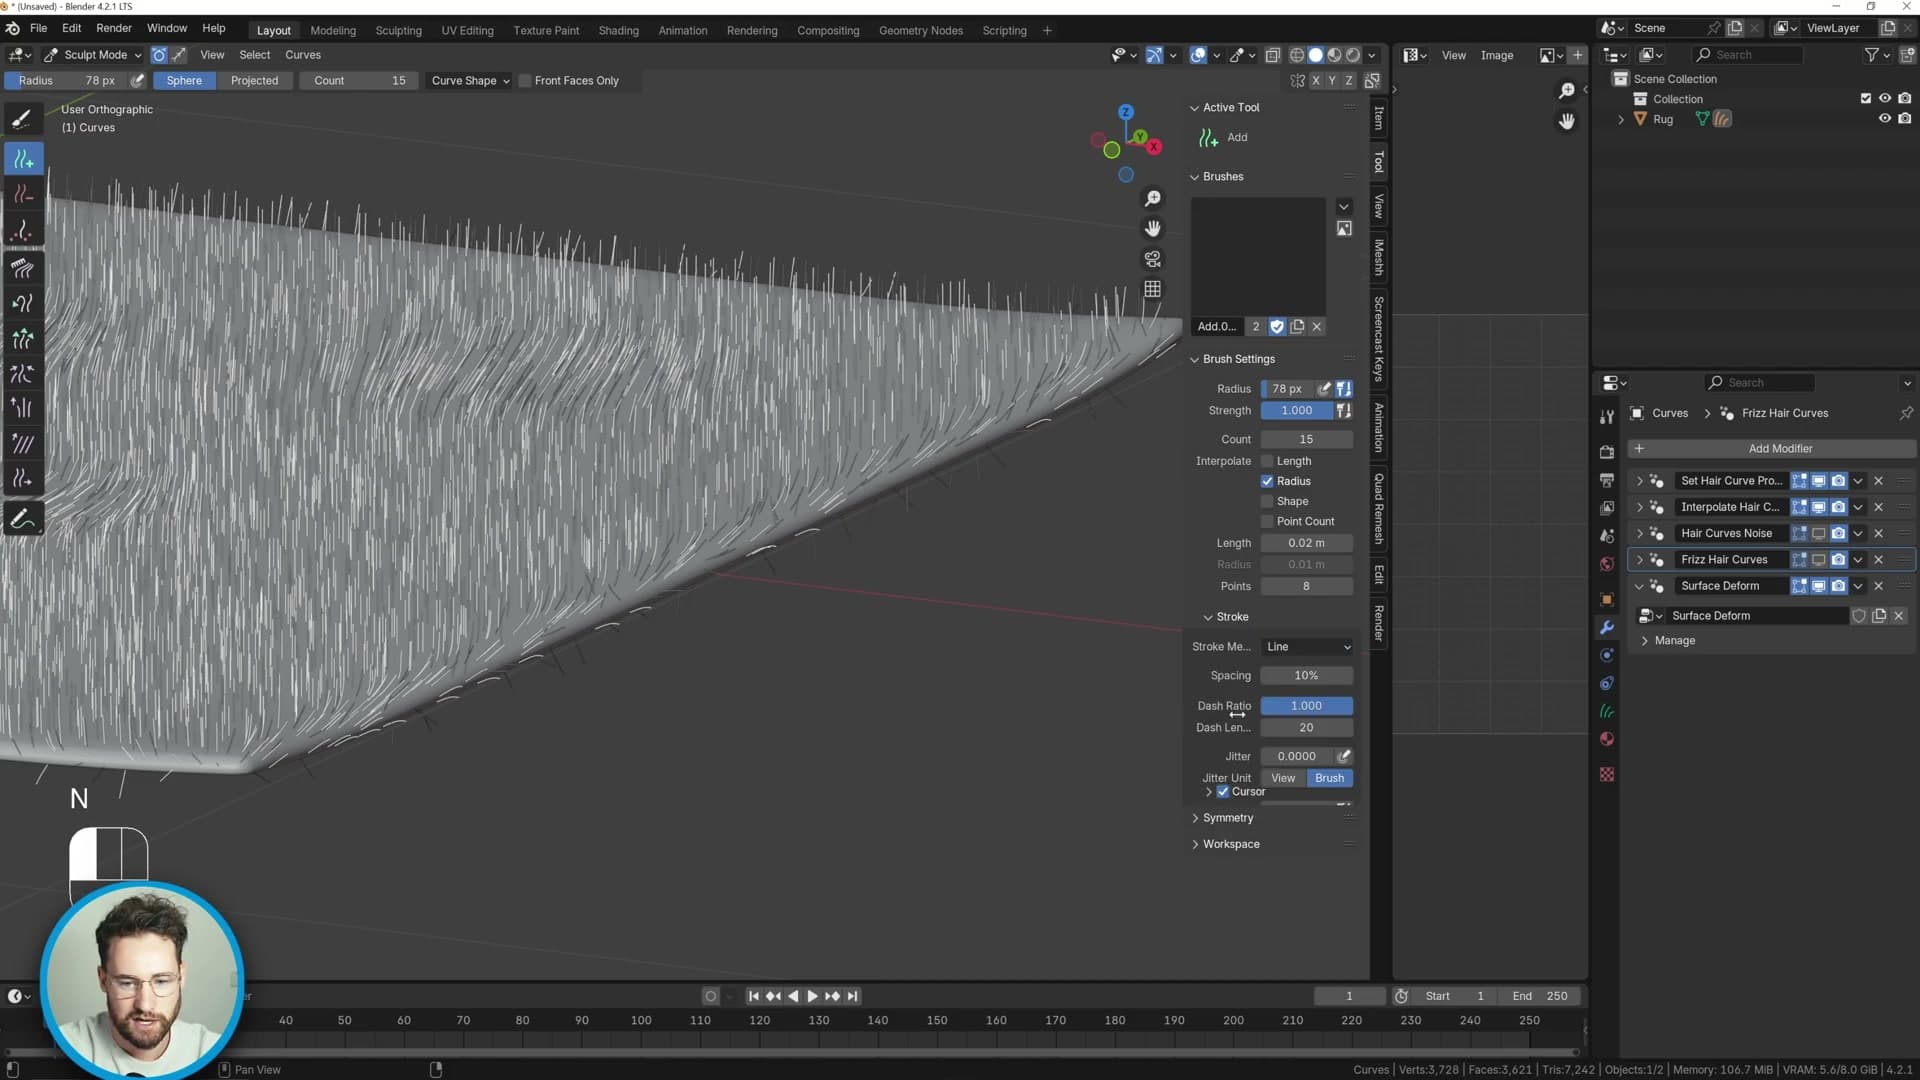
To fix this, press 5 to drop into orthographic view and line yourself up with one side of the rug. Switch back to the Add Curves brush and bring the Count down. Around 30 works as a starting point, and you can drop it as low as 15 if you only need a sparse top-up along a single edge. You want enough new guides to cover the rim, but not so many that you swamp the existing groom.
Open the N panel, expand the Stroke section, and set the Stroke Method to Line. Instead of free-handing a smear of guides, you now click once at one end of the rug edge and once at the other, and the brush deposits a single straight pass of guides between the two points. From the orthographic side view, draw a line that runs from the top of the rug down to the very bottom so the new guides span the full edge profile.
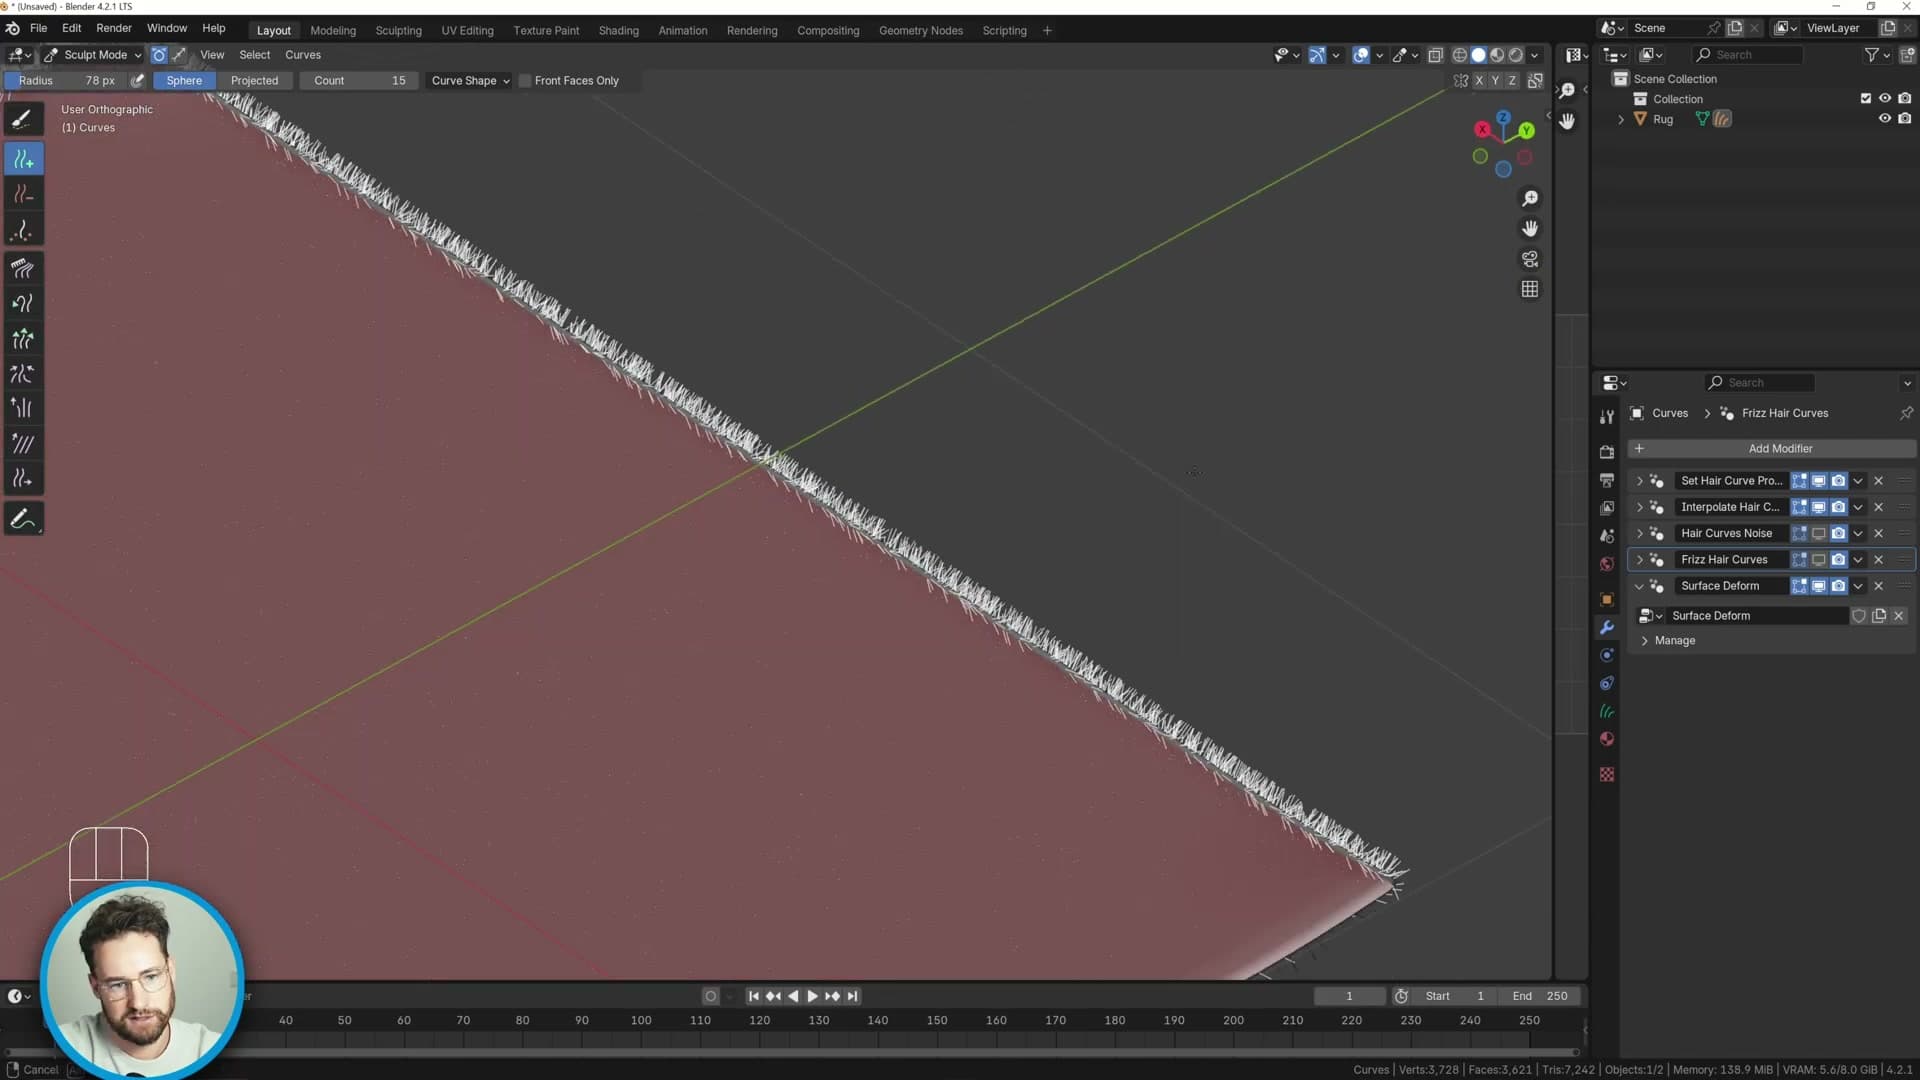
Repeat the same line stroke on the remaining three sides, rotating the orthographic view each time. When you're done, every edge of the rug carries its own row of guides. The rim now has something to bite into when you go back to combing.
Combing the fur
Switching the comb brush to Projected, pushing edge hairs off the floor, increasing Interpolate Hair Curves to 25,000, and randomising the top surface for a natural look.
Projected comb pushes edges off the floor
With enough guides standing up around the edge of the rug, it's time to start steering them. Click the comb brush and switch its falloff mode to Projected. Projected combing tells the brush that the hairs shouldn't be allowed to pass through the floor. Anything you push will be lifted along the surface normal rather than dragged into the geometry below.
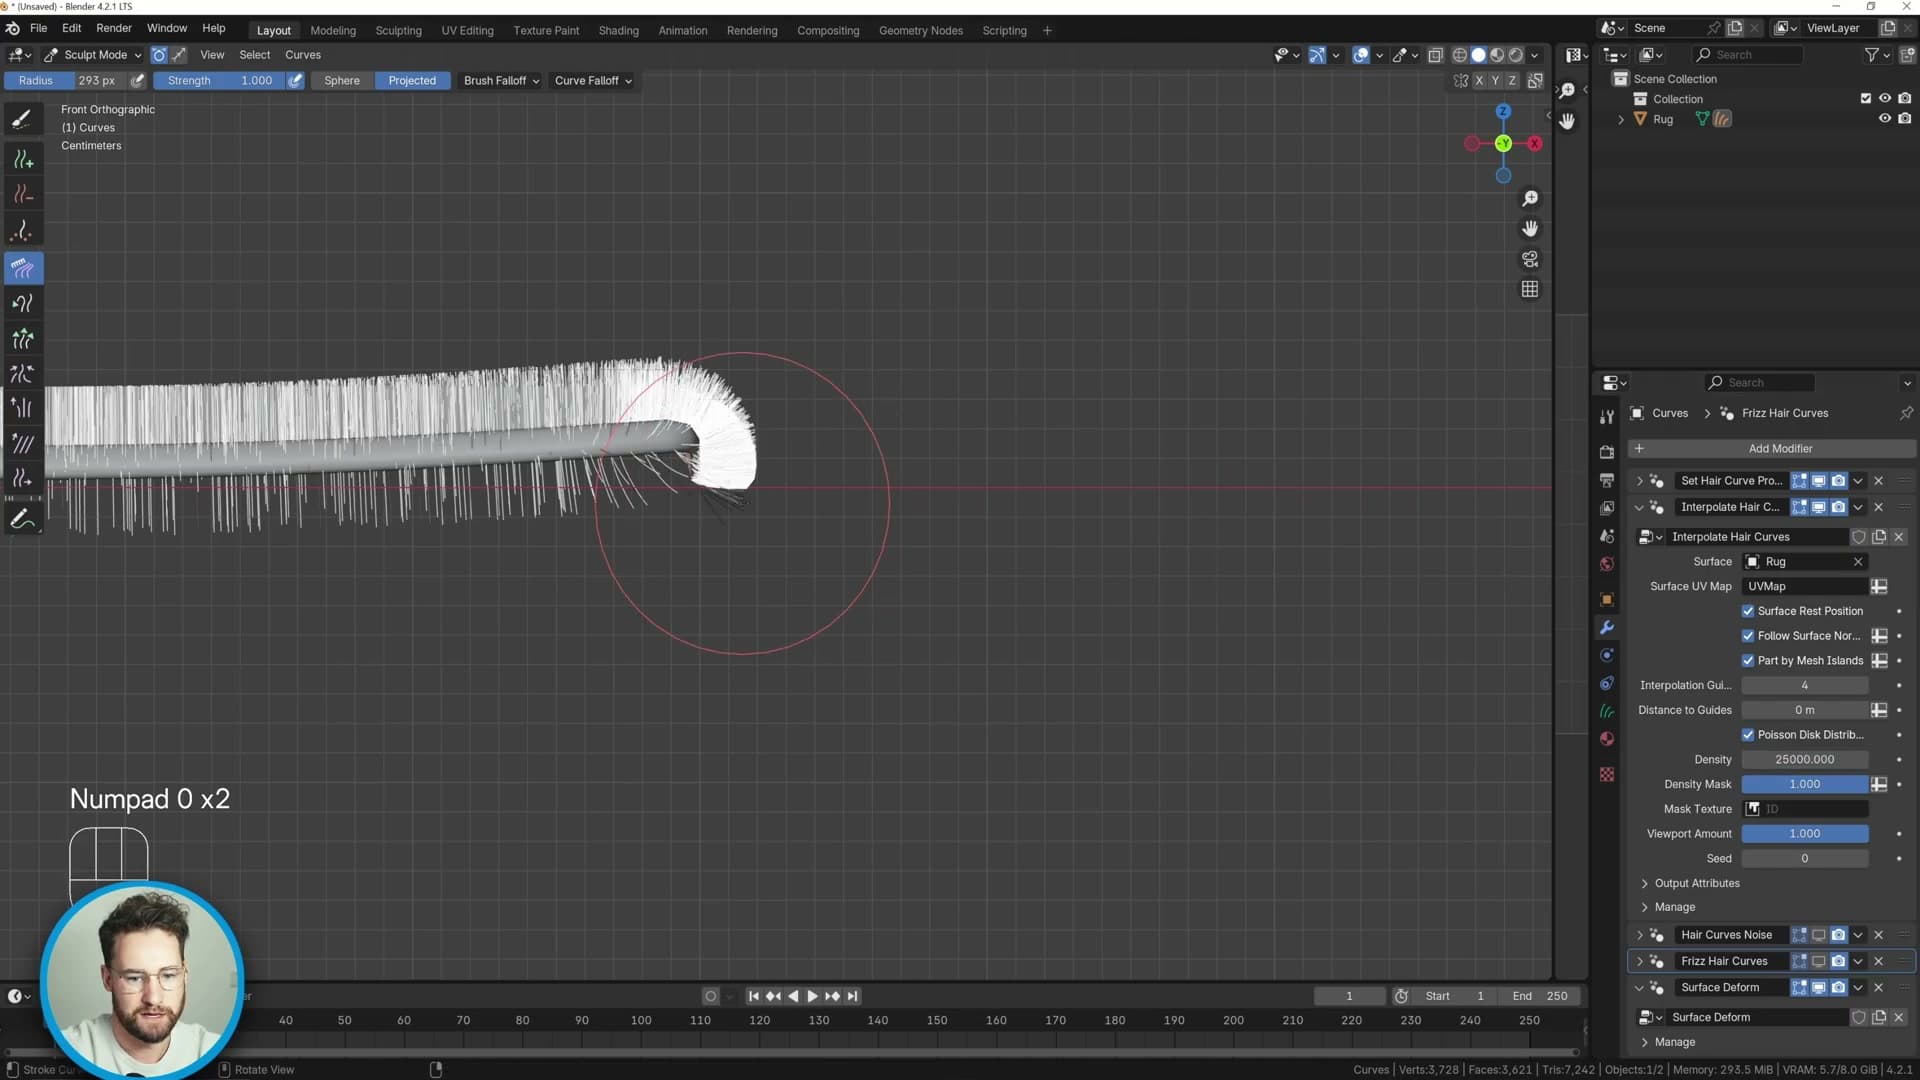
Swing the viewport round to a side view and brush the edge hairs upward. They flick up off the ground in clean strokes and stay there. Side-on is the angle you want for this pass. Combing edge hairs from above tends to flatten them, but from the side you can clearly see which strands are still poking through the floor and lift them out.
Increase Interpolate Hair Curves
Once the guides along the side are pointing in roughly the right direction, jump to the Interpolate Hair Curves modifier and push the count up to 25,000. The viewport instantly fills in with dense, soft fur built from the handful of guides you've placed.
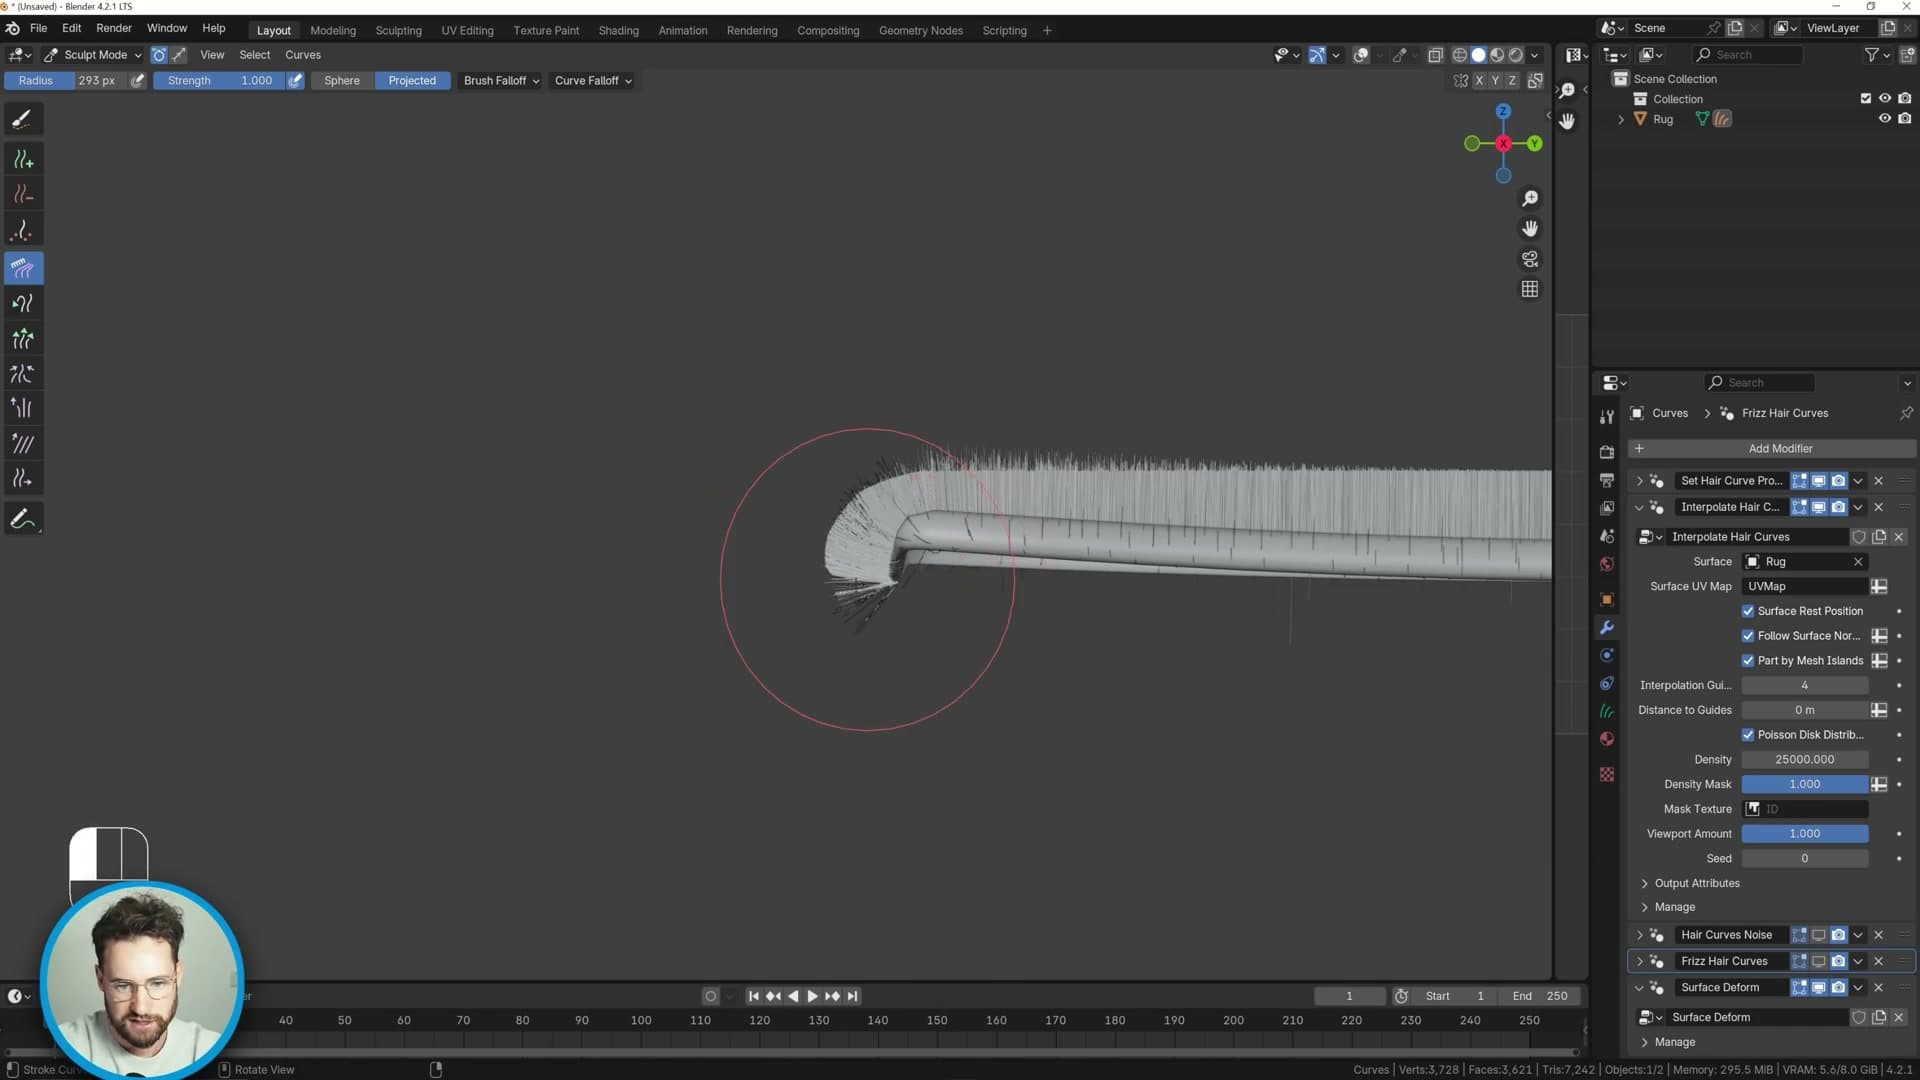
You'll see a few stray strands still passing through the floor, but don't worry about chasing every one. The vast majority are pushed cleanly away from the ground, and the odd outlier vanishes inside the surrounding clump. It's not worth combing each individual hair to fix it.
Randomise the top surface
With the edges sorted, comb across the whole top surface to break up the uniform look. Be careful with your angle here: if you brush straight down from above, you'll flatten hairs into the rug and some will end up clipping through the geometry. Mix in regular trips back to the side view to lift them out again.
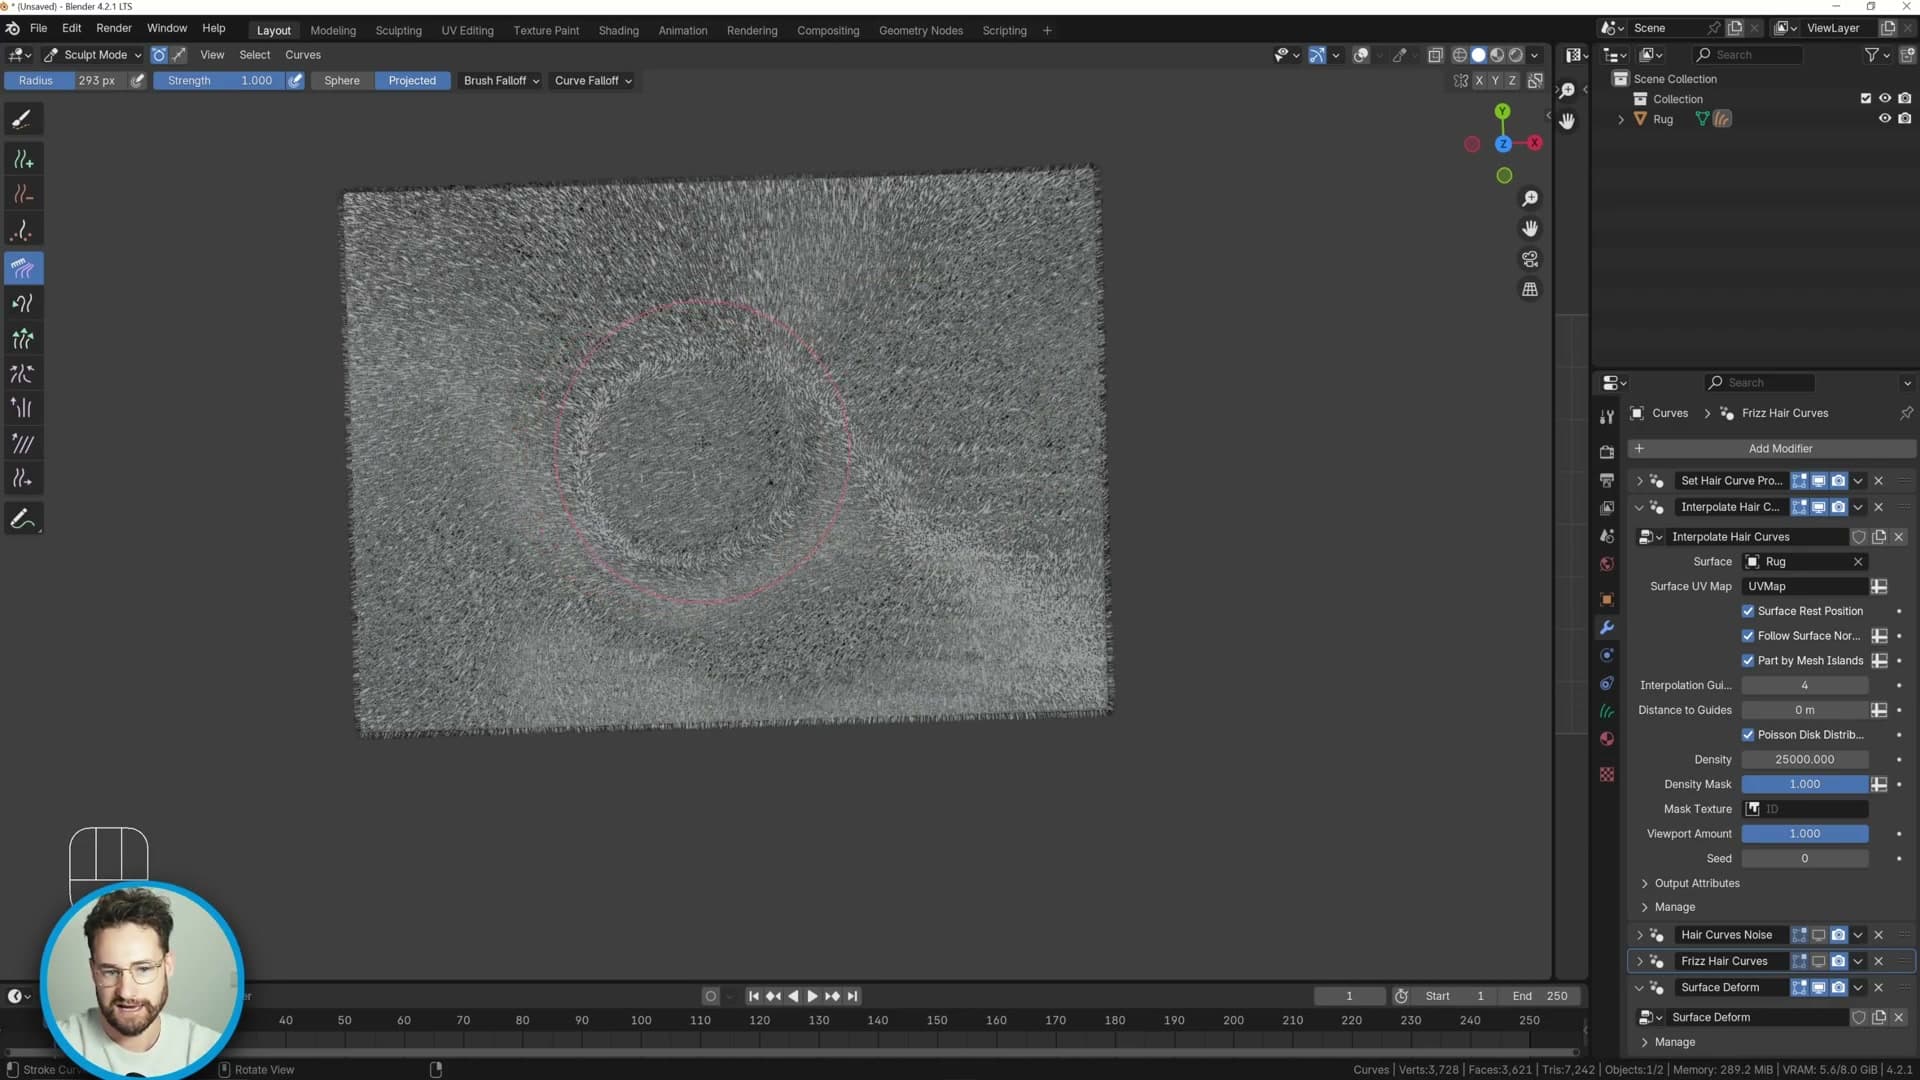
The goal is variety, not neatness. Brush over the surface in lots of different directions, almost randomly, so the fur ends up pointing every which way. Pile-style rugs in real rooms aren't combed uniformly. They have a lived-in, slightly chaotic top layer, and that's what you're trying to imitate.
If you spot strands dipping through the floor as you work, swing back to the side and gently pull them up. You can also use this stage to react to other objects in the scene later. Drop in a table or a chair and you can brush the fur out of the way around its legs. There's also a Puff brush worth knowing about: stroke over the surface and the hairs push away from one another, giving an extra bit of fluff to the top layer.
Noise and frizz modifiers
The built-in Noise modifier adds large-scale variation; Frizz adds the micro-randomness that real fibres have. Both need Preserve Length enabled to stop the fur shrinking.
Noise scale 0.75, strength 0.2
With the comb pass looking tidy, add a Noise modifier to break up the uniformity. Straight out of the box it's far too aggressive. The surface looks like static rather than fur, so the first thing you do is tame it.
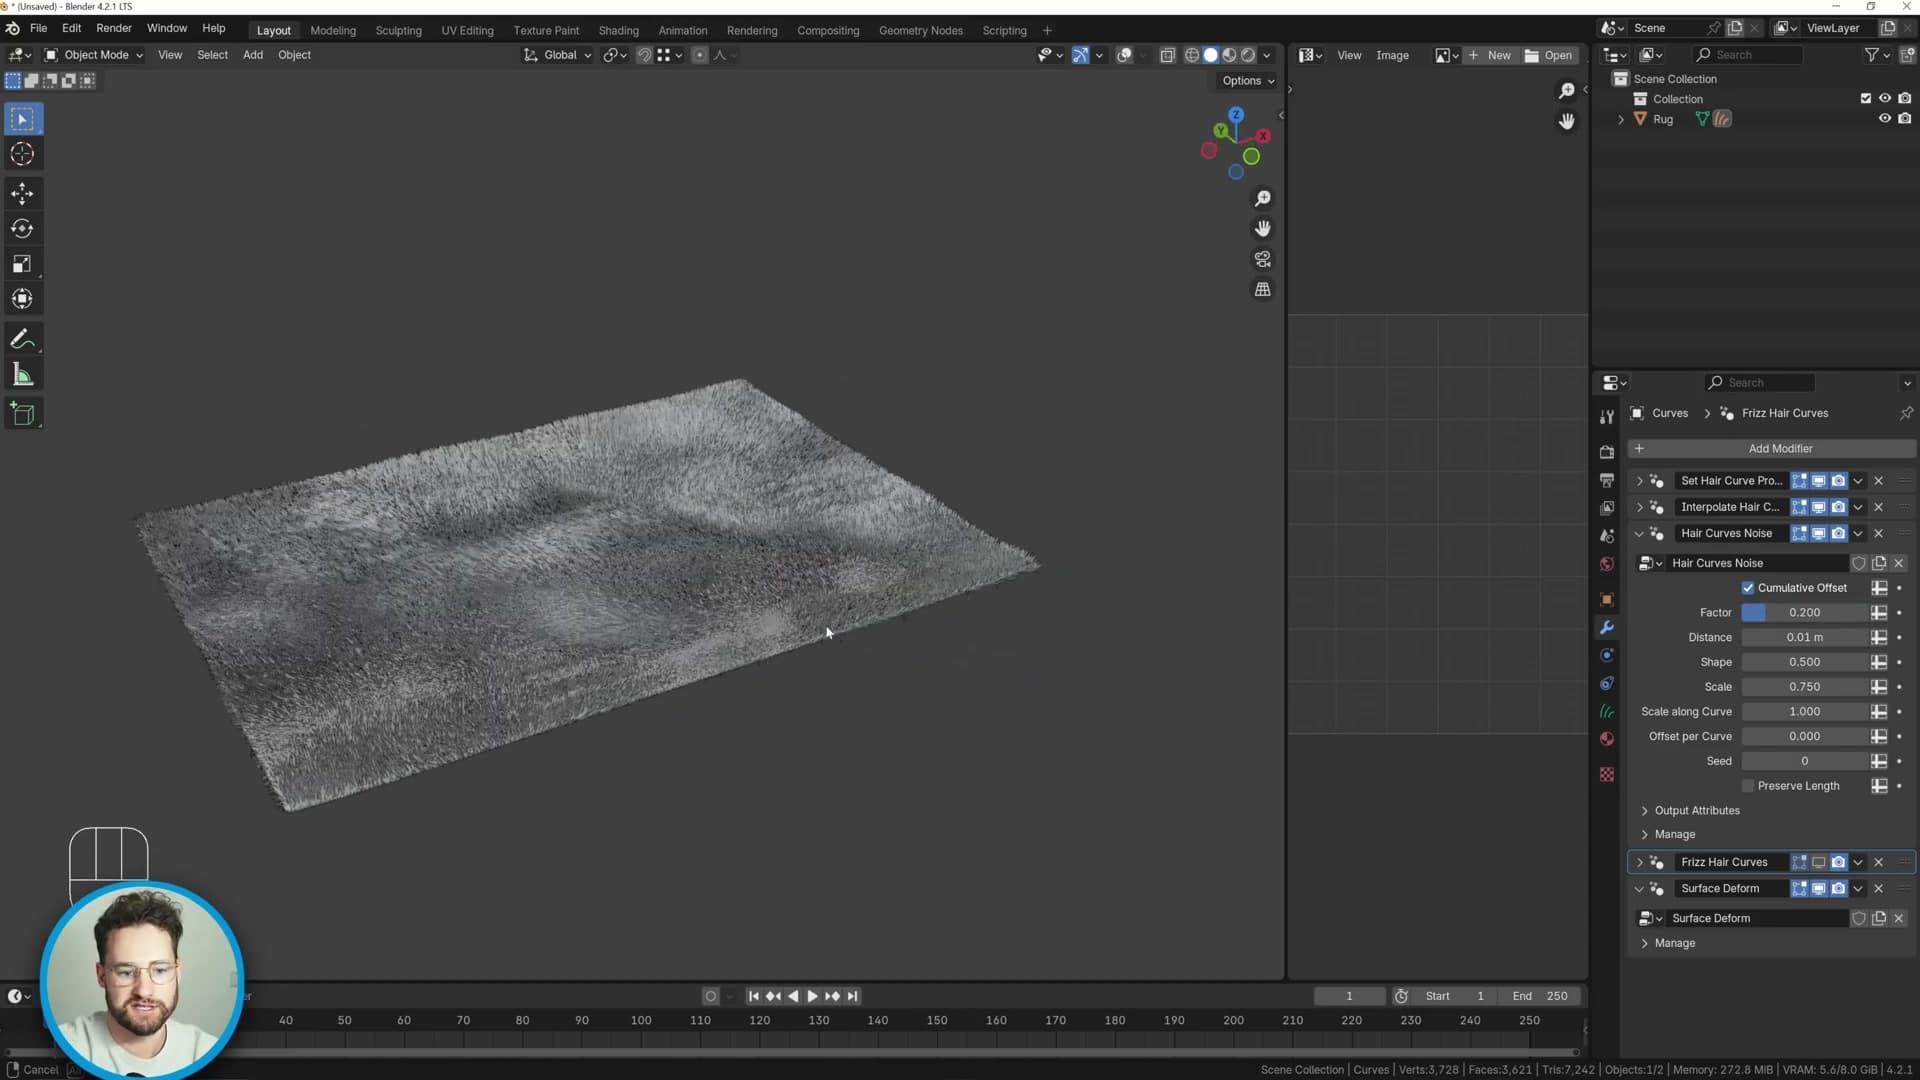
Drop the scale to 0.75 and the strength to 0.2. That's enough to add gentle, large-scale variation across the rug without undoing the direction you established while combing. The goal here isn't chaos; it's just a hint that no two strands are pointing in quite the same direction.
Frizz with Preserve Length
Next, add the Frizz modifier. This one is very powerful. It's where you finally get the small-scale chaos that makes hair read as hair rather than as a combed wig.
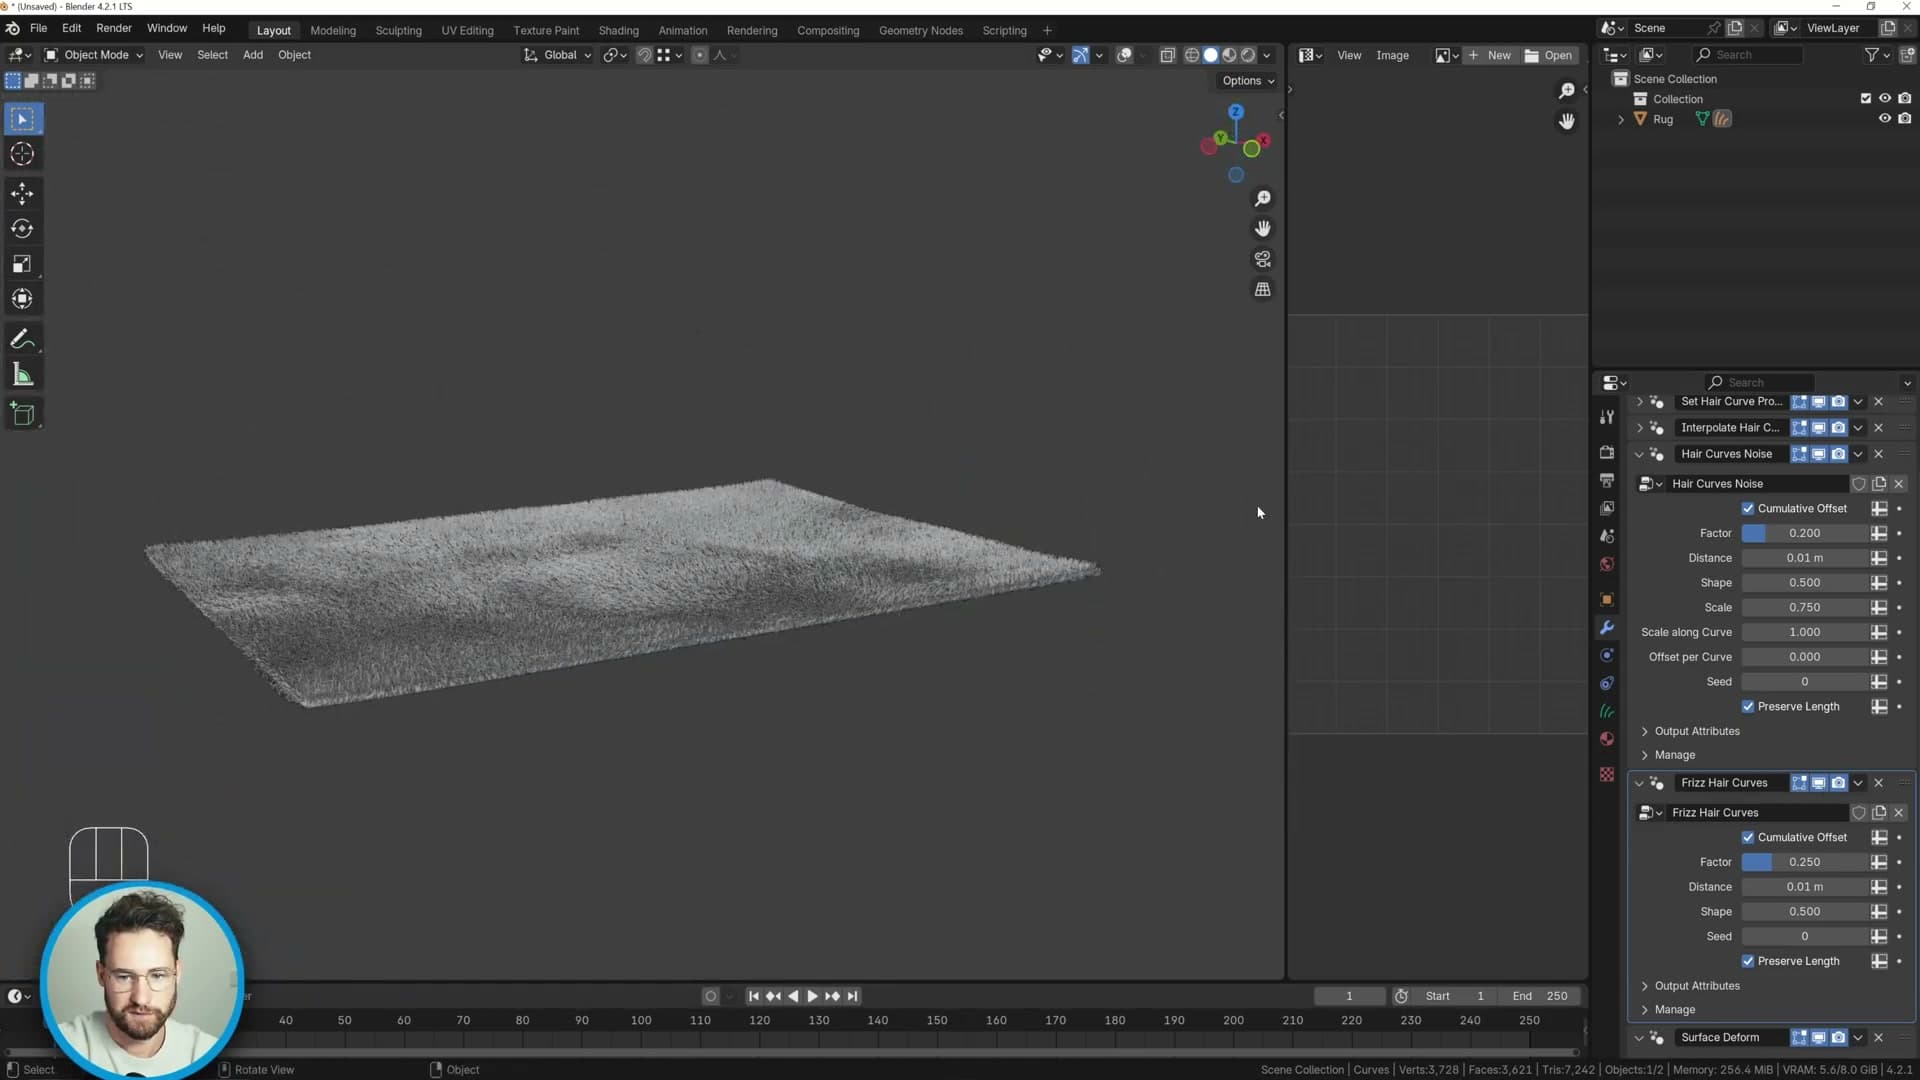
Before you touch any of its values, enable Preserve Length. Without it, every strand gets shorter as randomness is introduced, and the rug visibly shrinks. With it on, Frizz redirects each strand along its length but never steals any of that length away.
Frizz works by adding randomness to every strand, which is essentially how real-world fur behaves. Individual fibres never sit perfectly straight. Dial the strength back so the effect is suggestive rather than overpowering, and the surface picks up the kind of natural, slightly untidy texture you'd see on a real rug.
Clump and modifier order
Dragging the Clump modifier from the Essentials asset browser gives the fur its tufted, fibre-bundle look. The order (clump before or after frizz) dramatically changes the result.
Drag Clump from the asset browser
The last of the built-in modifiers (and my favourite) is Clump. Drag it from the Essentials asset browser onto the rug the same way you added Noise and Frizz, and you'll immediately see the curves gather into tufted bundles instead of standing as individual strands.
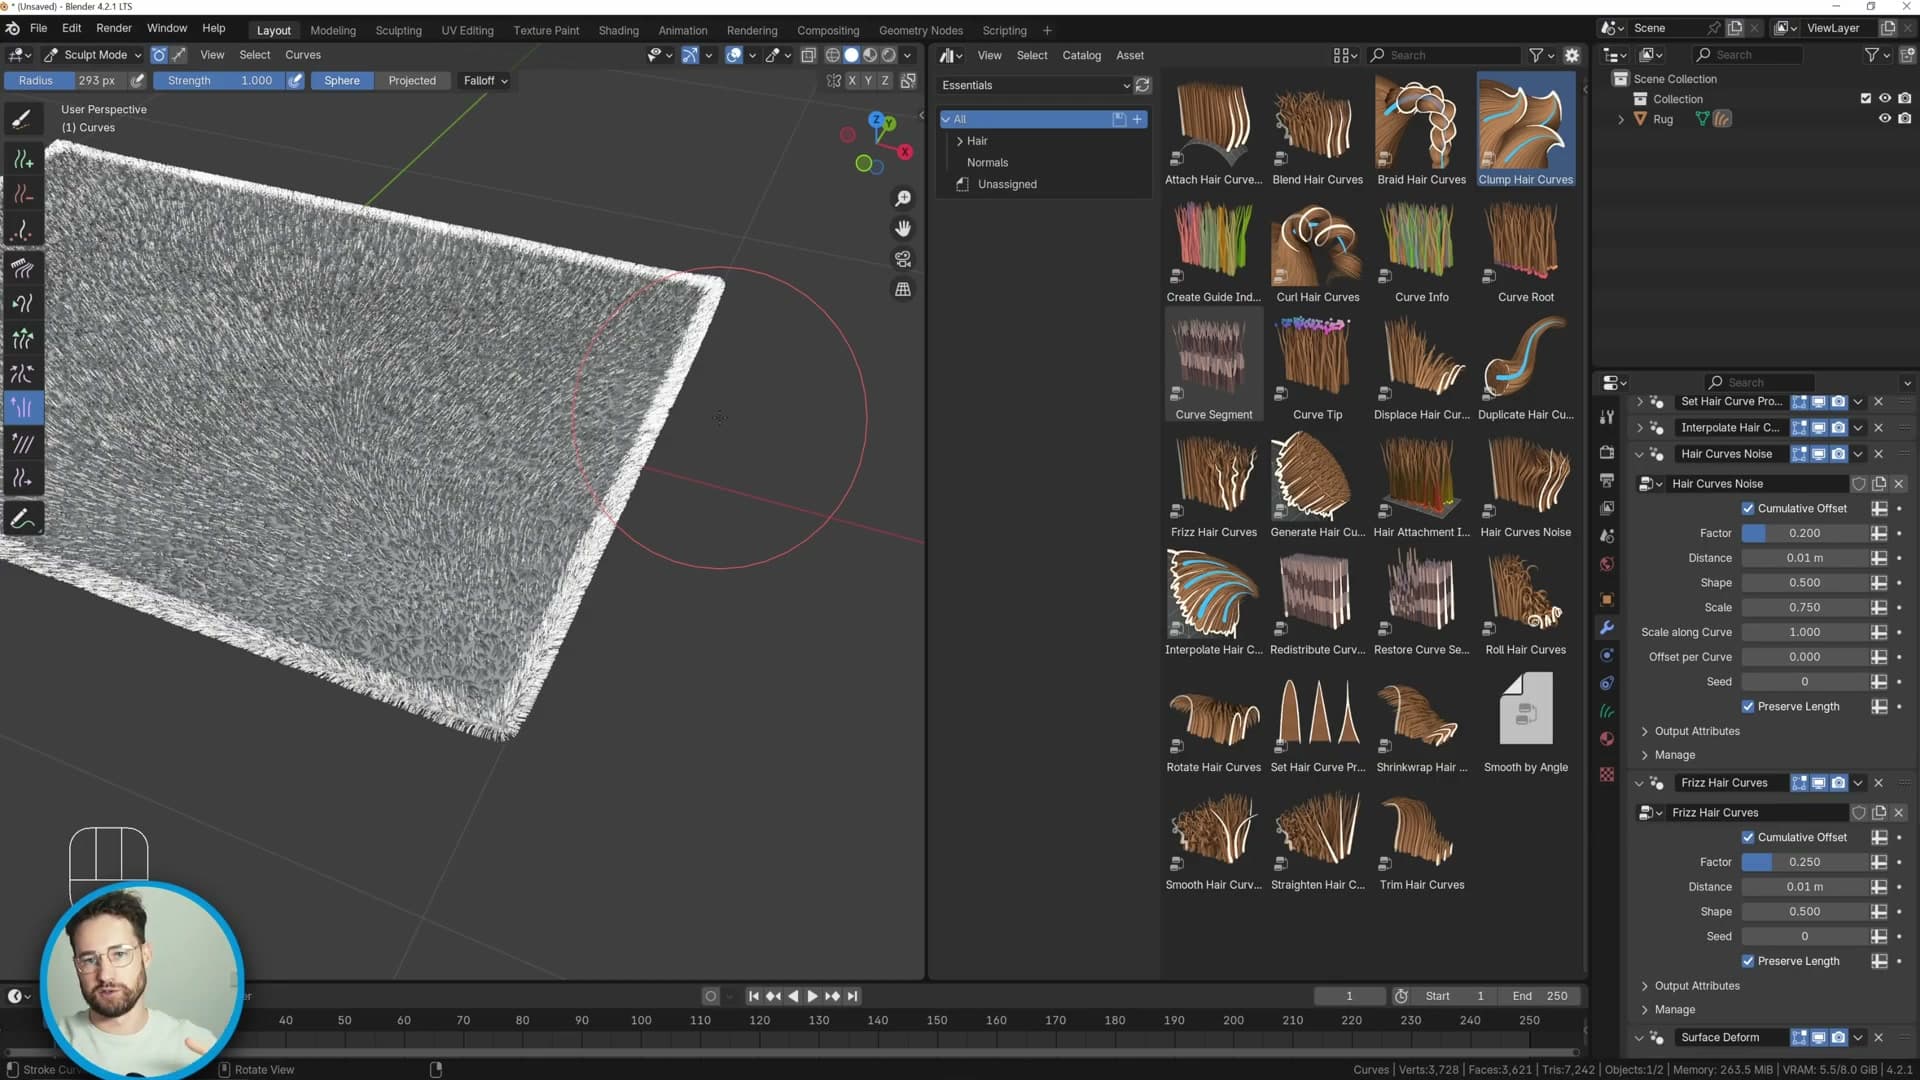
Drop into sculpt mode for a moment and the reason becomes obvious: the clumps form around the guides you painted earlier. Each guide acts as a magnet that pulls the surrounding interpolated hairs into a tuft, so the distribution of clumps across the rug is really a distribution of guides.
That has a practical consequence at the rug's perimeter. Because you painted a denser ring of guides around the edge, you'll get a lot of small clumps along the border. For a rug that's about right. The top of the pile reads as clumpy anyway, and the sides spread out naturally. But if you want fewer (or more) clumps somewhere, the fix is to go back and remove (or add) guides, not to fight the modifier.
Clump-then-frizz vs frizz-then-clump
Clump is added to the bottom of the modifier stack by default. Before doing anything else, enable Preserve Length so the clumping action doesn't shorten your fur.
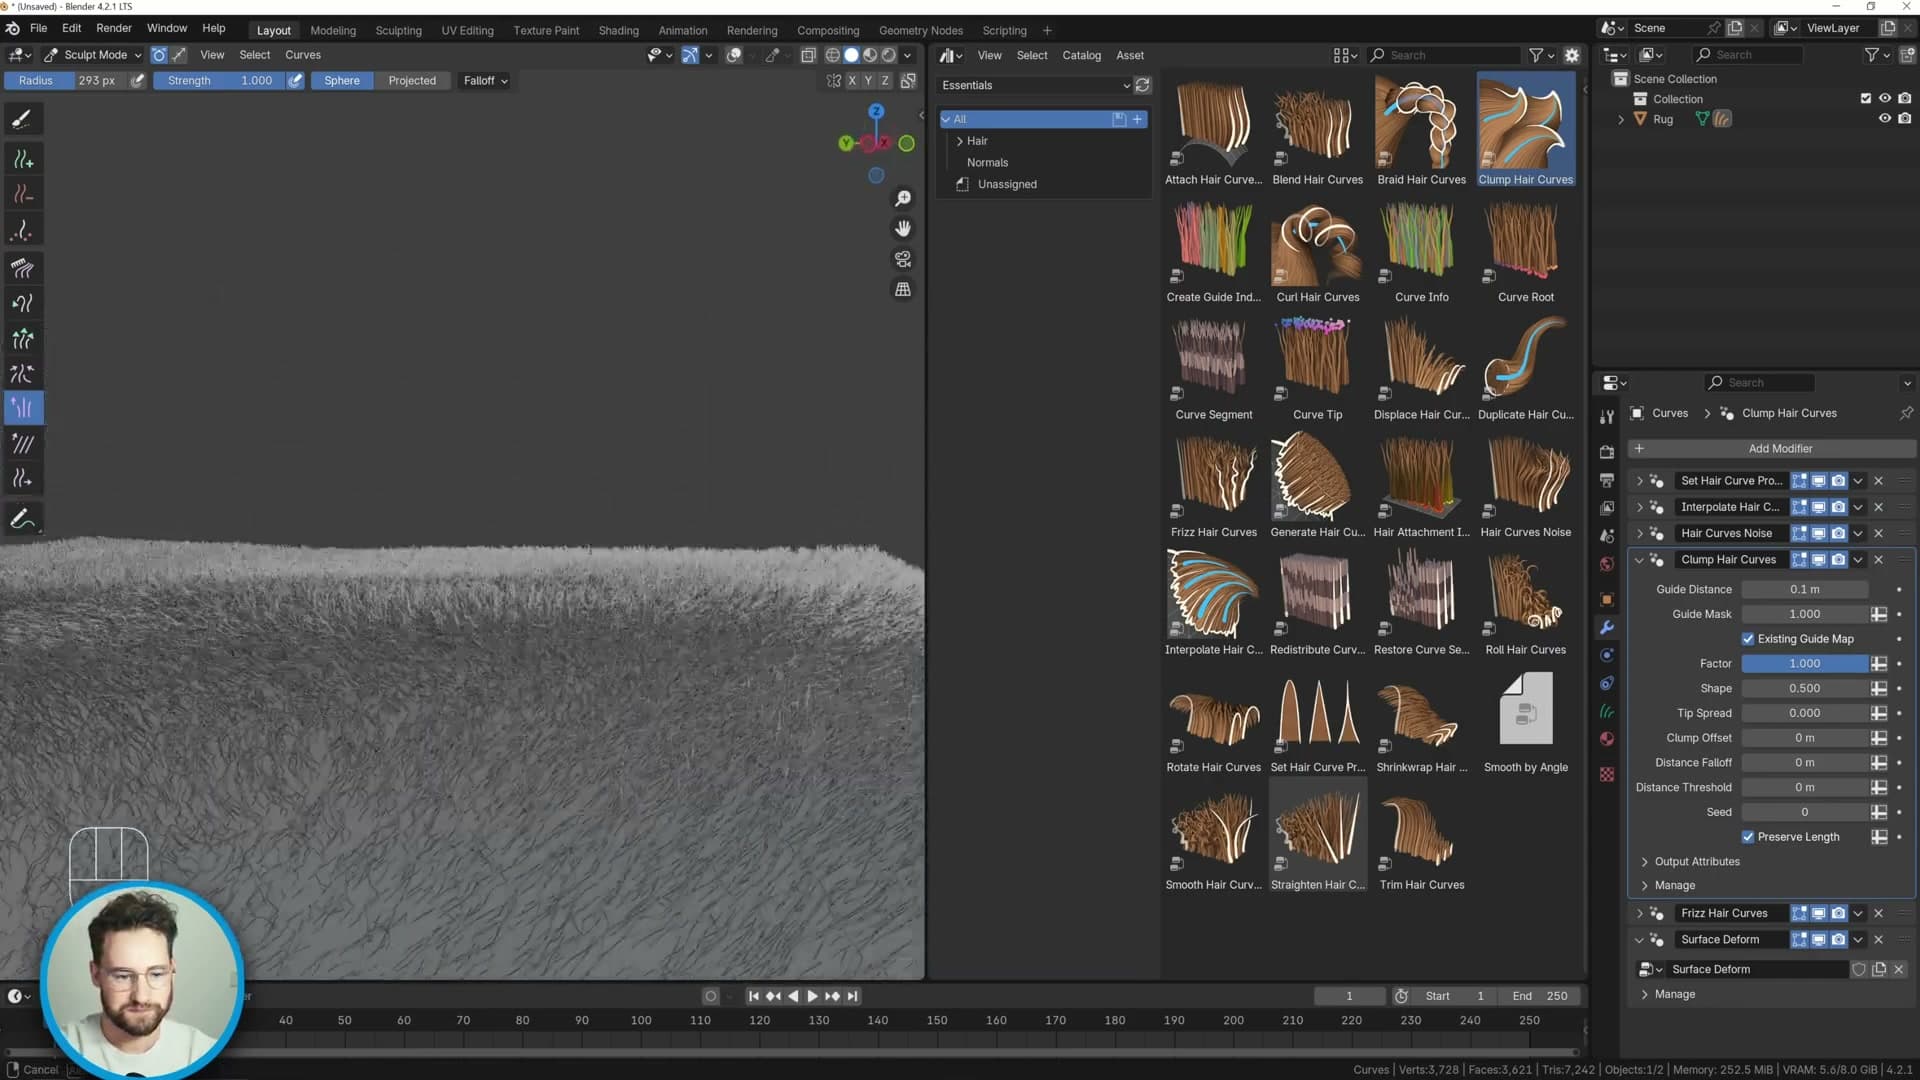
Now the interesting part: the order of Clump and Frizz changes the look of the rug dramatically. If you place Clump above Frizz, the fur is gathered into tufts first and then the frizz roughens them up. The tips stay broken and uneven. If you place Clump after Frizz, the frizz is applied first and then the clump pulls everything back together, tidying the surface as the last step.
My preference is to finish with frizz so that nothing ends up too even. A perfectly tidy surface reads as synthetic, whereas a faintly messy one reads as a real rug. Pick whichever order matches the look you're after, but be deliberate about it.
With the order settled, drop the Clump Factor to around 0.5. That softens the pull so the tufts are visible without looking like the curves have been glued together, and the rug starts to read as a believable pile.
Varied height with custom geometry nodes
A small bespoke geometry node group adds row-wise height variation to the fur. Capture Attribute, Set Position, Wave Texture, Spline Parameter and Combine XYZ are combined so only the Z axis is offset.
Capture Attribute, Set Position, Wave Texture
There's one thing the built-in fur modifiers don't really do on their own: make some patches of the rug stand taller and others sit lower. I went looking for a modifier that handled it, didn't find one, and Trim Hair Curves can technically vary length but it felt too fiddly to drive cleanly. The fix was a small bespoke Geometry Nodes group, only a handful of nodes, doing exactly one job.
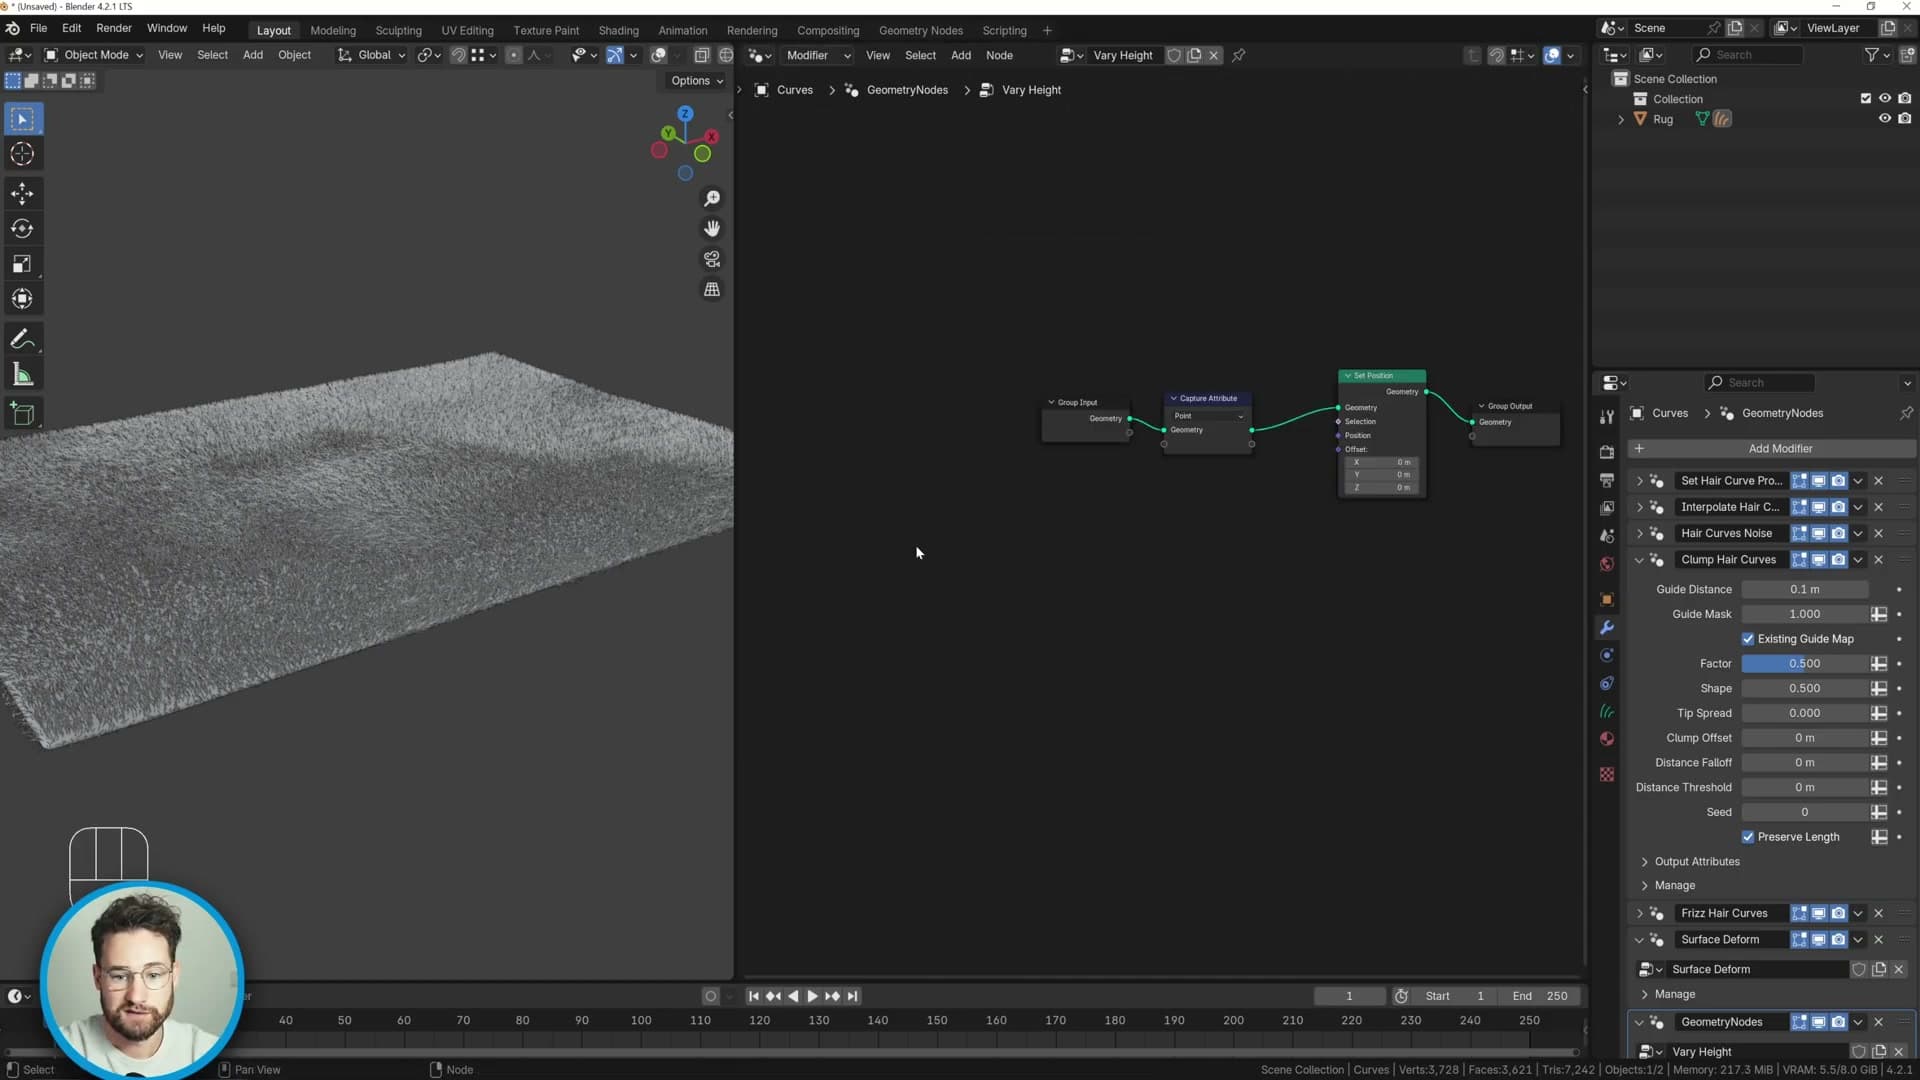
With the rug curves still selected, add a Geometry Nodes modifier from the modifier stack and hit New. Name the new group Vary Height. Inside the node editor, start the chain with a Capture Attribute node and follow it with a Set Position node. That's the node that will actually displace each curve point along the rug.
Next, bring in a Wave Texture and three Vector Math nodes: one set to Subtract and two set to Scale. These will sit between the Wave Texture and the Set Position offset and let you control how strongly the wave displaces curve points.
Spline Parameter and Combine XYZ for Z-only offset
Add a Spline Parameter node next to the chain. Its Factor output runs from 0 at the root of each curve to 1 at the tip, so feeding Factor into the Vector Math chain scales the wave's effect along the length of the hair. Roots stay anchored to the rug base; tips get the full ripple.
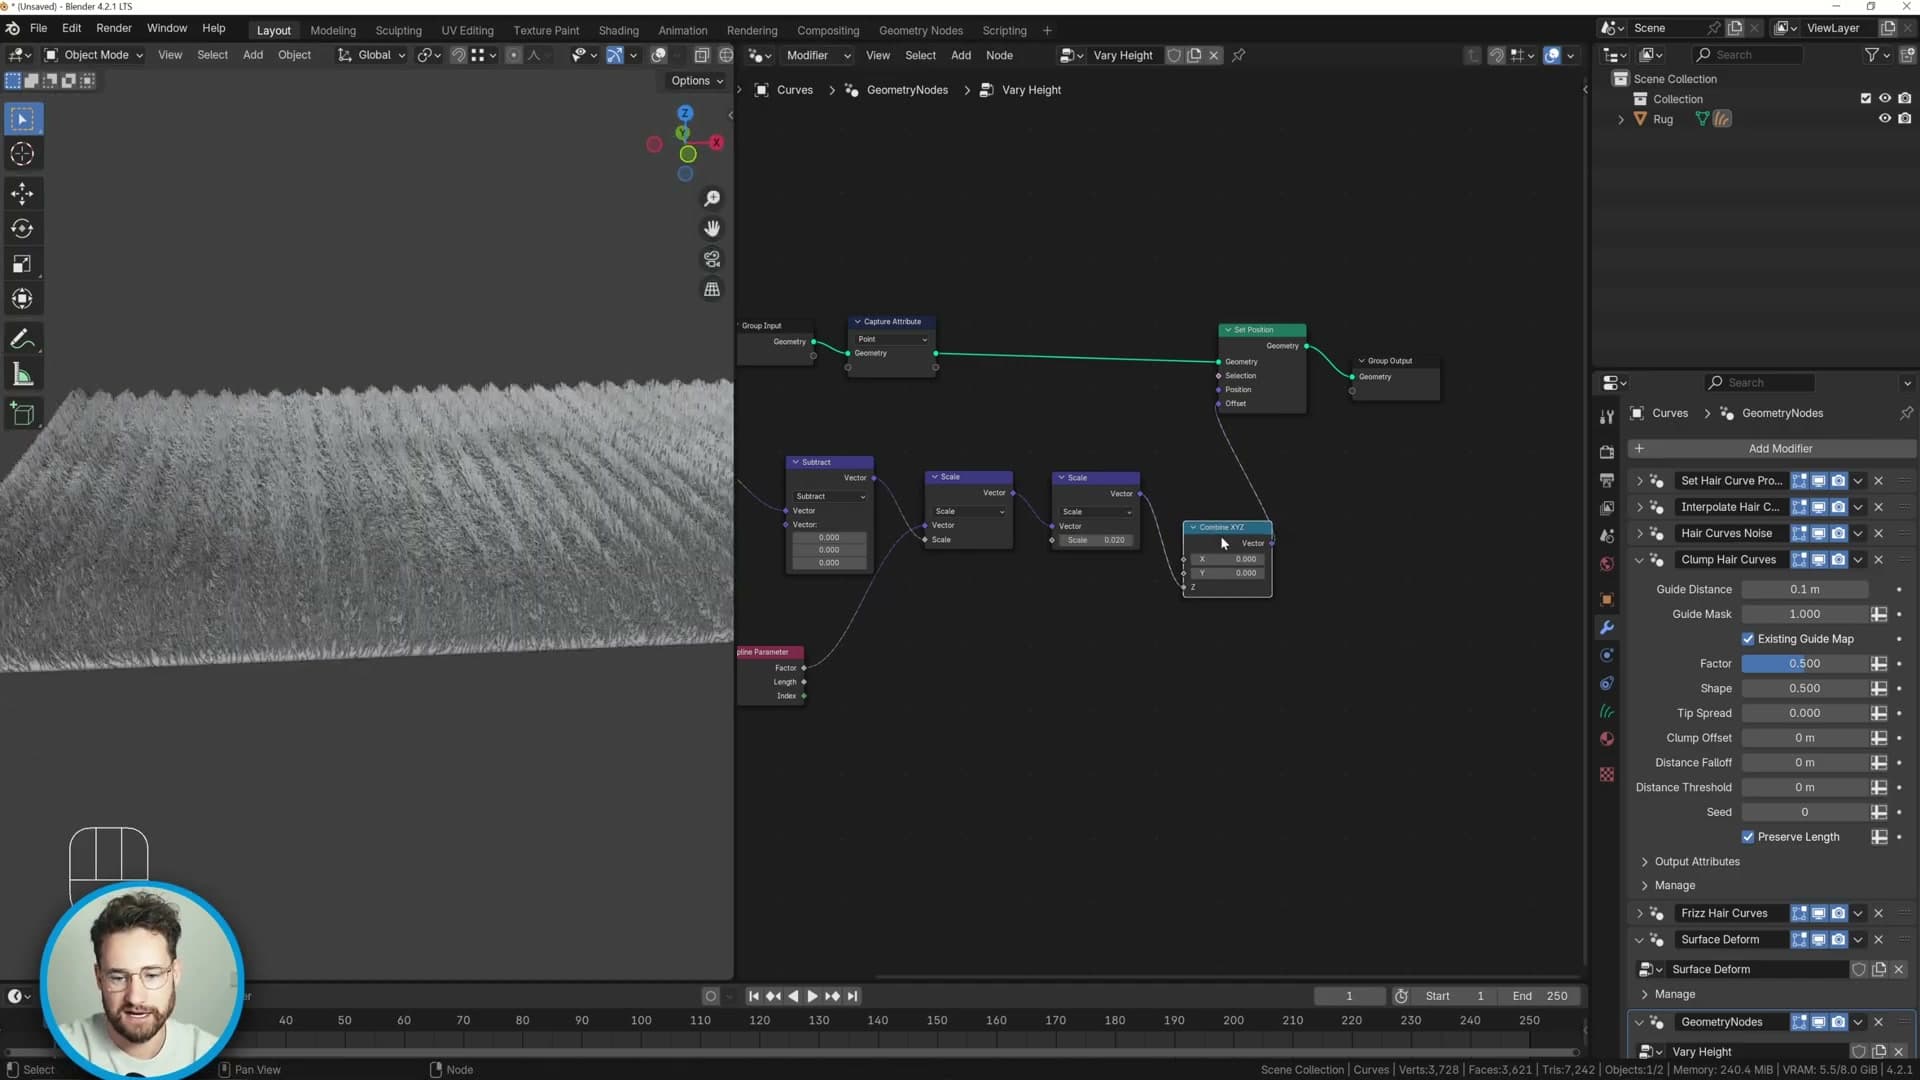
Finish with a Combine XYZ. Plug the wave's output into the Z input only, then feed Combine XYZ into Set Position's Offset. This is the step that matters: if you route the raw wave straight into Offset, the hairs get pushed sideways as well as up. You can confirm this by sliding the value and watching every strand drift in one direction. Routing only into Z keeps the displacement purely vertical, which is what a real rug does.
Set the wave scale to something small. Start around 0.02 and you'll see a gentle ripple appear across the whole surface of the rug.
Tuning the wave scale for rug rows
At 0.02 the ripple is too pronounced for a rug. Drop the value down to 0.01 for a subtler effect that reads as natural variation rather than a warped surface.
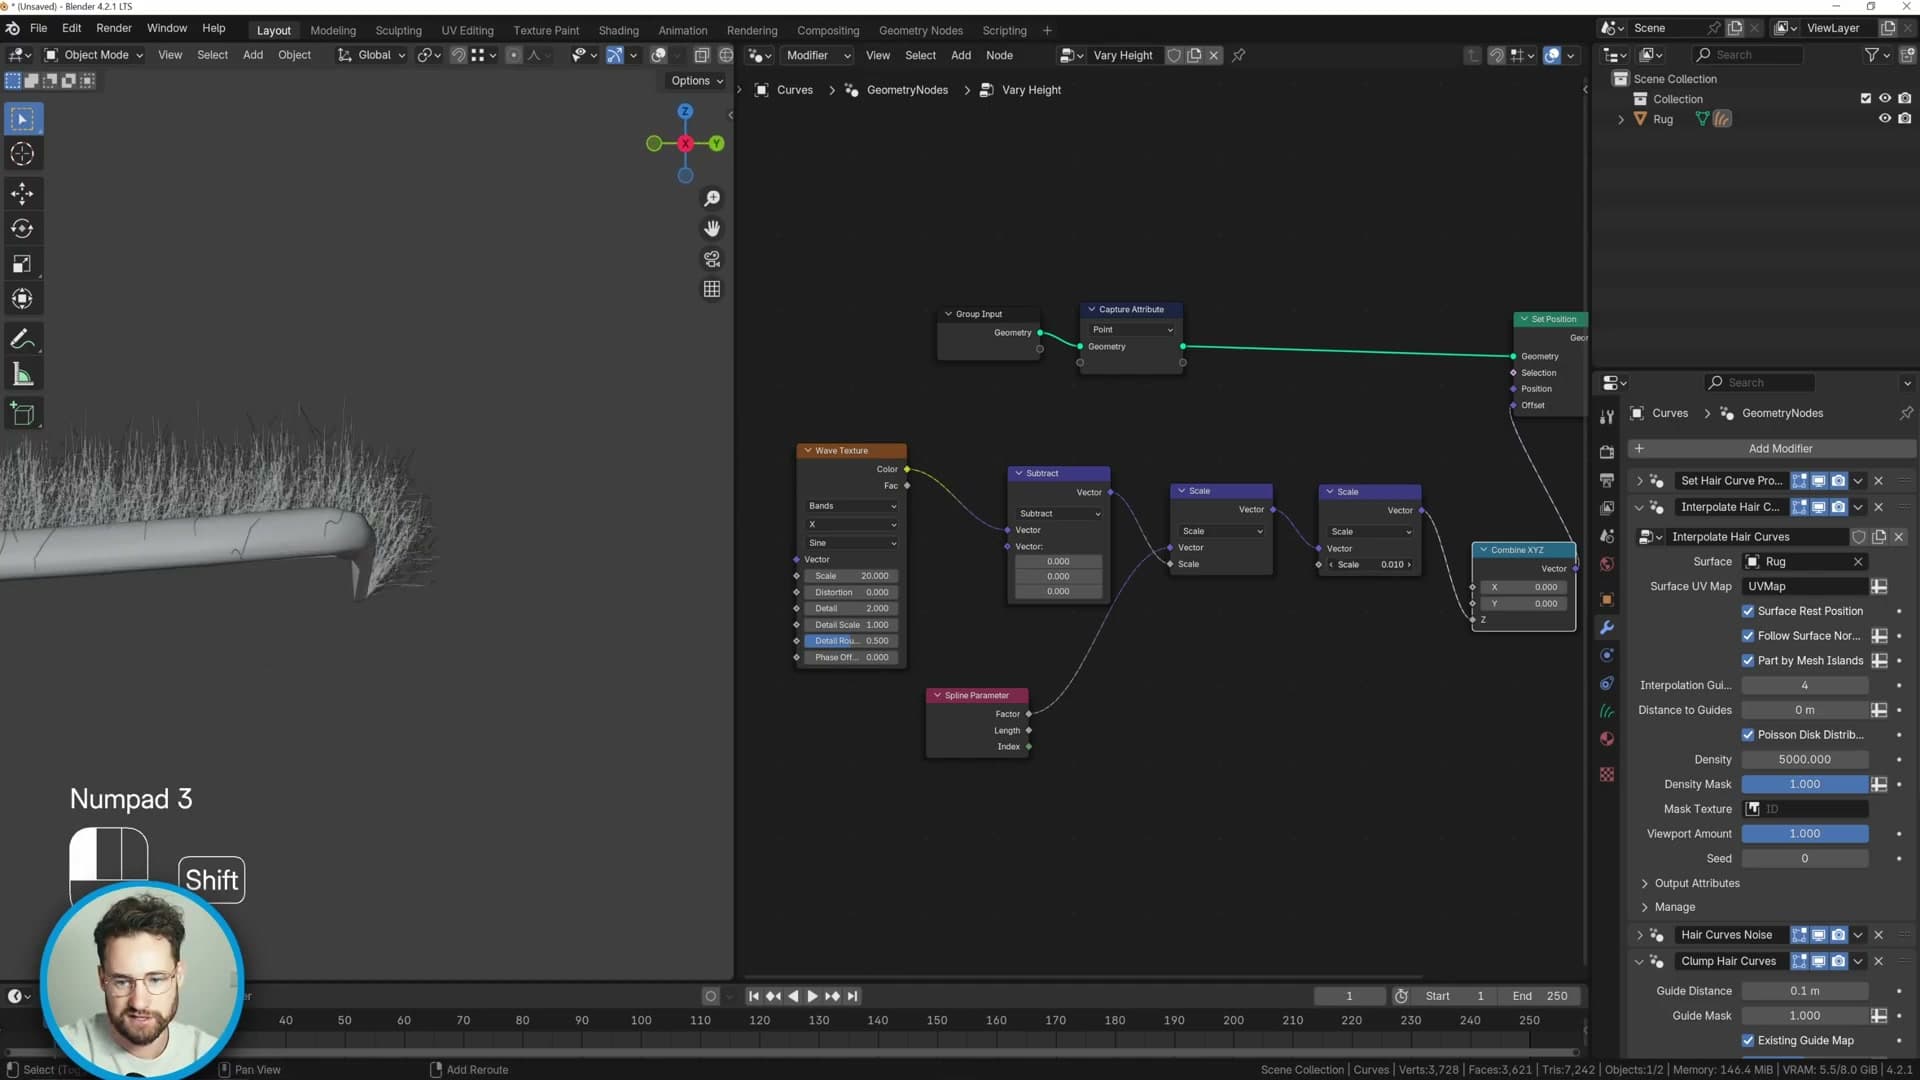
Real-world rugs are manufactured in rows, so a faint row-like ripple isn't just acceptable. It's accurate. The wave texture's frequency naturally produces those linear ridges, which sells the soft fabric feel without having to sculpt anything by hand.
The Subtract node earlier in the chain controls where the ripple sits relative to the base height. Increasing the value shifts the whole offset up; lowering it pulls it down. I leave it at zero for this rug, but the control is there if you want to tune which strands sit closer to the floor.
There's one remaining issue, though. The hairs at the very edge of the rug are being displaced upward along with the rest, and you generally want those border strands to sit flat against the floor instead. That's what the next module solves with a vertex-group mask.
Vertex group edge mask
An inverted edge-loop selection becomes a 'Mask' vertex group, exposed as a Group Input parameter so the height variation is restricted to the top surface and not the rug sides.
Edge loops, invert, and assign
Jump back into Edit Mode on the rug base mesh and switch to edge select. Alt+Click the outermost edge running around the top face to grab the full perimeter loop, then tap NumPad + five times to grow the selection inwards. Each press extends the band one loop further toward the centre. Press Ctrl+I to invert, so everything except that outer band is now selected.
Open the Object Data Properties tab, add a new vertex group under the Vertex Groups list, and rename it Mask. Click Assign to bake the inverted selection (the inner top face area) into the group. This is the group the geometry nodes setup will read to keep the height variation off the rug's sides and corners.
Mix node with exposed Group Input
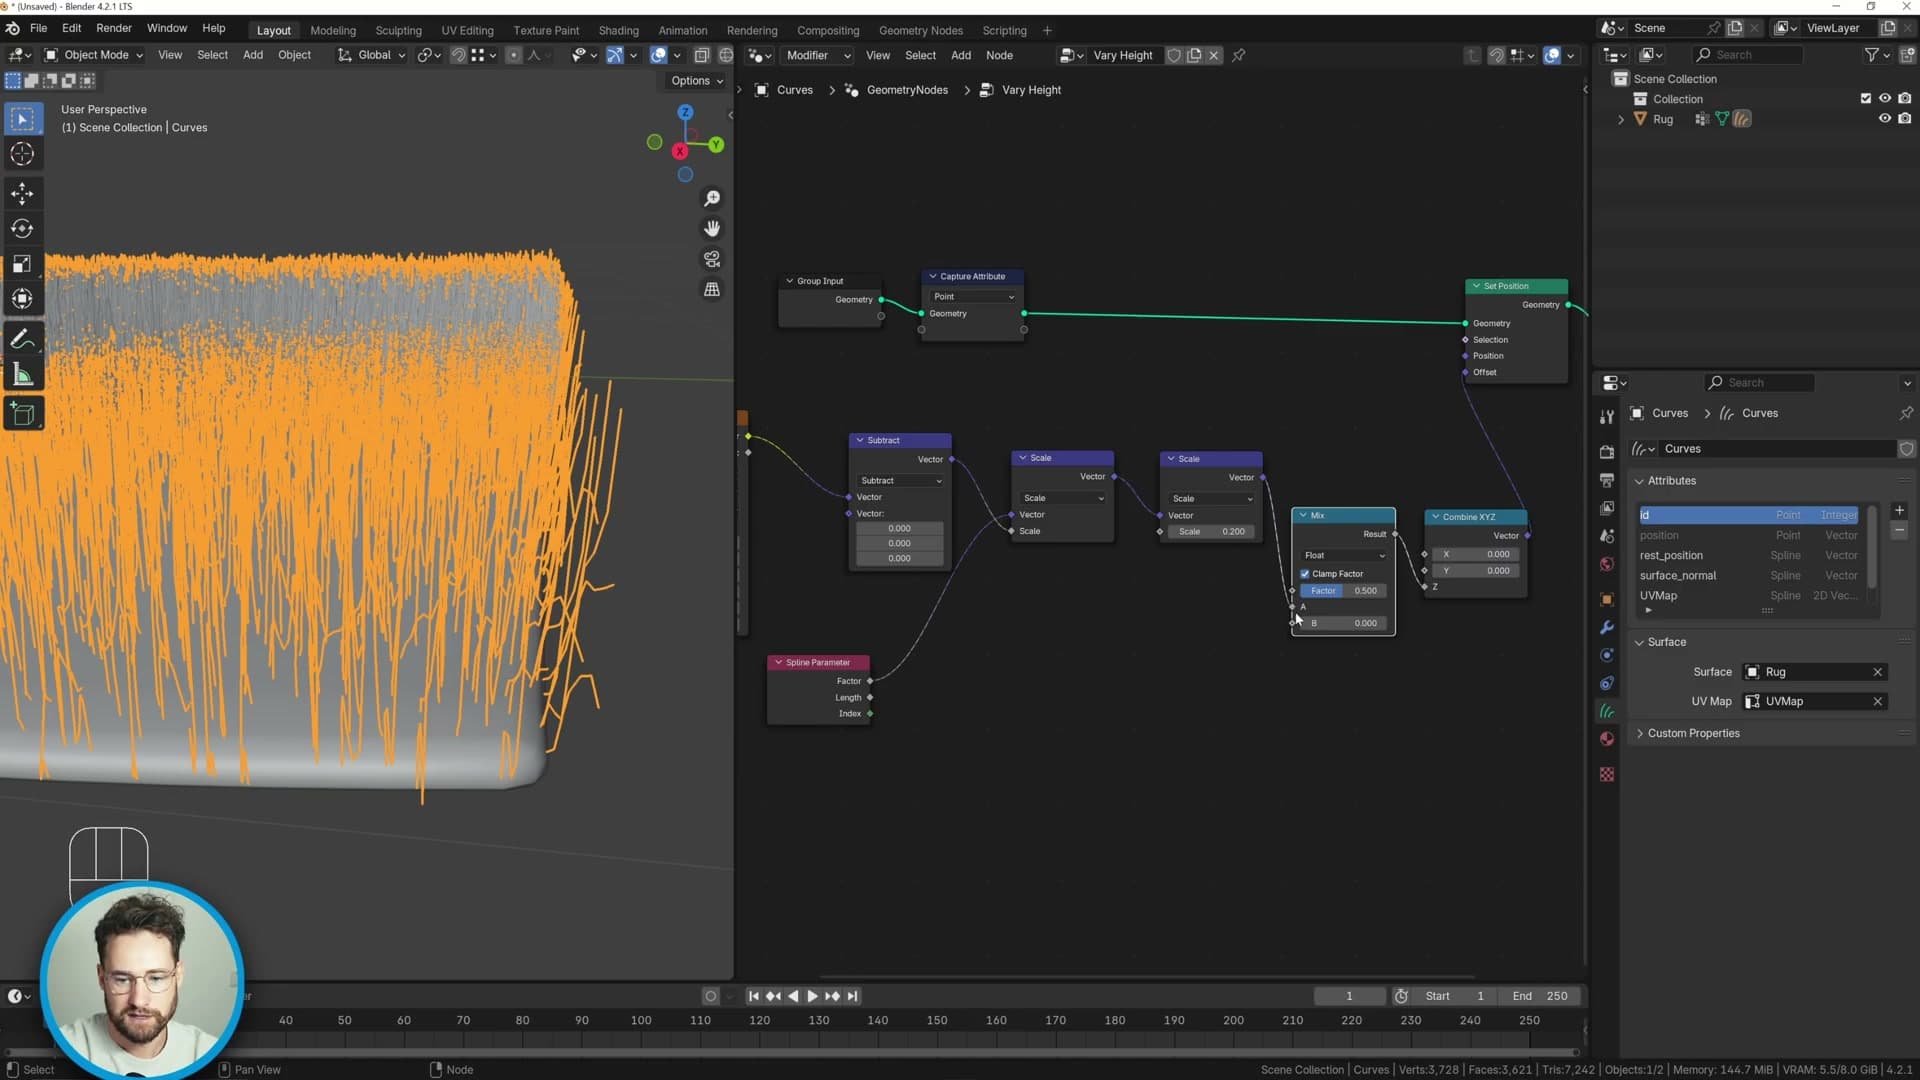
Click back onto the rug and open the geometry nodes graph. Add a Mix node and route it into the existing chain: the wave-driven offset into one input, the original value into the other, with the Factor controlling how much of the ripple gets blended in.
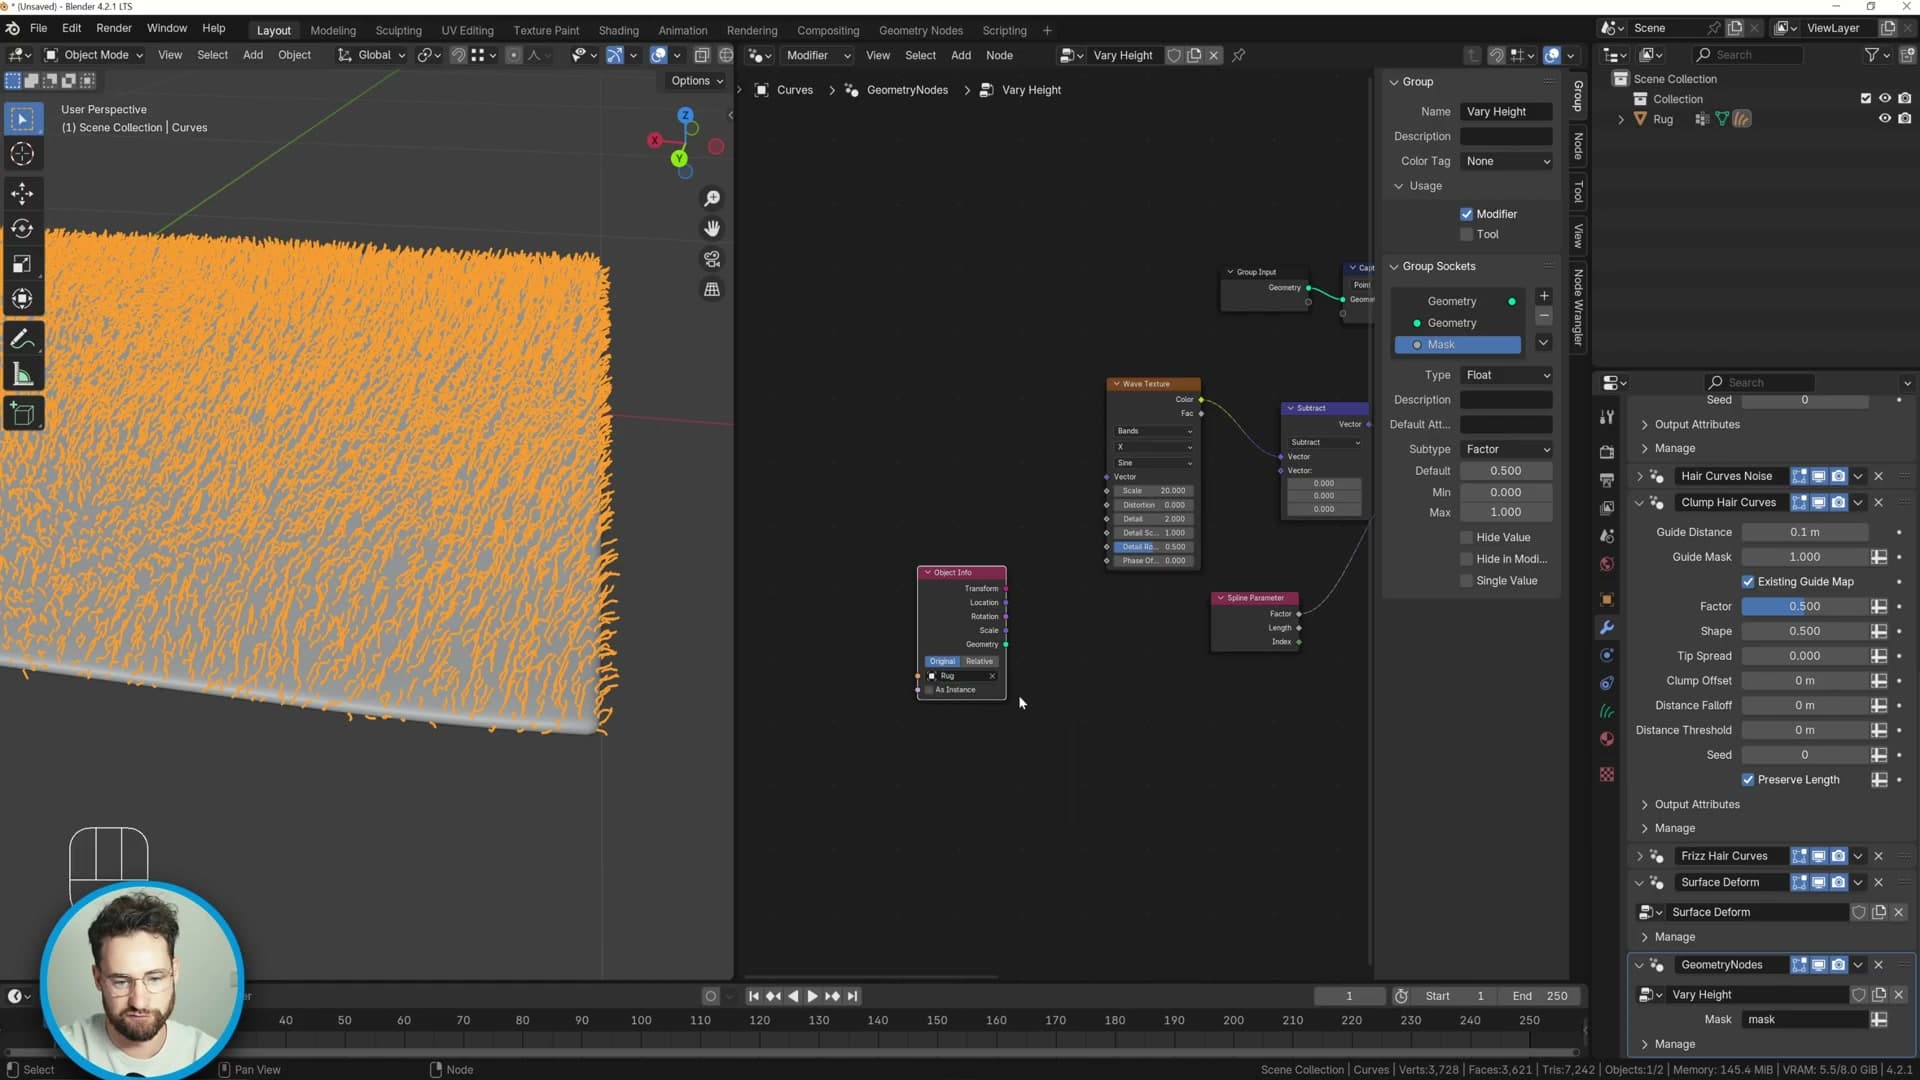
Add a Group Input node and plug it into the Mix node's Factor. Press N to open the side panel, find the new socket under the Group section, and set its data type to Float. Switch back to the modifier panel, scroll down, and the Mix factor is now exposed as a slider on the geometry nodes modifier itself.
Rename that exposed parameter to something readable (Mask or Scale both work). Click the small attribute-toggle button next to the slider and type Mask so it picks up the vertex group you just assigned. The effect immediately falls off across the edge band: the inner verts ripple, the verts along the rug's edges stay flat.
Set the value to 0.01 to soften the result. The masked ripple now bumps up the top surface of the rug without disturbing the bevelled sides or the lifted corners.
Image texture in geometry nodes
Sample Nearest Surface plus a Named Attribute named 'UVMap' pulls the underlying mesh's UVs into the curves, so an image texture can drive the height variation in the same coordinate space.
Object Info and Named Attribute
The same UV-based trick that drove the wave texture's height variation can also drive a literal image texture across the fur. To get there, geometry nodes needs access to the rug mesh's existing UV map, and that takes two extra input nodes feeding into the tree.
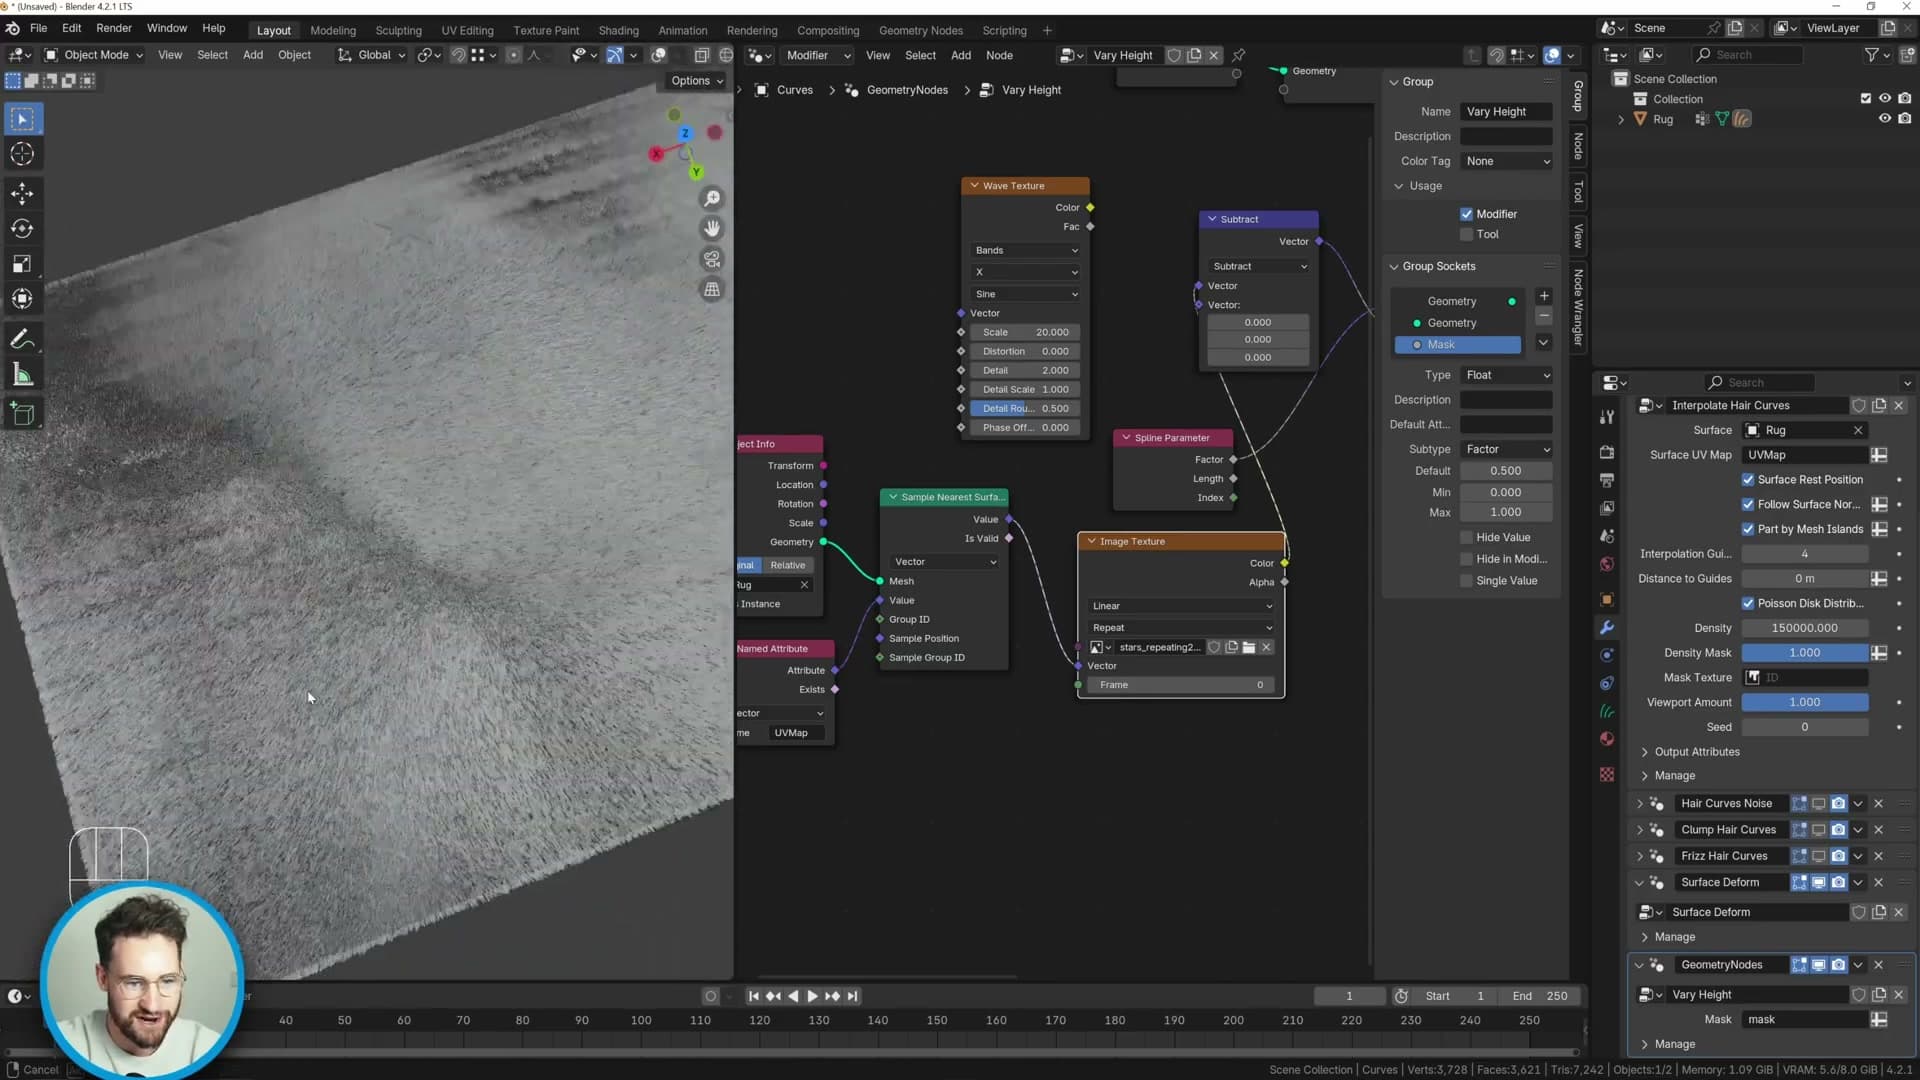
Add an Object Info node with Shift+A → Input → Object Info and drop the rug into the object slot. That gives the node tree a handle on the mesh sitting underneath the curves. Then add a Named Attribute node with Shift+A → Input → Named Attribute, type UVMap into the name field, and switch its data type to Vector so it returns the UV coordinate as a vector rather than a single float.
Sample Nearest Surface to transfer UVs
On their own, the Object Info and Named Attribute nodes don't know which UV value belongs to which fur curve. Each curve grows from a different spot on the rug, and the node tree has to look that mapping up per curve, not in bulk.
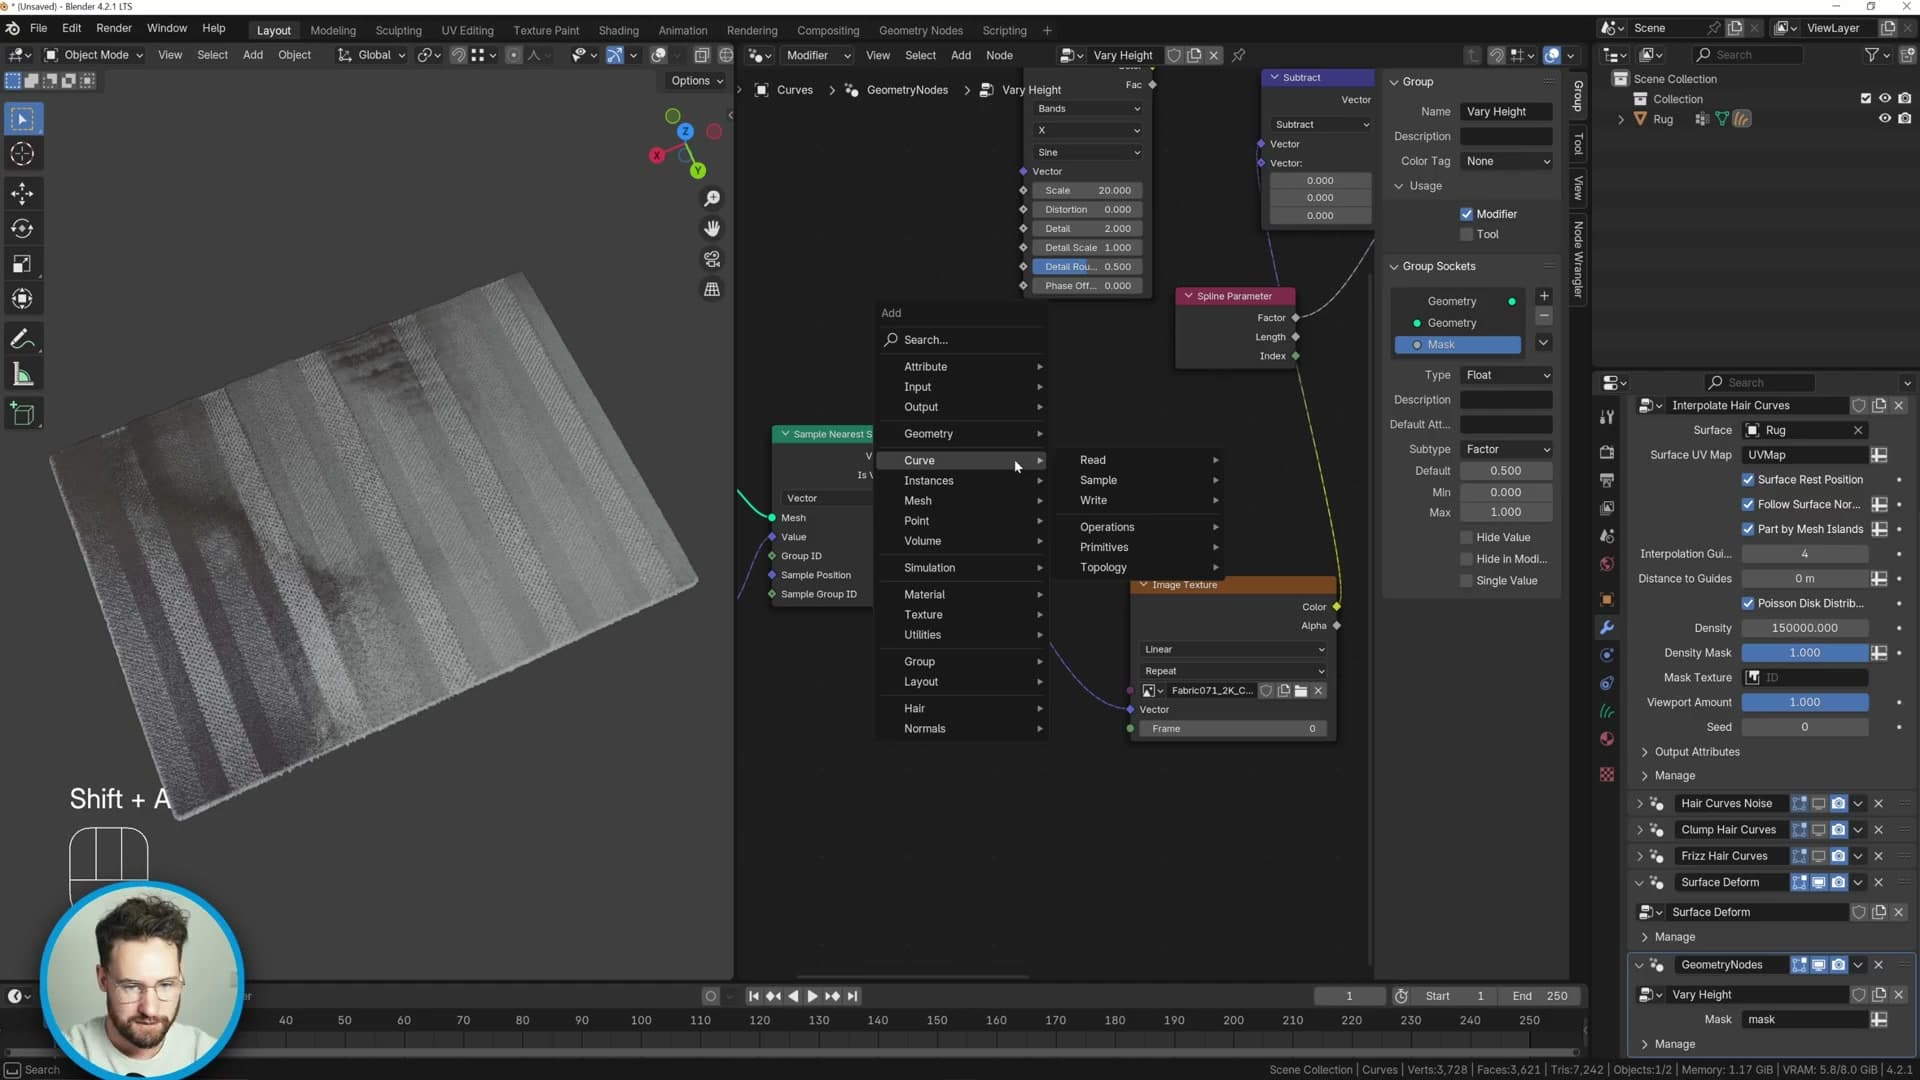
Sample Nearest Surface does that lookup. Add it with Shift+A → Geometry → Sample Nearest Surface. Plug the Object Info's geometry output into the Mesh input, then plug the Named Attribute's vector output into the Value (Vector) input. For every curve point in the system, the node finds the closest point on the rug surface below and returns the UV coordinate sitting at that point.
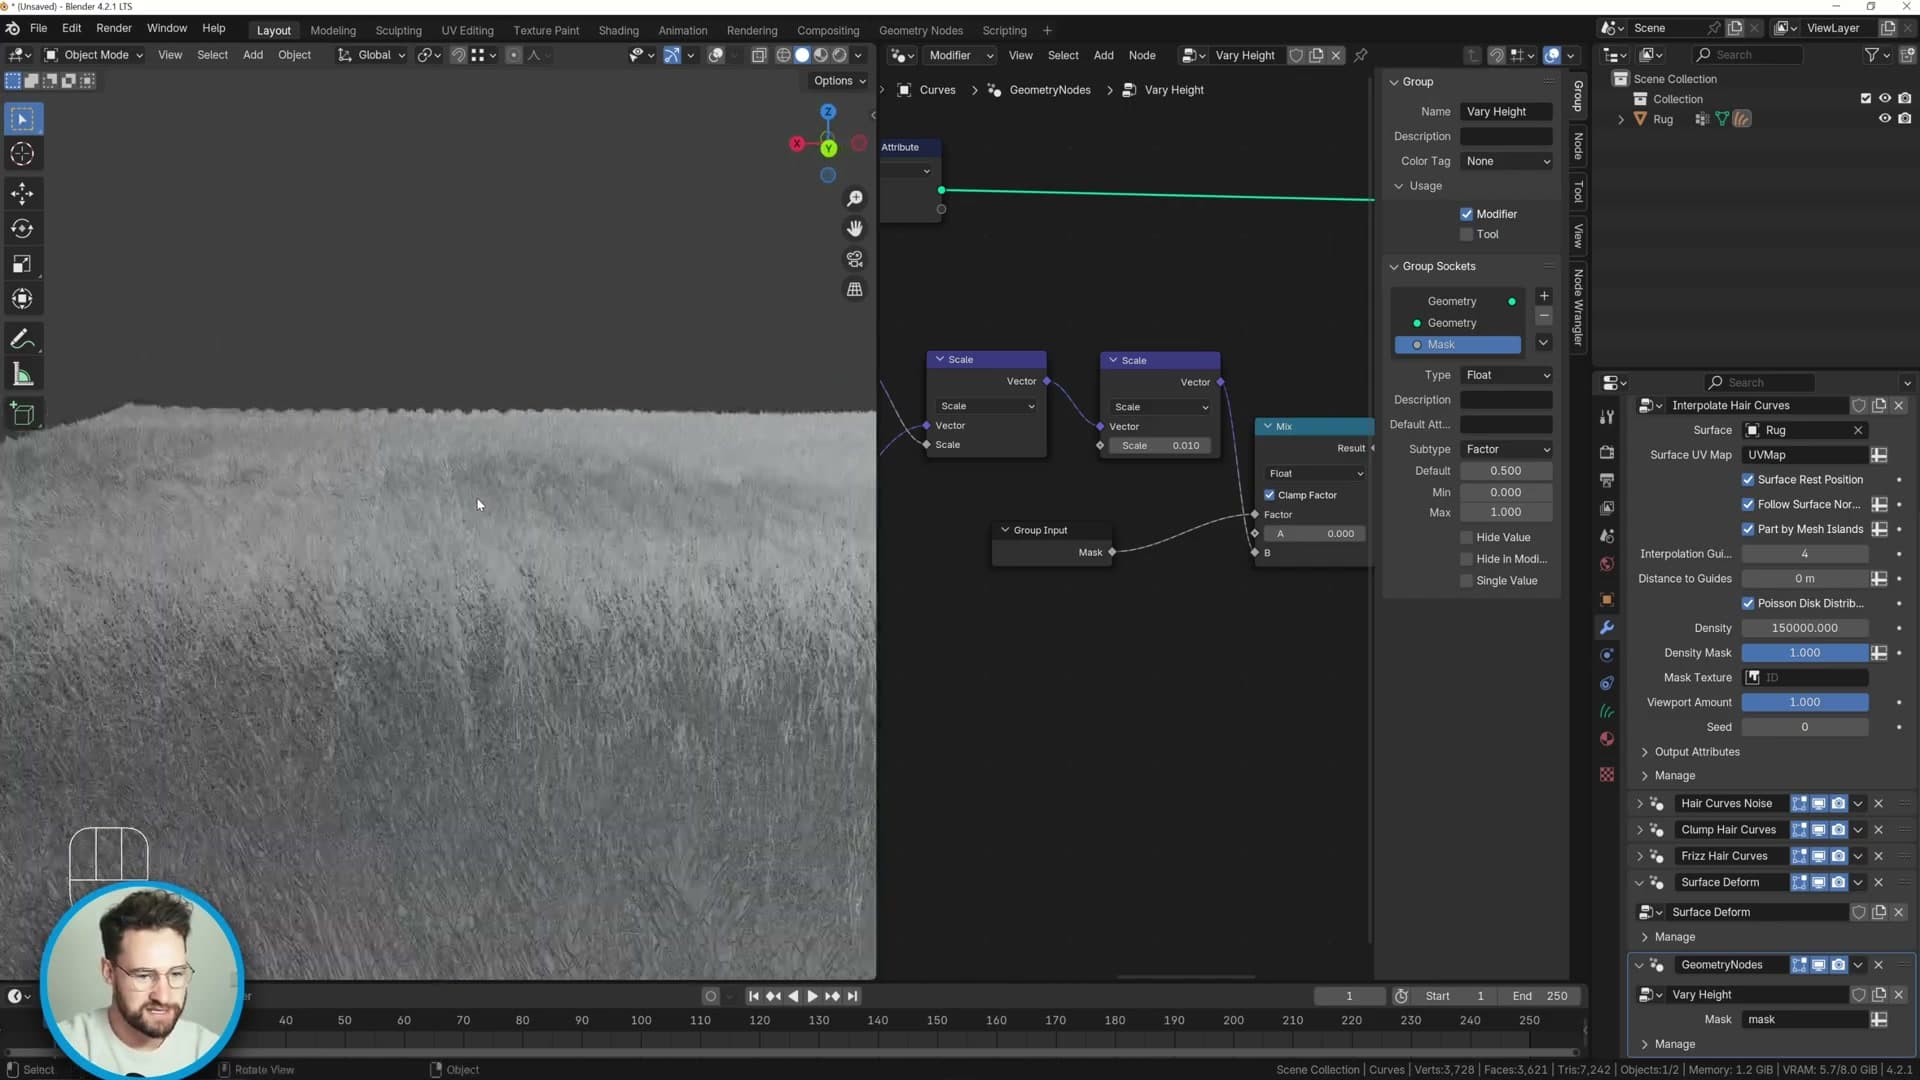
With UVs now flowing onto the curves, an image texture can read from them directly. Drop one in with Shift+A → Image Texture and route the Sample Nearest Surface vector output into the texture's Vector input. The first test image is too low-contrast to read through the fur, so swap to a higher-contrast stripe pattern and bump Interpolate Hair Curves up to 150,000 so there are enough curves on screen for the texture to actually display.
Vector Math scale to tile the texture
Out of the box the texture follows the rug's UVs one-to-one, so any stripe or pattern repeats only as often as it does on the source plane. To tile it more densely (closer to the row spacing of a real rug), drop a Vector Math node with Shift+A → Vector → Vector Math between Sample Nearest Surface and the image texture, switch the operation to Scale, and try a few multipliers. I step through 3, then 6, and settle on 8: small enough lines to read as fine stripes across the surface, but large enough that the edge-vertex-group mask from the earlier height setup still leaves the rug borders clean.
Principled Hair BSDF material
The fur is shaded with Principled Hair BSDF for accuracy, and an image texture is connected via the Surface UV Coordinate attribute so it reads from the rug mesh's UVs.
Add Principled Hair BSDF
With the geometry settled, switch focus to the material. Select the rug, open the Material Properties, add a new material, click Use Nodes, then switch a window across to the Shader Editor.
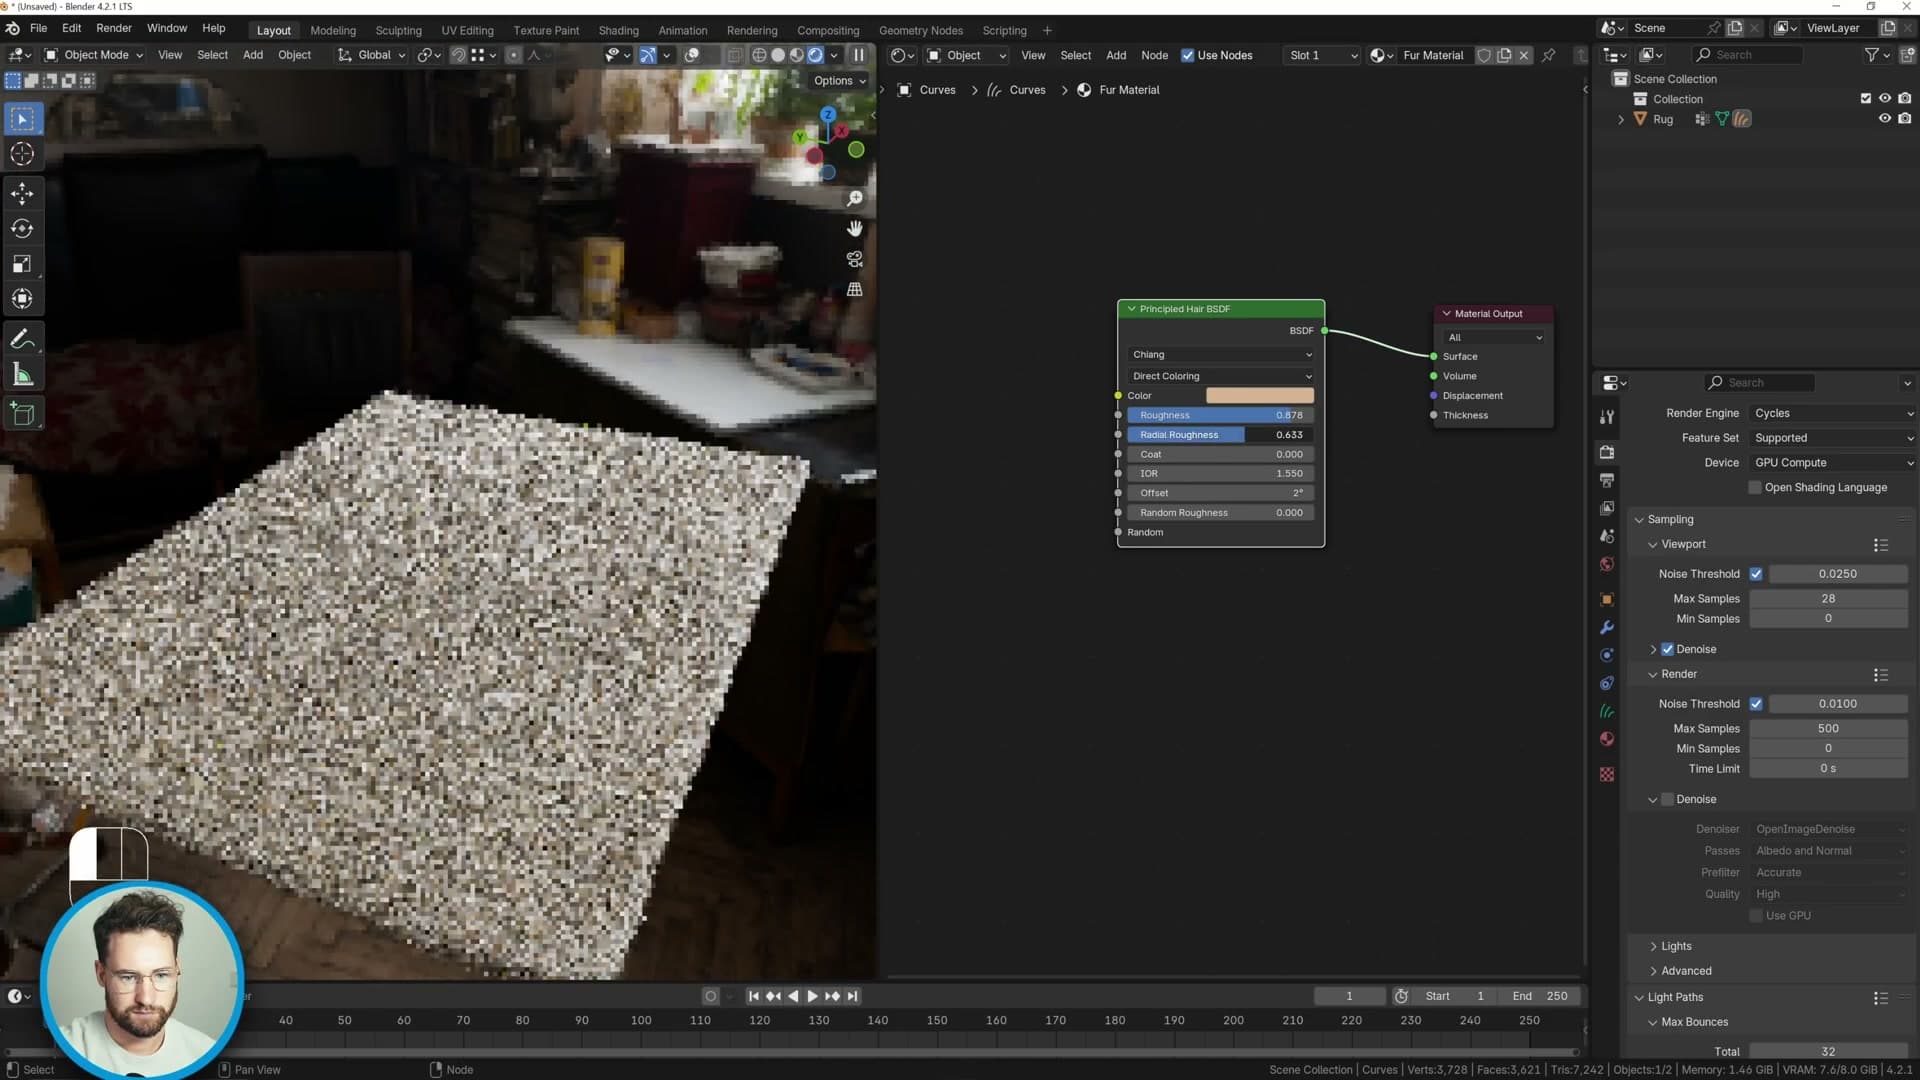
A standard Principled BSDF will give passable results even on fur, but Principled Hair BSDF is the physically accurate choice when the strands are actual hair geometry, so swap it in and plug it into the Material Output. Reduce the default value slightly to soften the result, enable Denoising in the Render Properties, and push the Roughness value fairly high. That's what gives the rug its soft, matt finish rather than the silky sheen you'd get from a low-roughness hair shader.
Surface UV Coordinate attribute
To drive the colour from an image, you'd normally plug an image texture in and let the UVs handle the rest. The rug mesh, however, was never unwrapped, and the hair curves themselves don't carry the rug's UVs by default. Drop a stripe texture straight onto the shader and you'll see it smears across the strands instead of reading the underlying pattern.
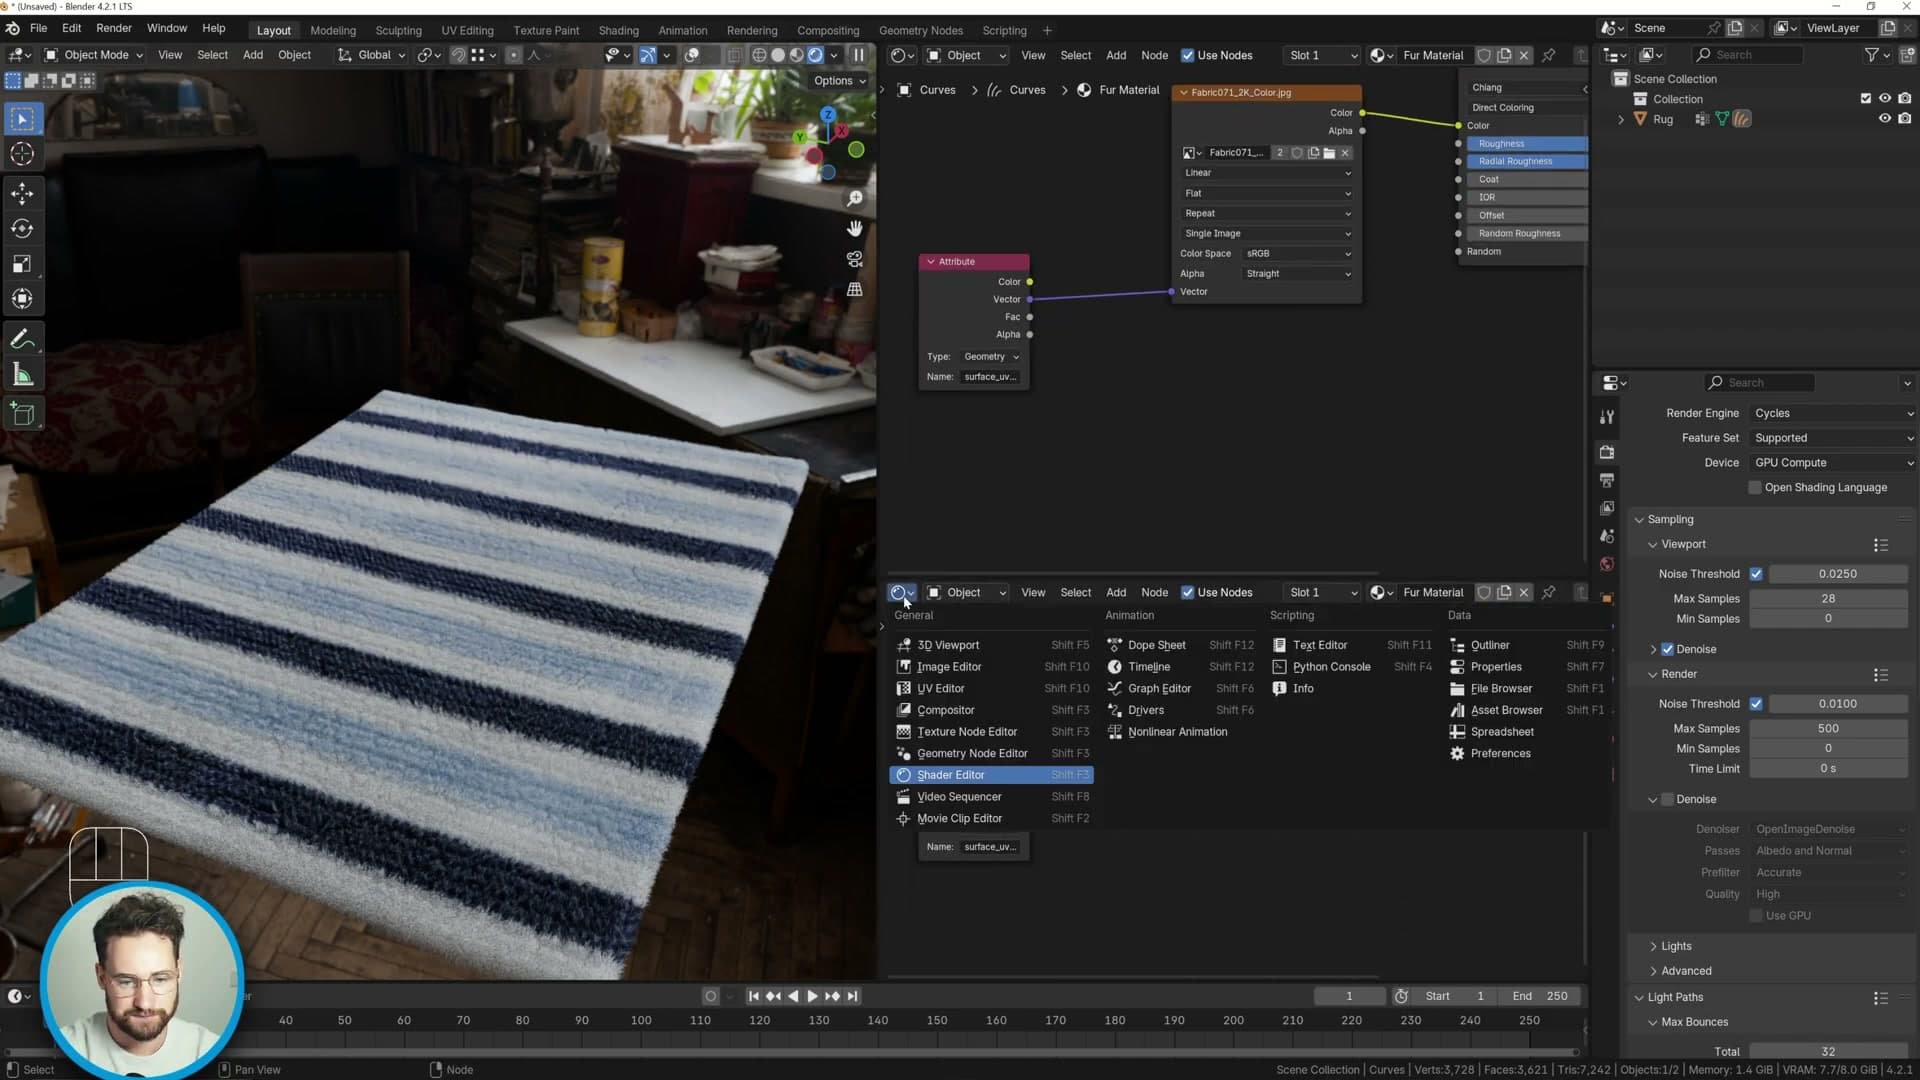
The fix is to tell the shader where to sample its UVs from. Add an Attribute node, plug its Vector output into the image texture's Vector input, and type surface_uv_coordinate into the Name field. That's the named attribute the curves-to-fur system stores on every strand, pointing back to the parent mesh's UV coordinates, so the texture now reads the rug's UVs even though it's being shown on the fur.
With the attribute wired up, the stripe pattern resolves cleanly across the rug as a flat image would, only now it's visible on the curve strands that make up the surface.
Aligning texture scale with the geometry-node ripples
There's one detail worth fixing if you want the colour to line up with the geometry. The same stripe texture is used inside the geometry-nodes group to drive the height variation, but the shader is reading it at a different scale, so the colour stripes don't sit in step with the rippled tufts.
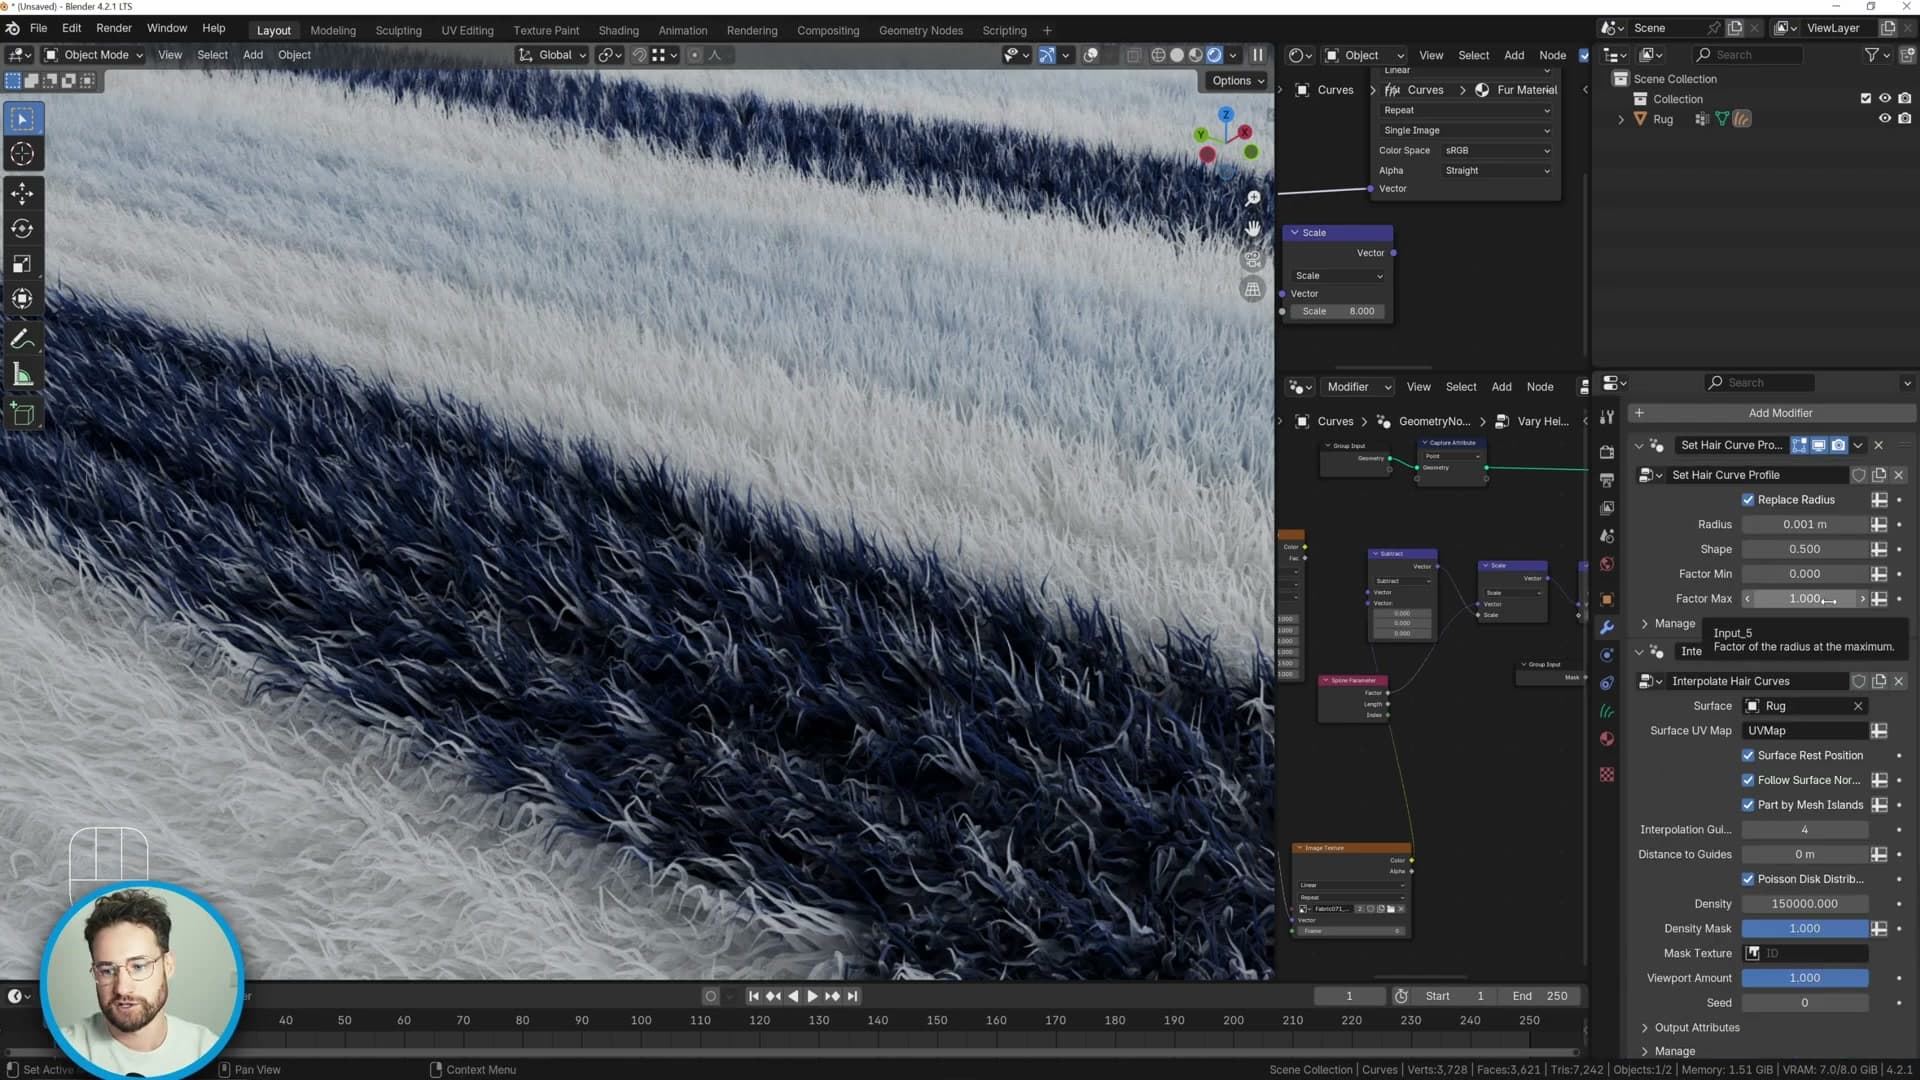
Match the two by inserting a Vector Math node set to Scale between the Attribute node and the image texture's Vector input, then set the scale value to 8, the same multiplier used inside the geometry-nodes group. Each ripple now carries the same colour band as the displacement, so the painted stripes and the physical stripes share the same rhythm across the rug.
In the final shot I actually drop the scale back to 1, preferring the softer look where the colour pattern isn't locked to the ripples. Either reading is valid: choose 8 if you want a deliberately striped rug, or 1 if you want the colour to drift independently from the geometry.
Refinement and viewport performance
Hair maximum thickness is reduced, count is pushed higher for realism, and viewport density is dropped to 0.01 so the rug stays usable inside a real scene.
Thinner radius, higher density
With the shading dialled in, push the realism further by thinning the strands. Drop the maximum radius down to 0.5. That controls how thick each hair is at the base, and a finer strand reads far more like real fibre than the chunky default.
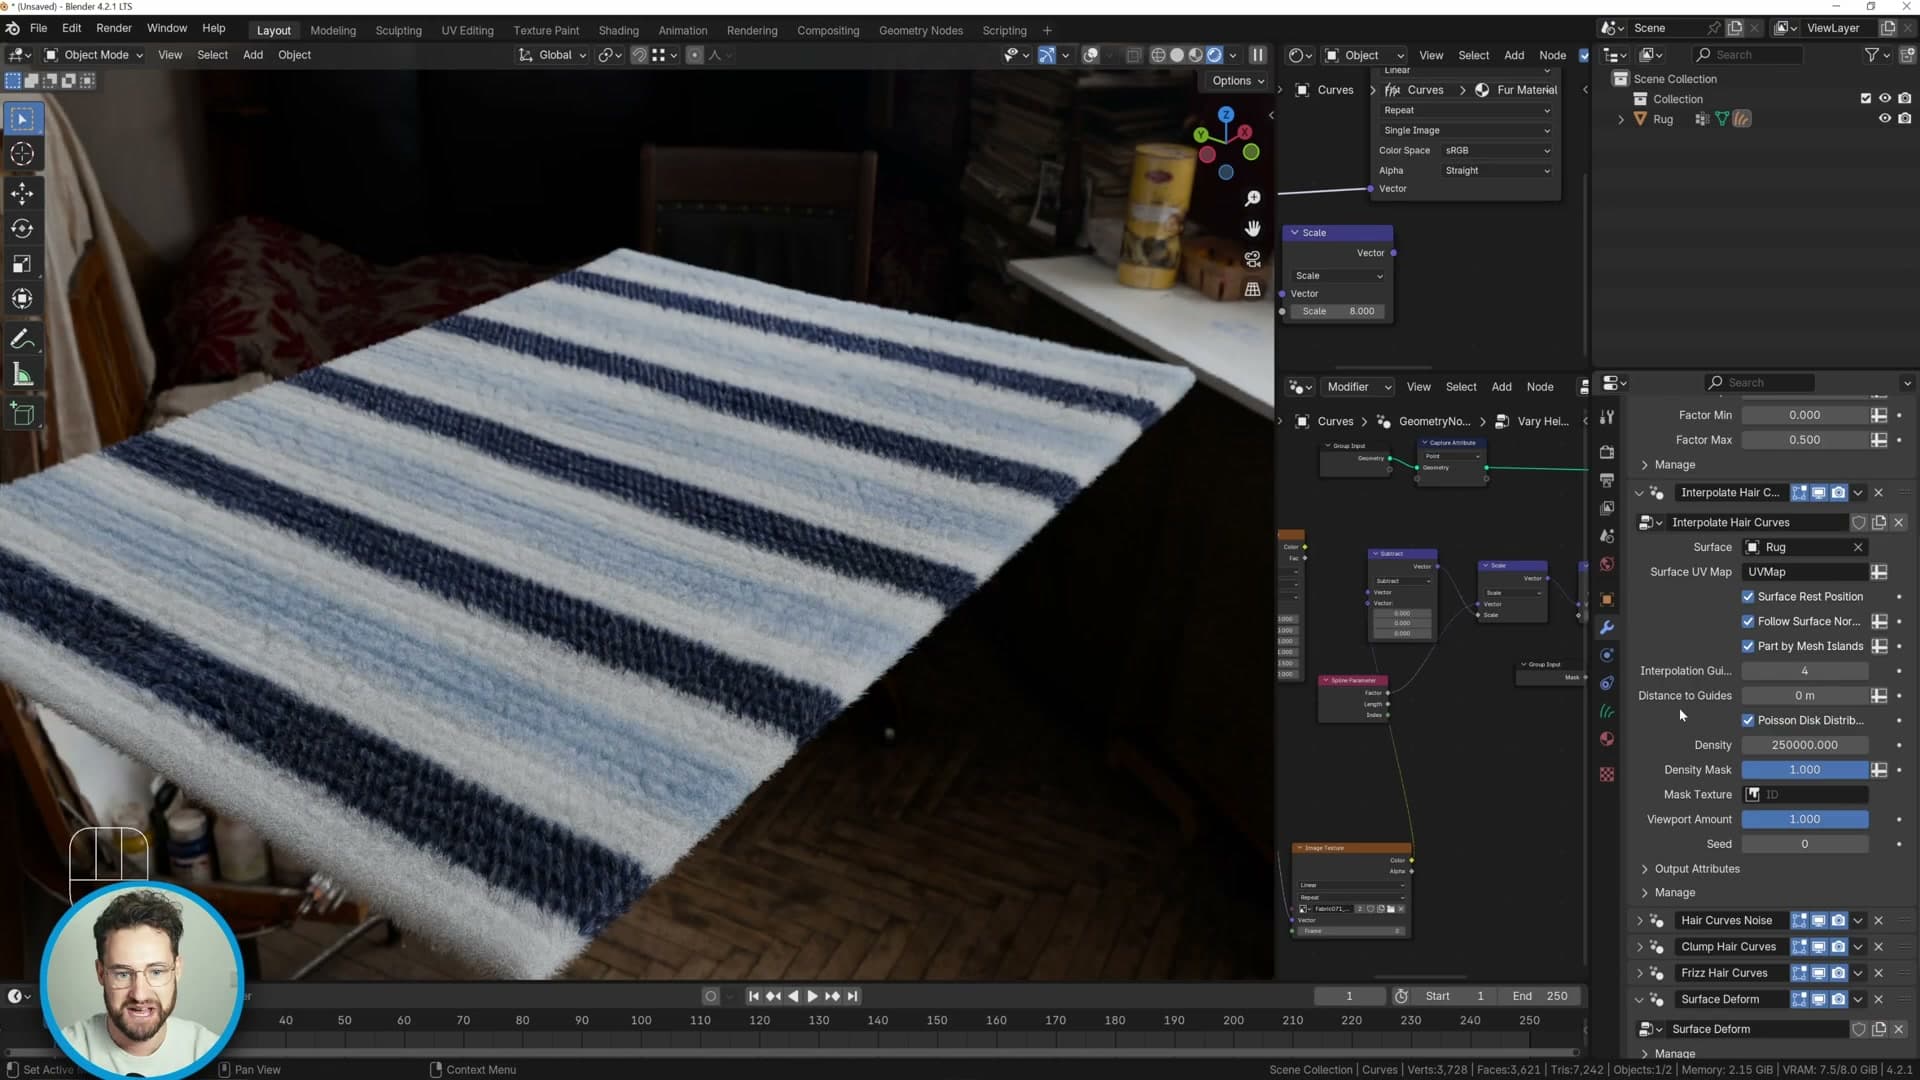
Thinner strands leave more visible gaps between them, so the rug immediately looks less dense than before. Compensate by pushing the interpolated curve count up to around 250,000. The combination of a finer radius and a much higher count gives a very soft, plush surface. At this point the rug is essentially the finished product.
Viewport density at 0.01
At a quarter of a million child curves the viewport becomes painful to use. Orbiting the scene can stall Blender entirely and, on heavier setups, crash it outright. The fix is a single field on the same modifier: find Viewport Density and reduce it to 0.01.

With viewport density at one percent, the system becomes responsive again. You can still see enough of the rug to position it inside a wider archviz scene, and the full density only kicks in at render time.
Final result
That's the finished rug. The base mesh with its bevelled, lifted corners; the painted and combed guides; the stacked Noise, Frizz and Clump modifiers; the custom geometry-node group driving varied height with the edge mask; and Principled Hair BSDF reading the surface UVs all stack into a single, soft, convincing piece of archviz furniture.

Blender's fur curves system is genuinely underrated. It doesn't get talked about nearly as often as it deserves. Paired with the varied-height geometry-node setup you've just built, it should let you create more or less any rug a brief throws at you, from short, tight modern pieces through to long shag styles.
Tools and credits
Everything mentioned in this tutorial, with links.
- Blender . The renderer this entire build runs in.
- iMeshh . Studio platform (project management, client review, asset library, invoicing). The asset library used in this tutorial is included with every iMeshh Pro plan.
- Poly Haven . Free CC0 textures and HDRIs.
Pillar guide: Modelling hub