Setting up a project to animate
Before you can practise camera moves you need a scene. Grab one from iMeshh's full project files or pull a free house from 3D Warehouse via the SketchUp importer.
Why archviz animations matter and what this guide covers
Sooner or later a client is going to ask you for an animation. The stills package gets signed off, the project lands, and a few weeks later they're back asking for a full walkthrough of the finished piece. Being ready for that brief is a critical part of building an archviz career.
This post collects the tips I've built up from shipping archviz walkthroughs over the years: storyboarding the shots before you commit, syncing cameras to music, picking render settings that don't bankrupt the project, and compiling the finished clip in DaVinci Resolve. Everything below comes from real paid jobs, not theory.
Animation is a huge topic and a single guide can't realistically cover every corner of it. My channel has a handful of other animation-focused tutorials that pick up adjacent ground, so dig through those for anything left out below. What follows gives you a complete end-to-end path from empty scene to finished walkthrough.
Finding a scene to test with (iMeshh or 3D Warehouse)
Before any of the camera work makes sense you need a building to fly through. Pick something with real geometry (a room, a house, an exterior) so you can practise different shot types without having to model anything from scratch first.
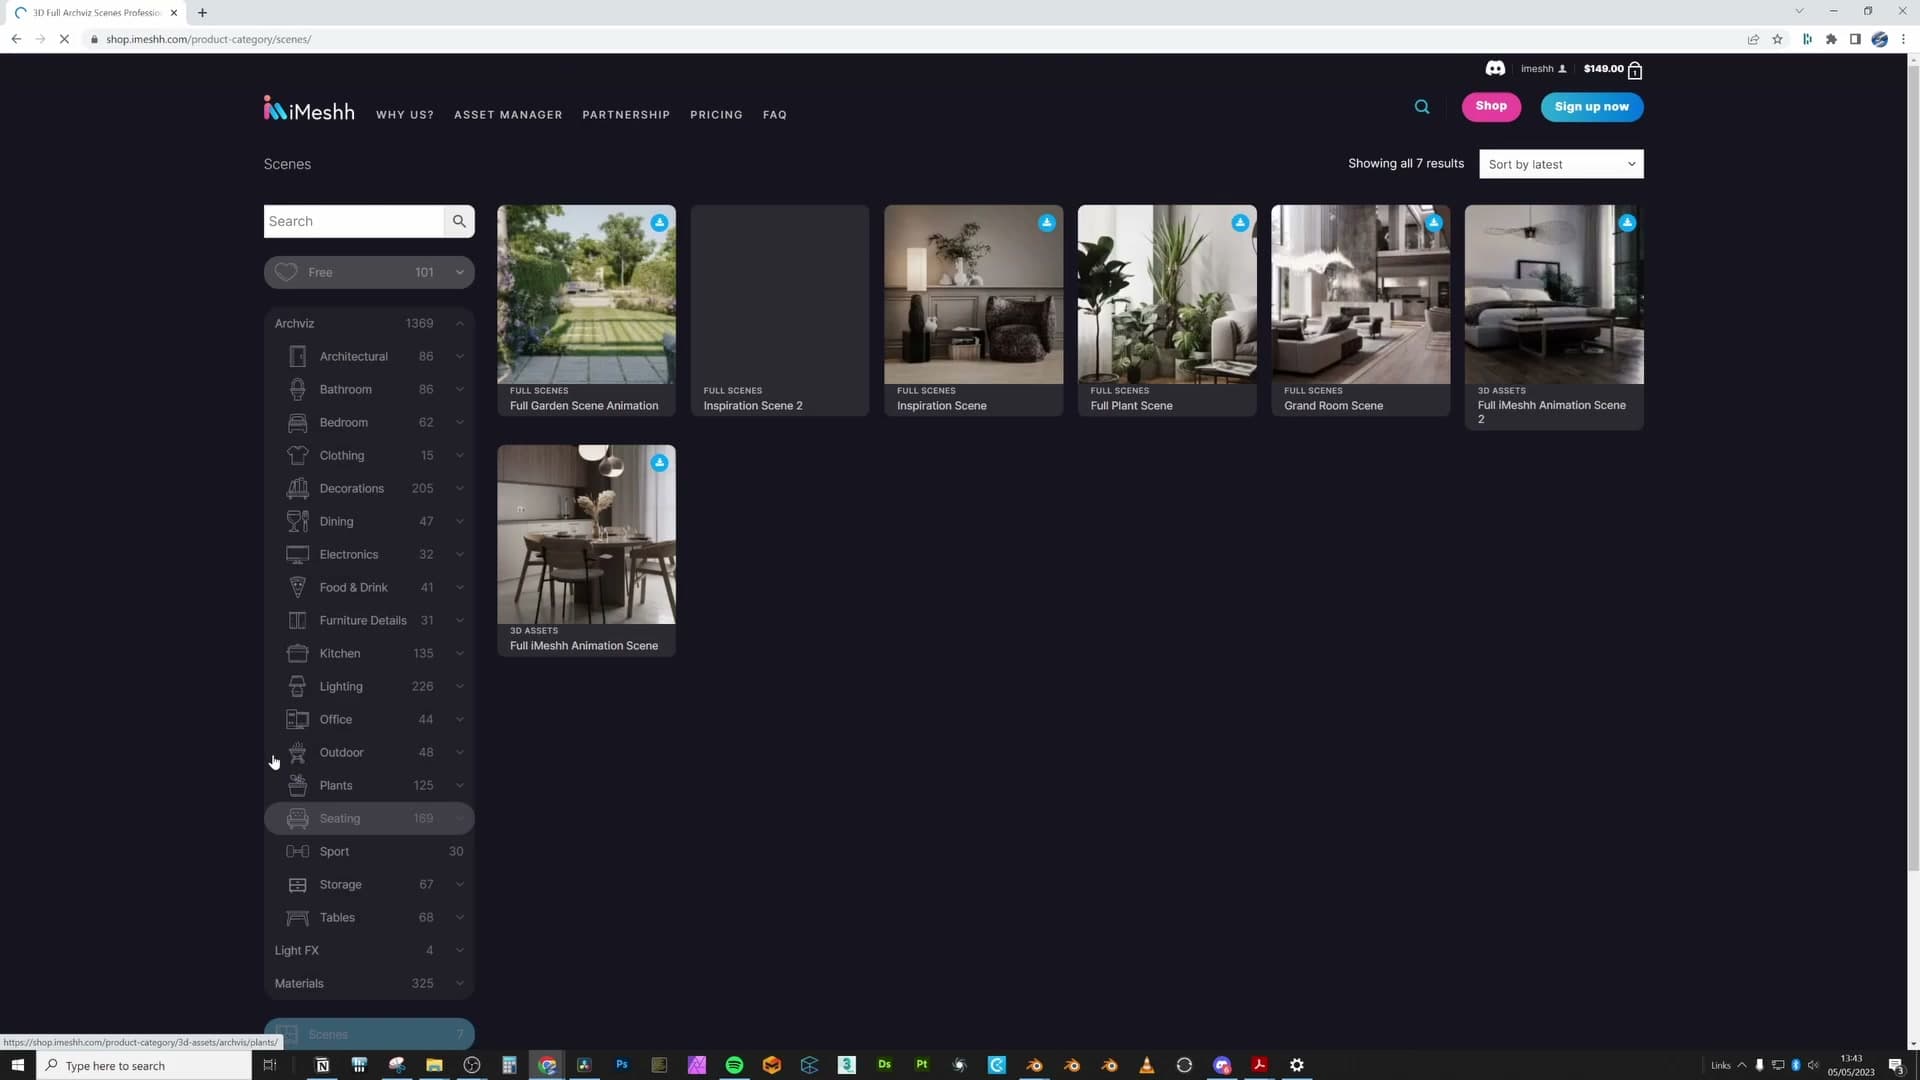
If you're already an iMeshh subscriber, head to the site and open the Scenes section. Every scene listed there ships with the full project file, so you can download any of them and have a fully built environment open in Blender within minutes. Pick one whose layout suits the kind of camera moves you want to rehearse.
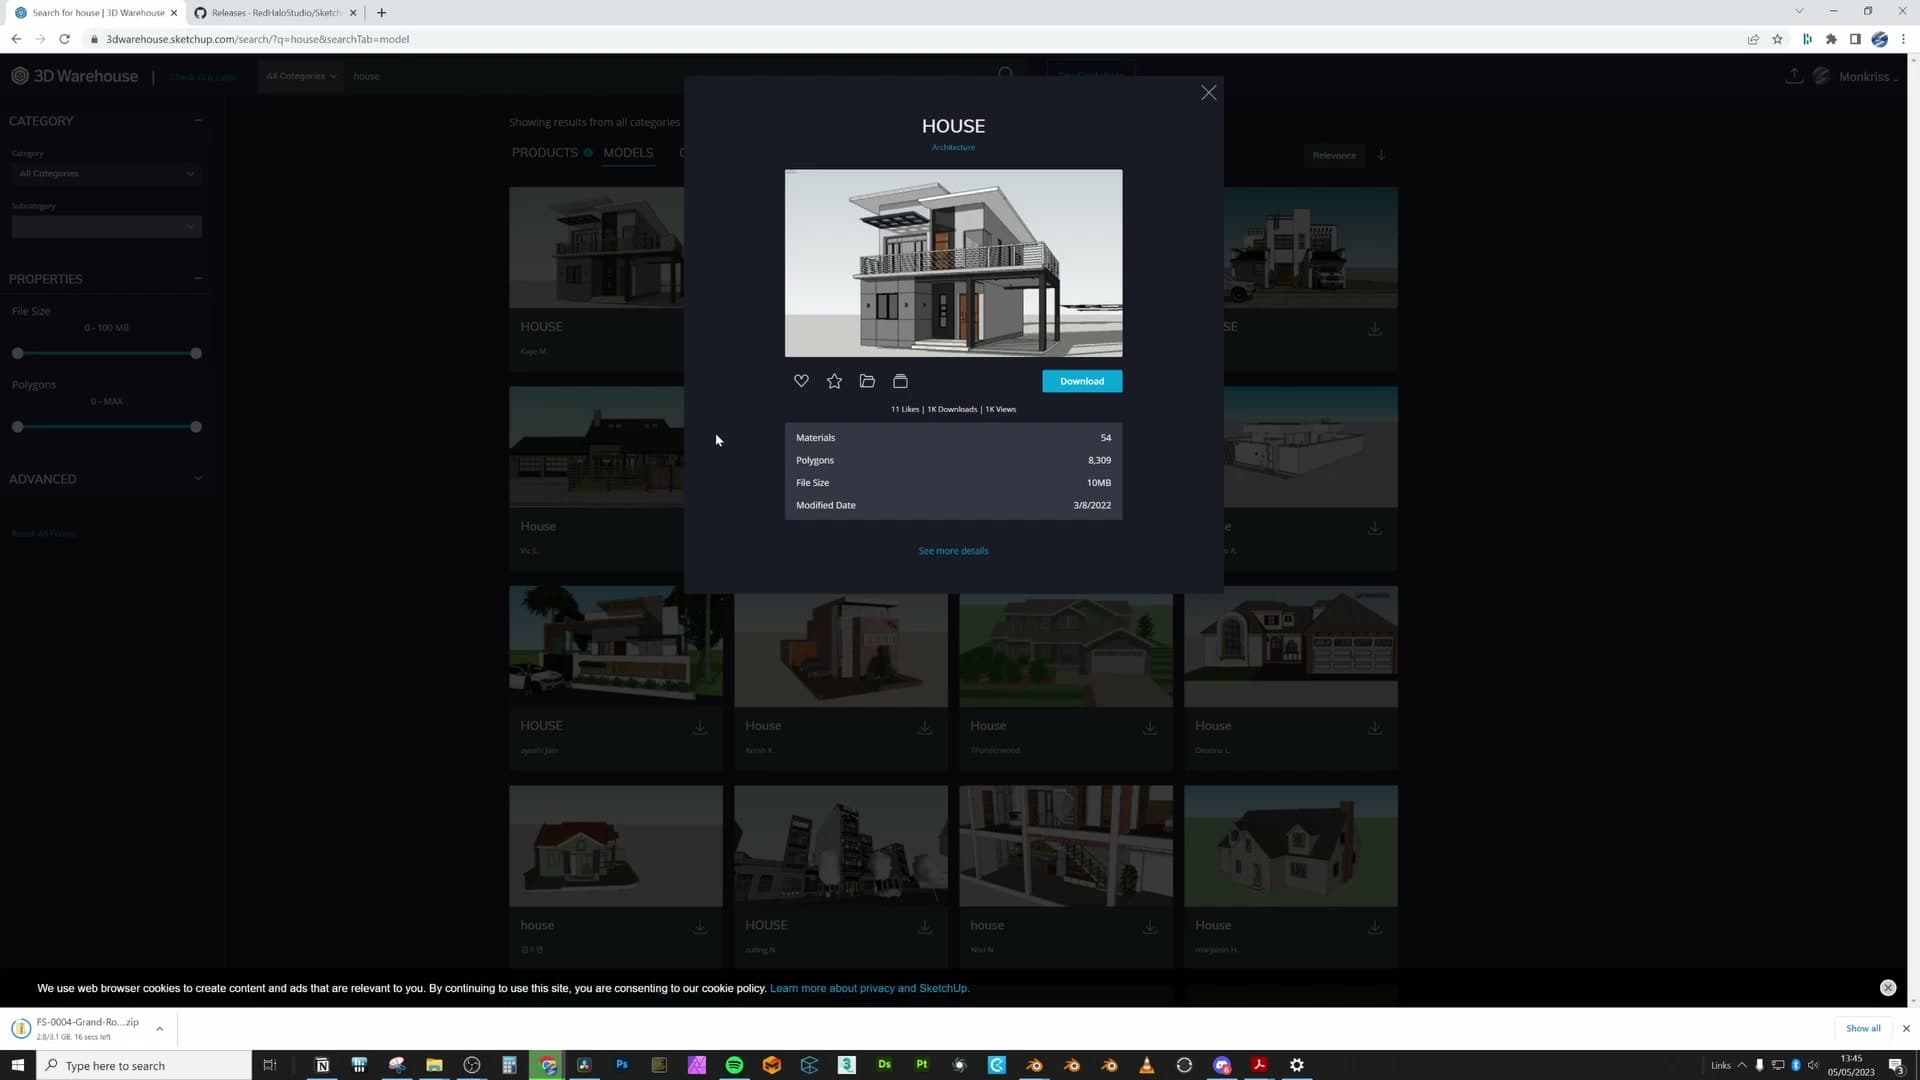
If you're not a subscriber, 3D Warehouse is a solid free alternative. Search for house and you'll find a long list of free project files to choose from. Blender can't open .skp files natively, so you'll first need to install a SketchUp importer plugin from GitHub and then bring the model in through that.
Expect a cleanup pass on anything you pull from 3D Warehouse. The geometry is rarely tidy (duplicated faces, inverted normals, oddly named objects) but it'll give you the basic building footprint you need to start framing shots, which is all this guide needs from a test scene.
Storyboarding the animation
A storyboard sells the flow of the walkthrough before any frames render. Identify the hero shot, draft each camera, and get the client to sign off on order before you commit.
Storyboards and choosing the hero shot
A storyboard shows the client the progression of the walkthrough (what they'll see, and in what order) before a single final frame goes near the render queue. Before drafting one, ask the client which sections matter most to them. They often have a specific area in mind that they want featured, and that answer changes which cameras you bother to draft.
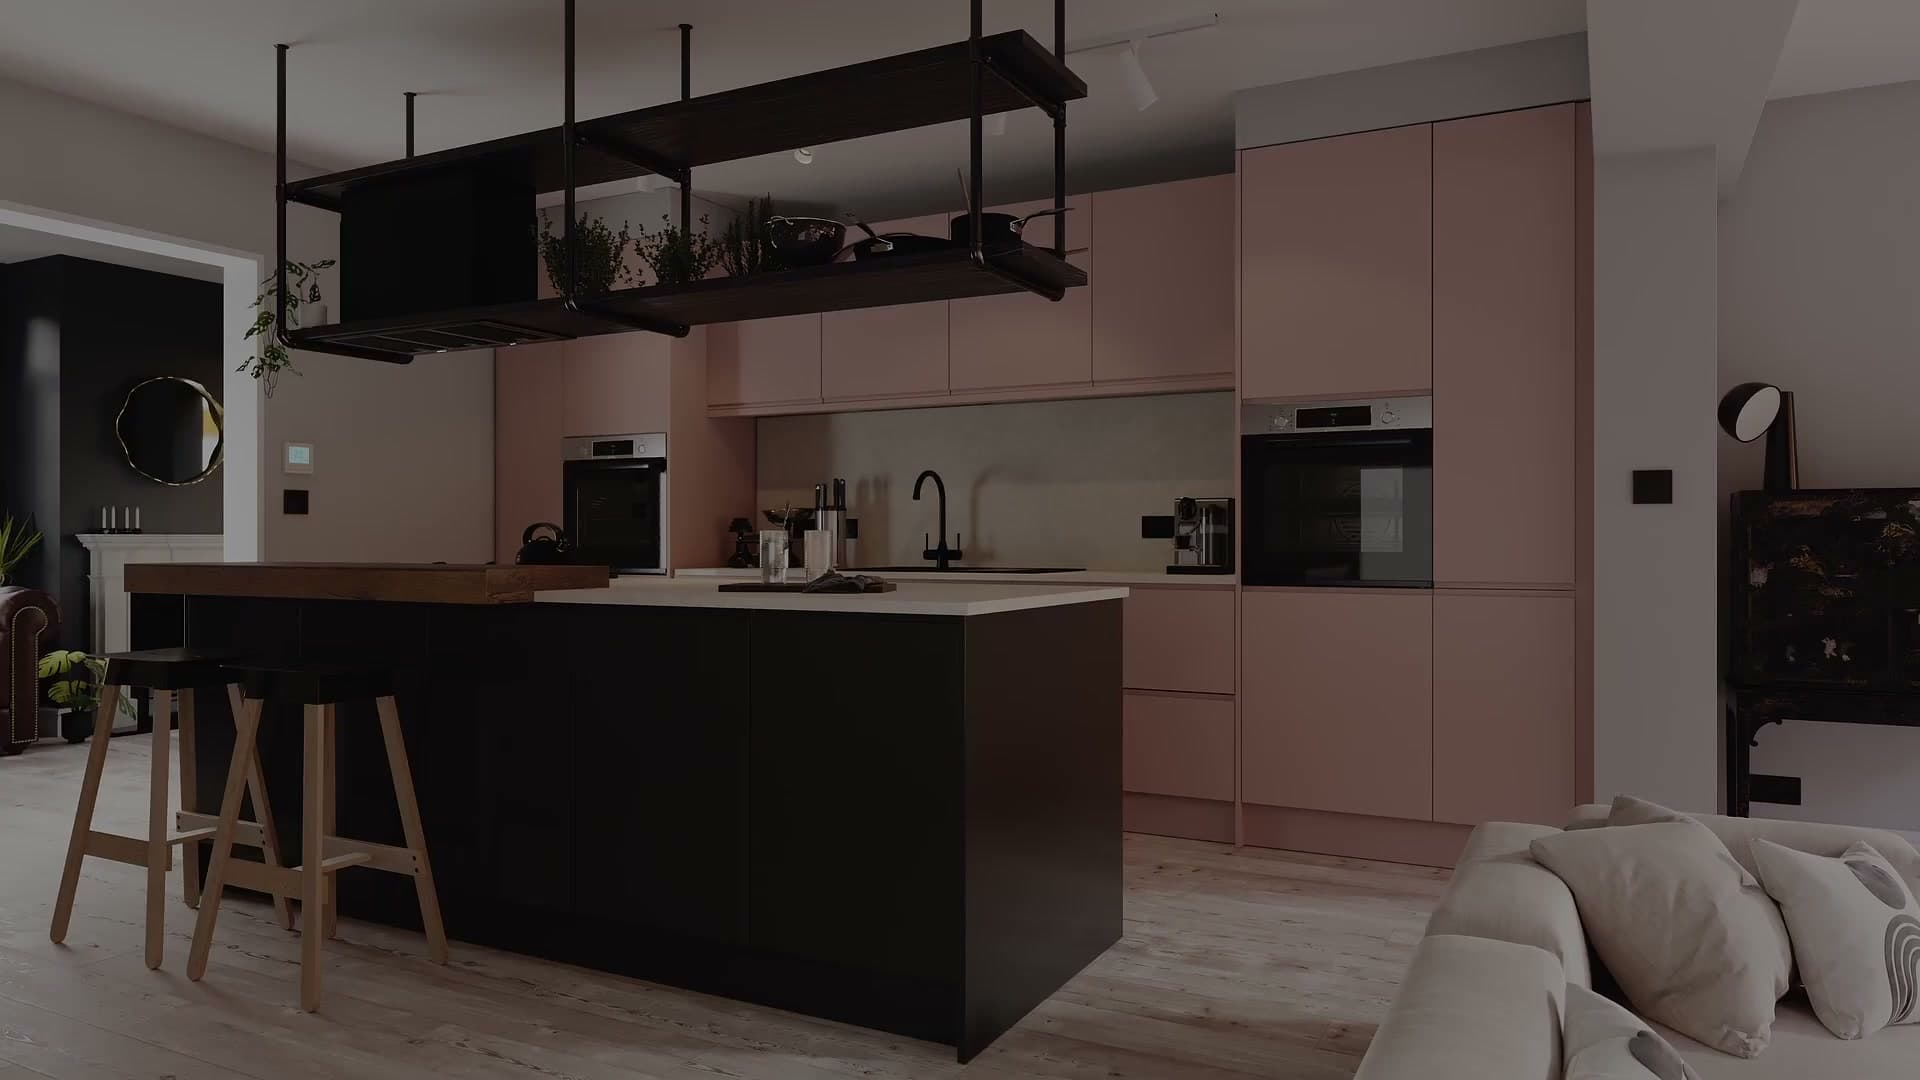
Every walkthrough also needs a hero shot: the moment that sells the whole project. It's usually the closing frame, sometimes the opener, and occasionally both. In the kitchen walkthrough shown here, the camera follows the build sequence and lands on the finished kitchen. That final frame is the hero shot, and everything before it exists to lead the eye towards it.
Quick camera drafts for the storyboard
Once you know which sections matter, draft a quick camera for each one so the client can compare them side by side. Working from a finished scene like this one means you can lift the existing cameras for the living room, the kitchen tables and the focus areas you've already considered. Starting from a downloaded house instead? Drop in placeholder sofas, tables and a rough kitchen first so the empty rooms need to read as the spaces they're meant to be. The storyboard only works if each frame actually looks like a room.
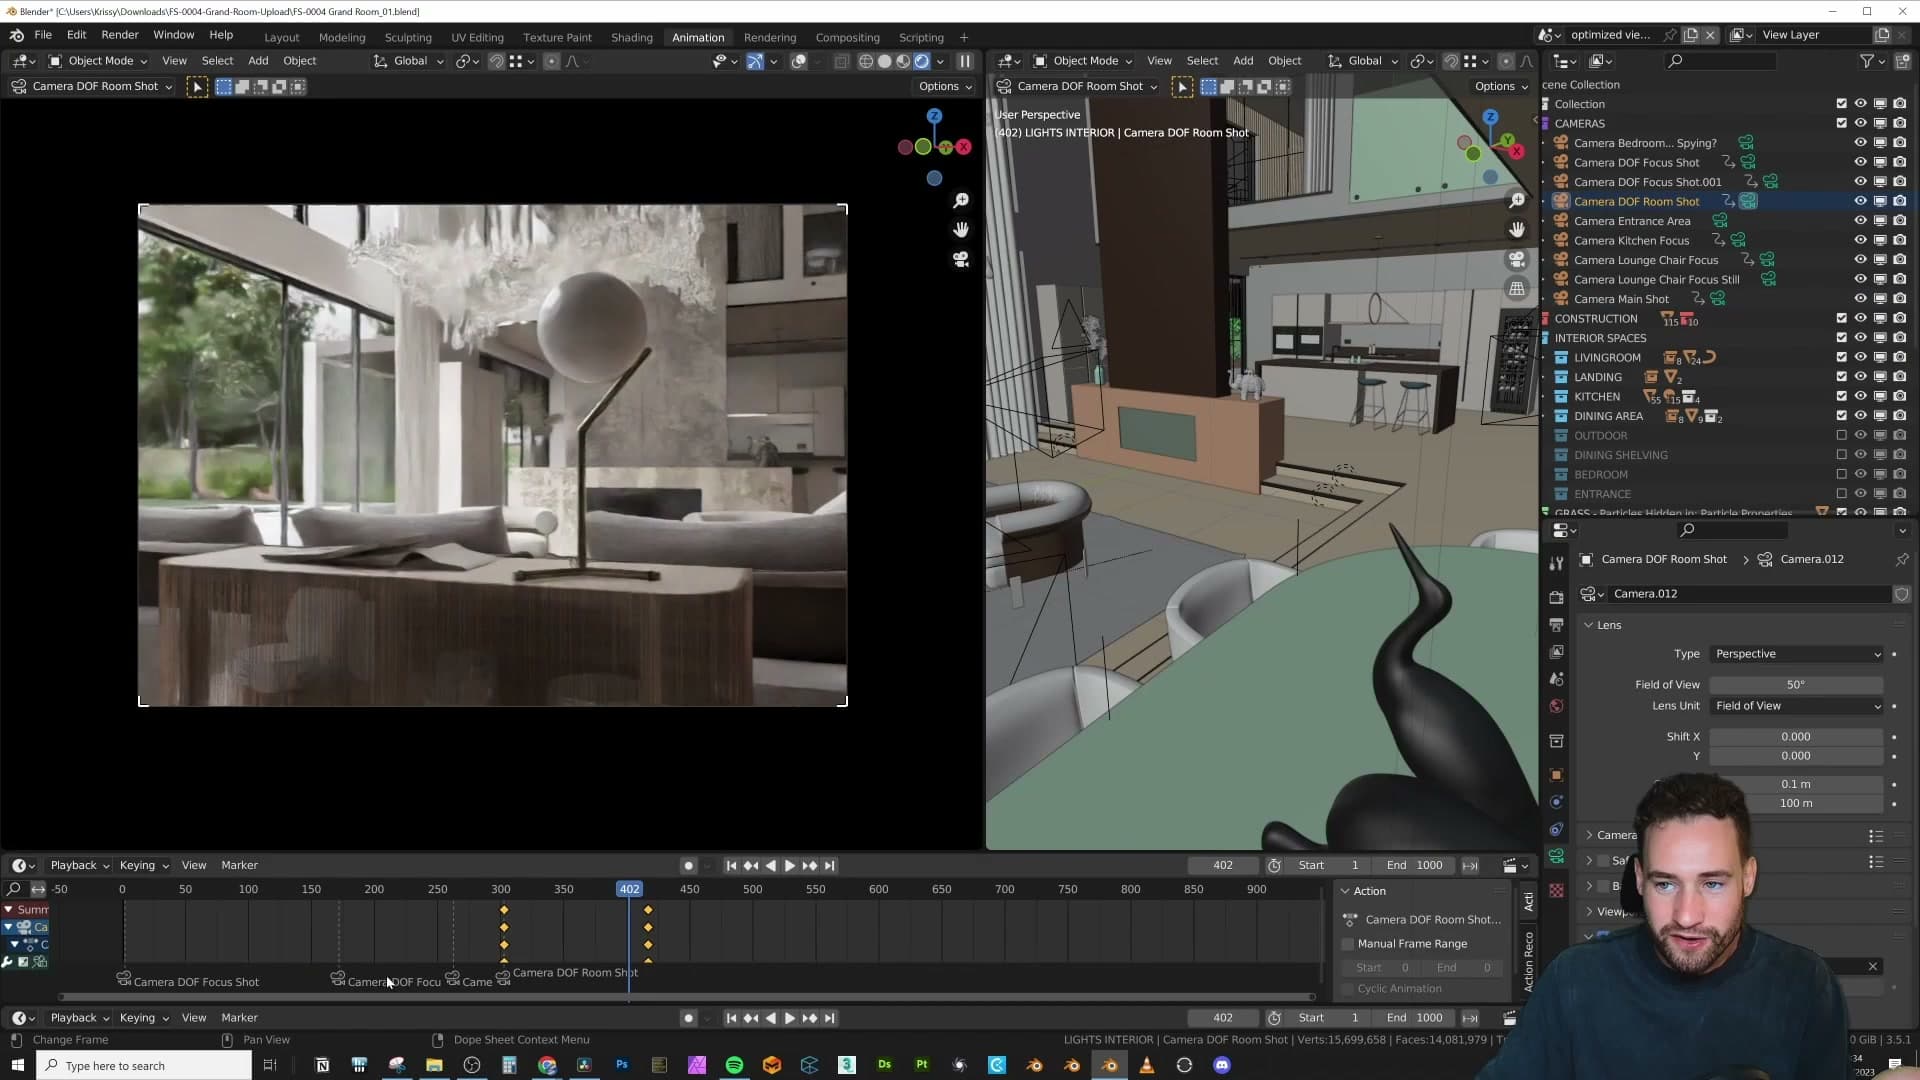
Turn denoising on in the render settings so each preview comes out clean enough to read at a glance. You don't need a final-quality pass here; frame the camera you like, take a screen grab, and move on. If a particular frame feels close to the hero shot, let it render a bit longer. Otherwise keep them rough.
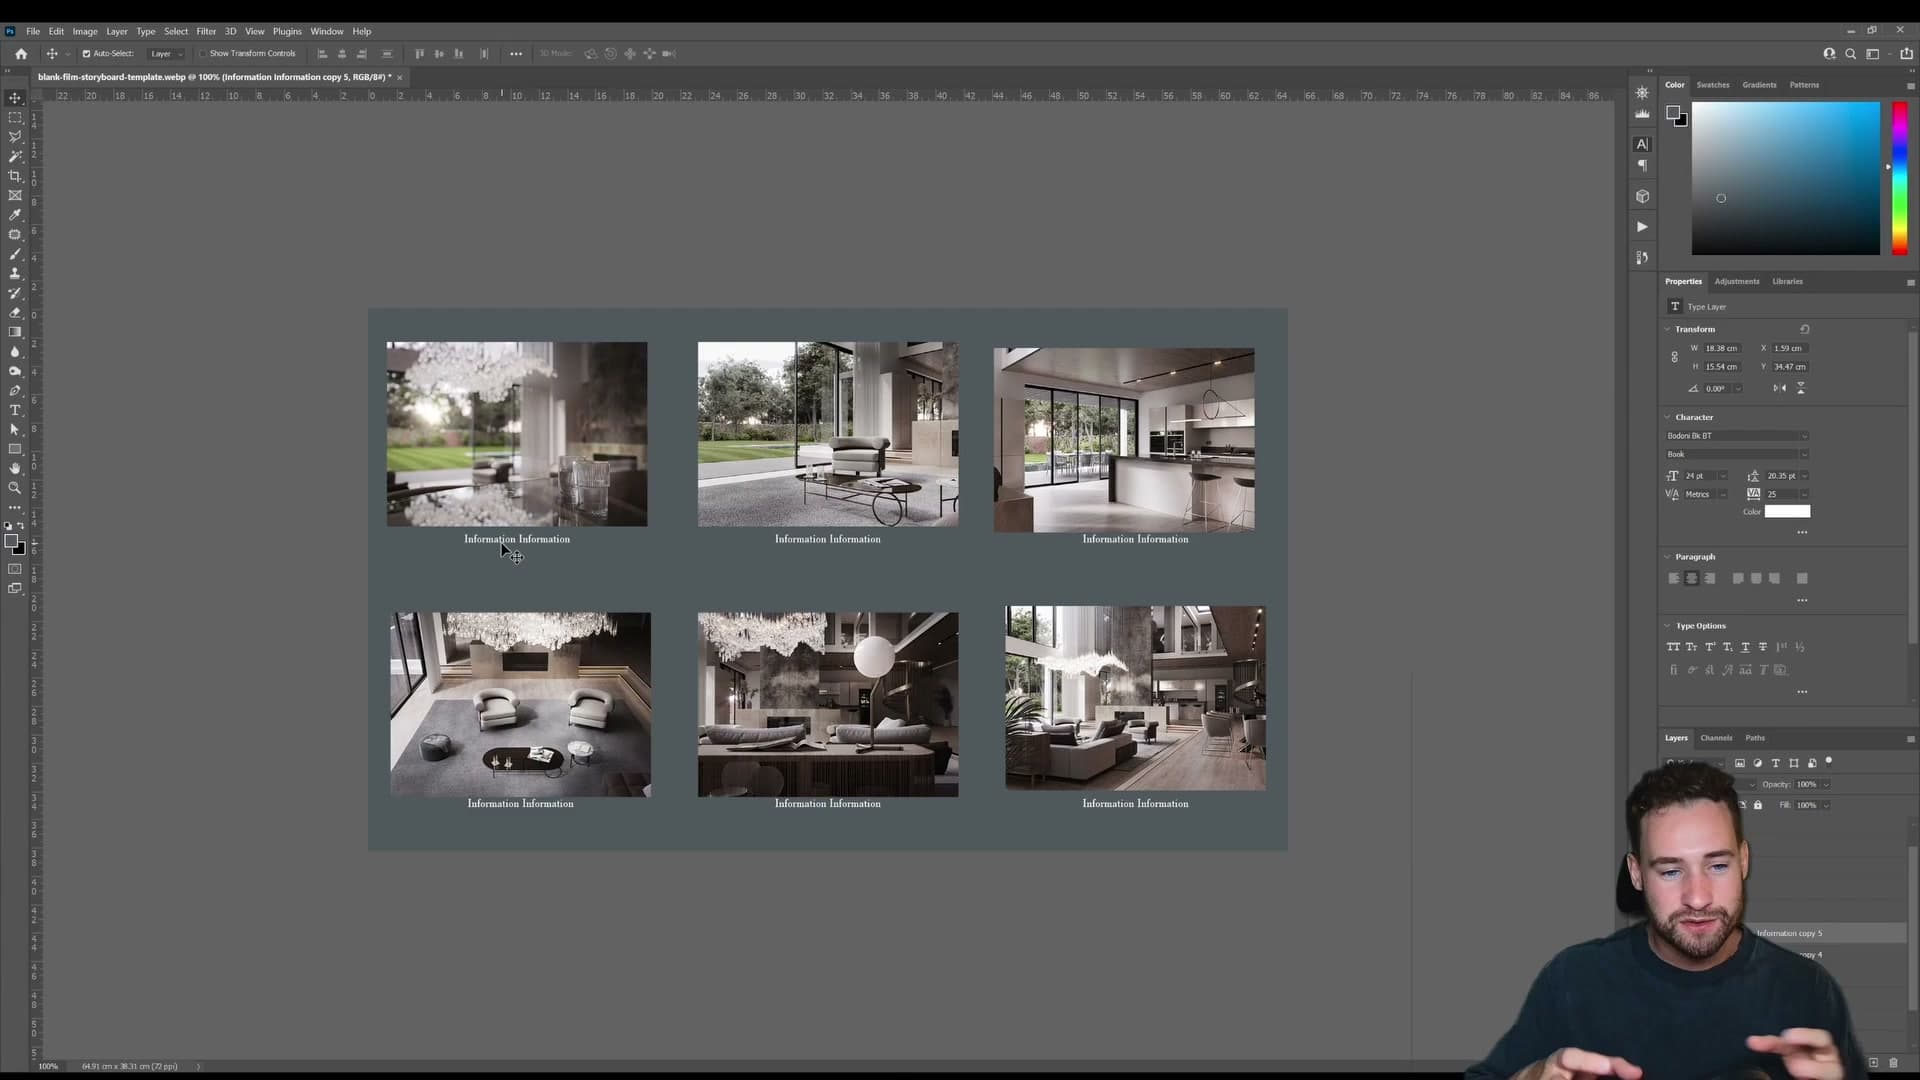
Number the screen grabs in playback order (1 through 20, or however many cuts you've drafted) and send them across with a short note describing the flow: start with small highlights, gradually reveal more of the space, finish on the hero shot. Some clients want a proper discussion around the order; others just want to confirm the numbered sequence looks right before you commit any render time. Either way, the storyboard is what they sign off on, and that sign-off is what protects you from re-rendering half the animation later.
Syncing cameras to music with timeline markers
Pick the track early, drop it into the Video Sequencer with the waveform visible, and bind each camera to a marker on the beat so cuts land in time.
Choosing music and showing the waveform in the VSE
Picking the soundtrack before you animate gives you a feel for how the camera moves should breathe. You can sense whether a track suits the scene's mood before you commit to anything. Some people prefer to cut to music after the fact, rendering extra frames so they have spare runway to edit against, but the workflow here is the other way round: lock the music in first so every camera can be timed against it from the start.
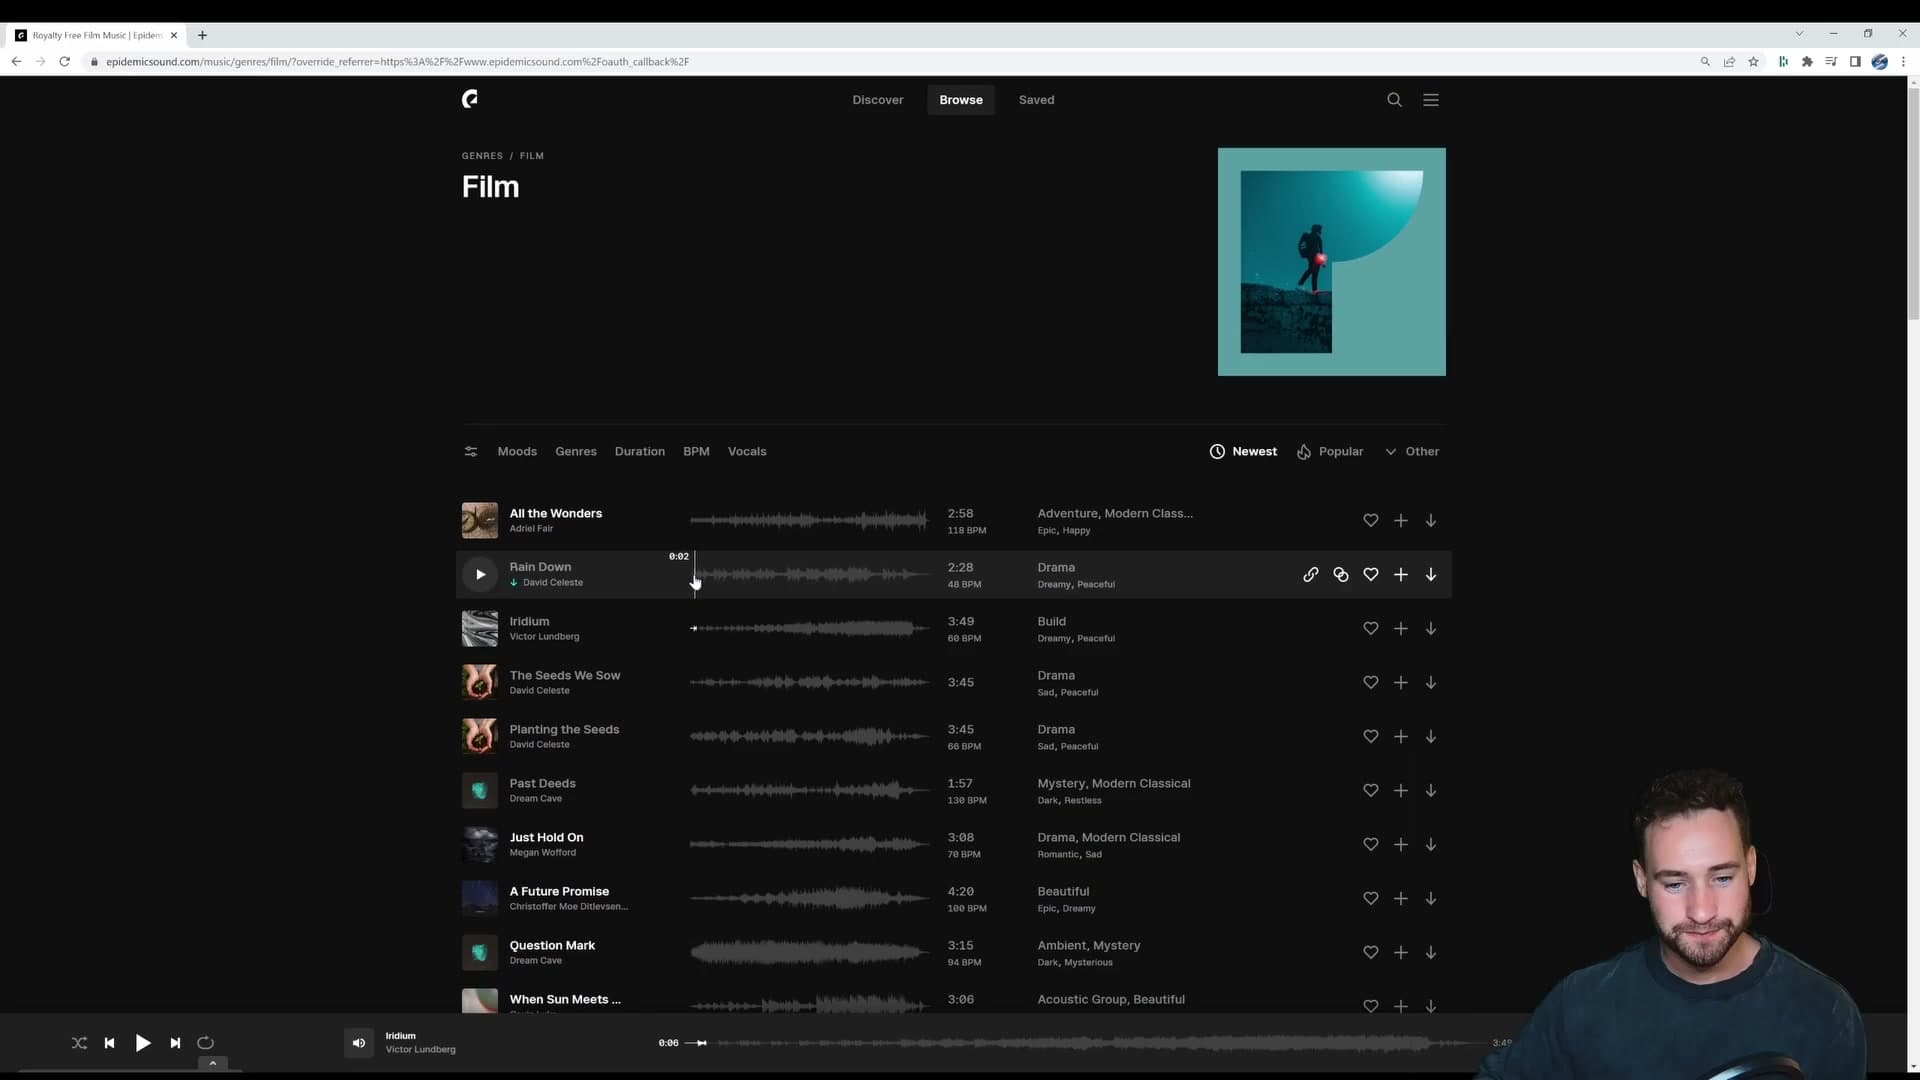
The track for this animation comes from Epidemic Sound, a paid-monthly library, not free, but with a deep catalogue and a straightforward licence. For this scene the choice was a piano-led piece with clear breaks between phrases, which makes the beats easy to read once they're on screen in Blender.
To get the track in front of you while you work, switch one of your editors to the Video Sequencer, then choose Add → Sound and pick the audio file. The clip lands on a sequencer strip and will play back alongside the rest of the scene.
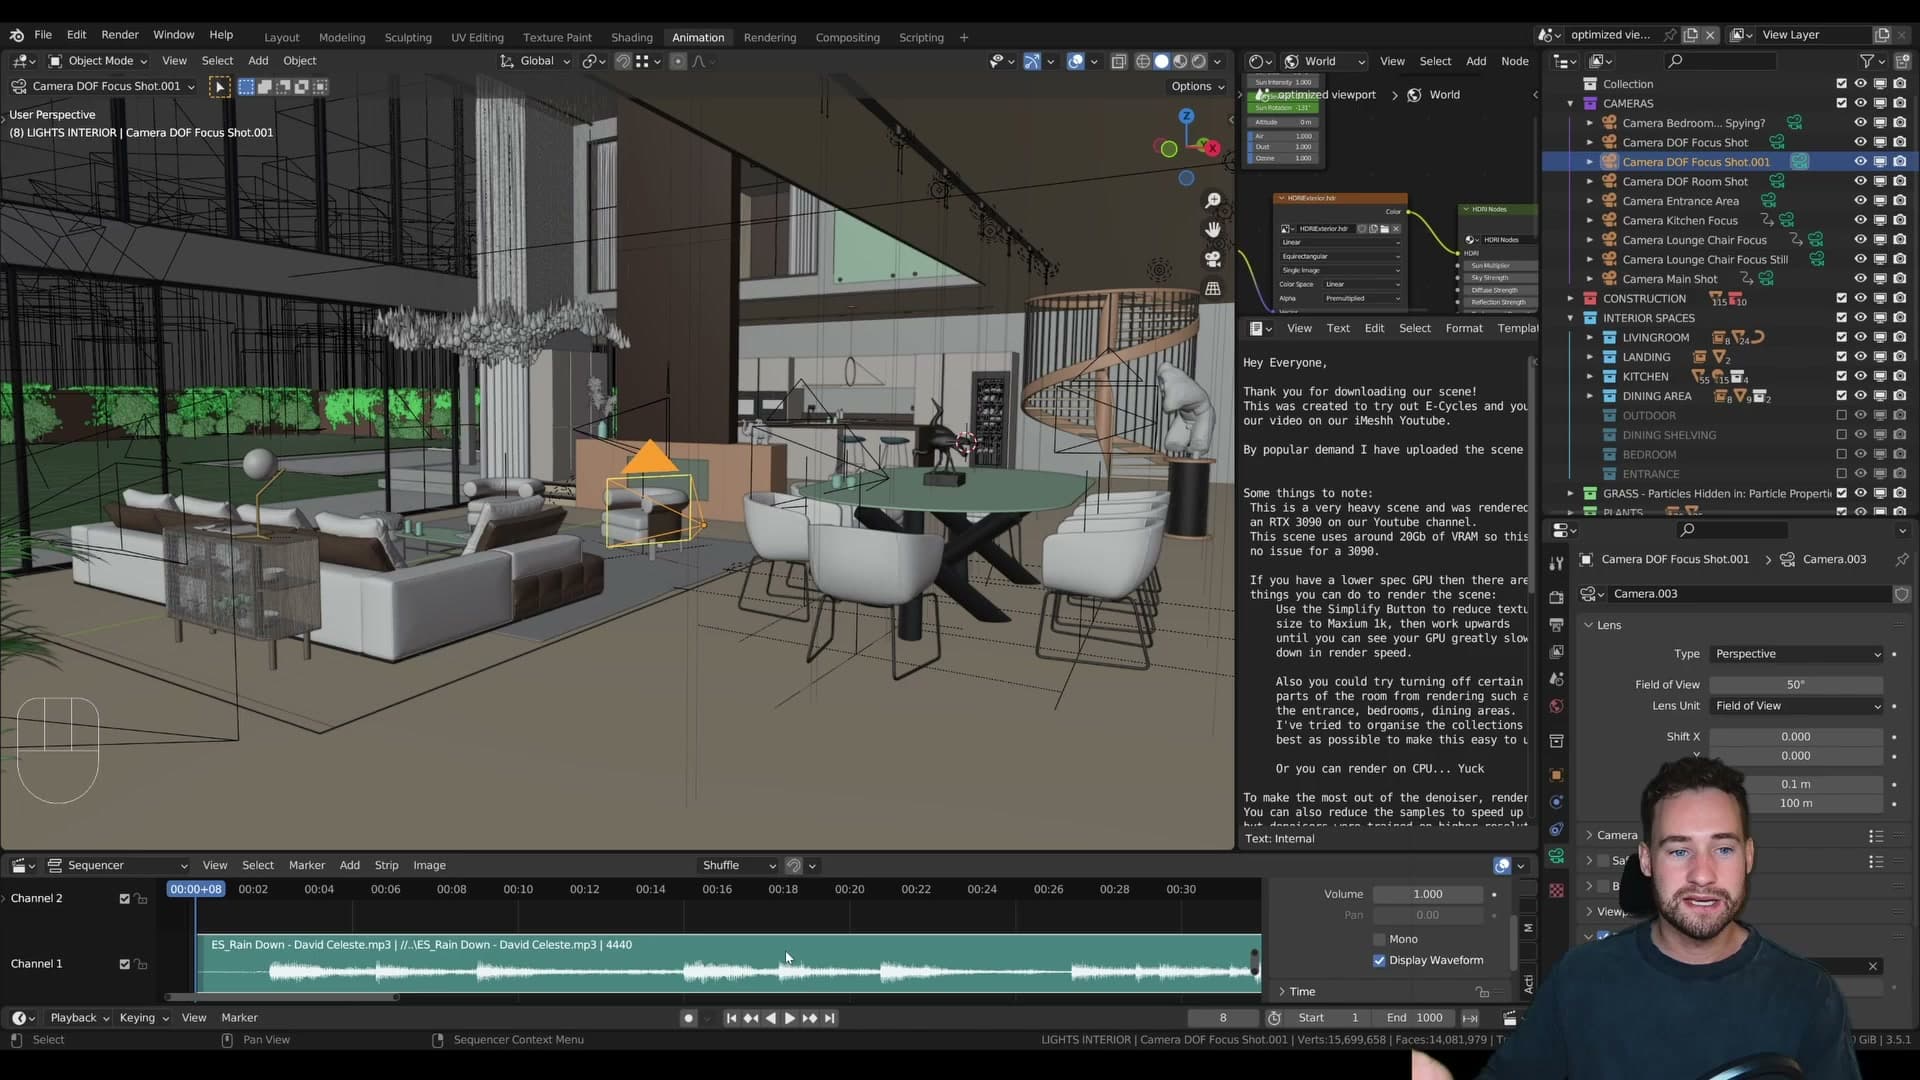
By default you'll see the strip but not the underlying audio shape. Press N to open the side panel and tick Display Waveform. The peaks and gaps now visible on the strip are your beat map, and those are the spots you'll line cameras up to in the next step.
Binding cameras to markers with Ctrl+B
Drop into the first camera from your storyboard so you're looking through it in the viewport. The plan is to tie each beat in the waveform to whichever camera should be active at that moment, and Blender does most of the work once a marker exists.
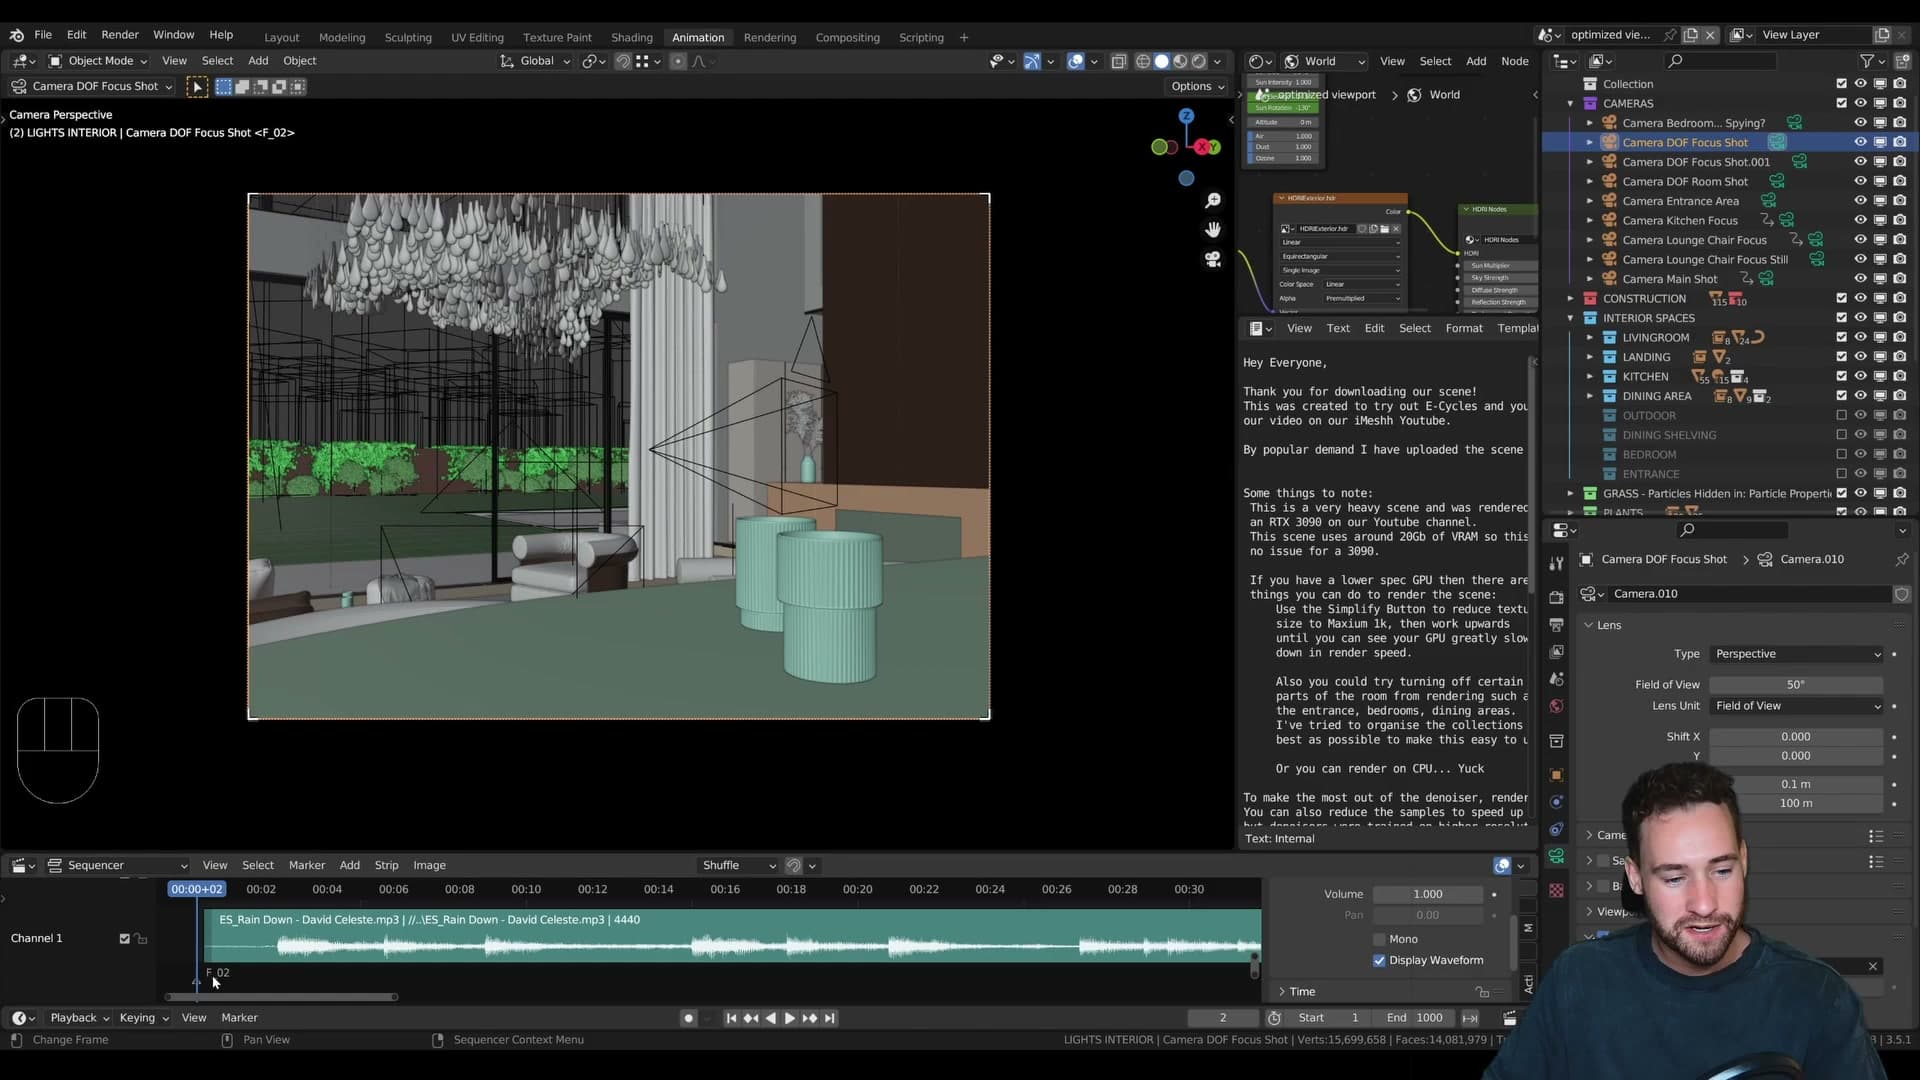
In the Sequencer, choose Marker → Add Marker at the timeline position where you want the cut to land. Make sure the marker is selected (it sits slightly greyed-out until you click it), then press Ctrl+B. Blender ties the active camera to that marker, and a small camera icon under the marker confirms the bind.
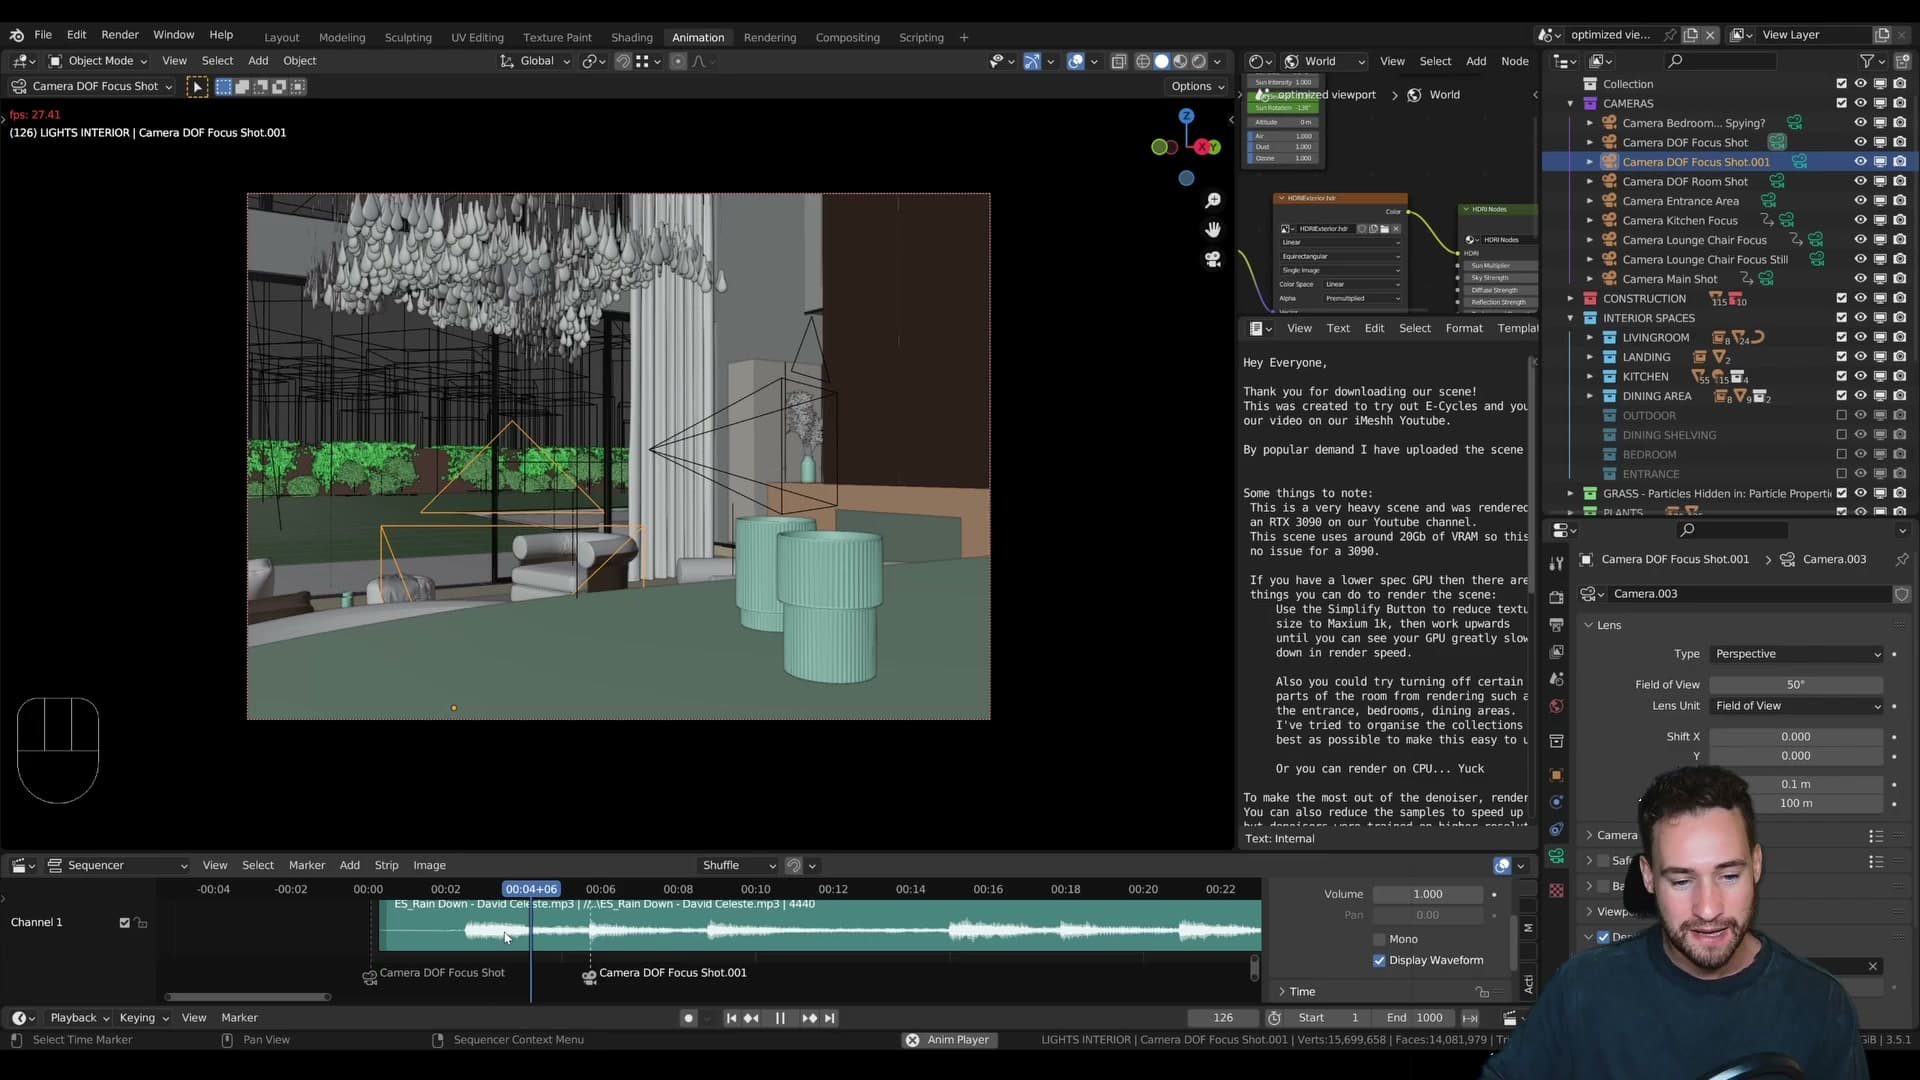
Repeat for every other beat. Step forward to the next prominent peak in the waveform, switch into the next storyboard camera, drop a marker, and press Ctrl+B again. Once two or three markers are down you can scrub or play through the section and Blender will cut between cameras automatically on each beat. That's the first real preview of how the finished animation will flow.
Fixing sync with Frame Dropping in playback settings
Play the timeline back and you'll often find the cuts don't land where the markers say they should. The audio carries on past the visible point of change. That isn't a binding problem. It's that the viewport can't draw frames fast enough to keep up, so playback limps along at something like 10 fps while the audio runs at full speed, and the mismatch shifts every cut off the beat.
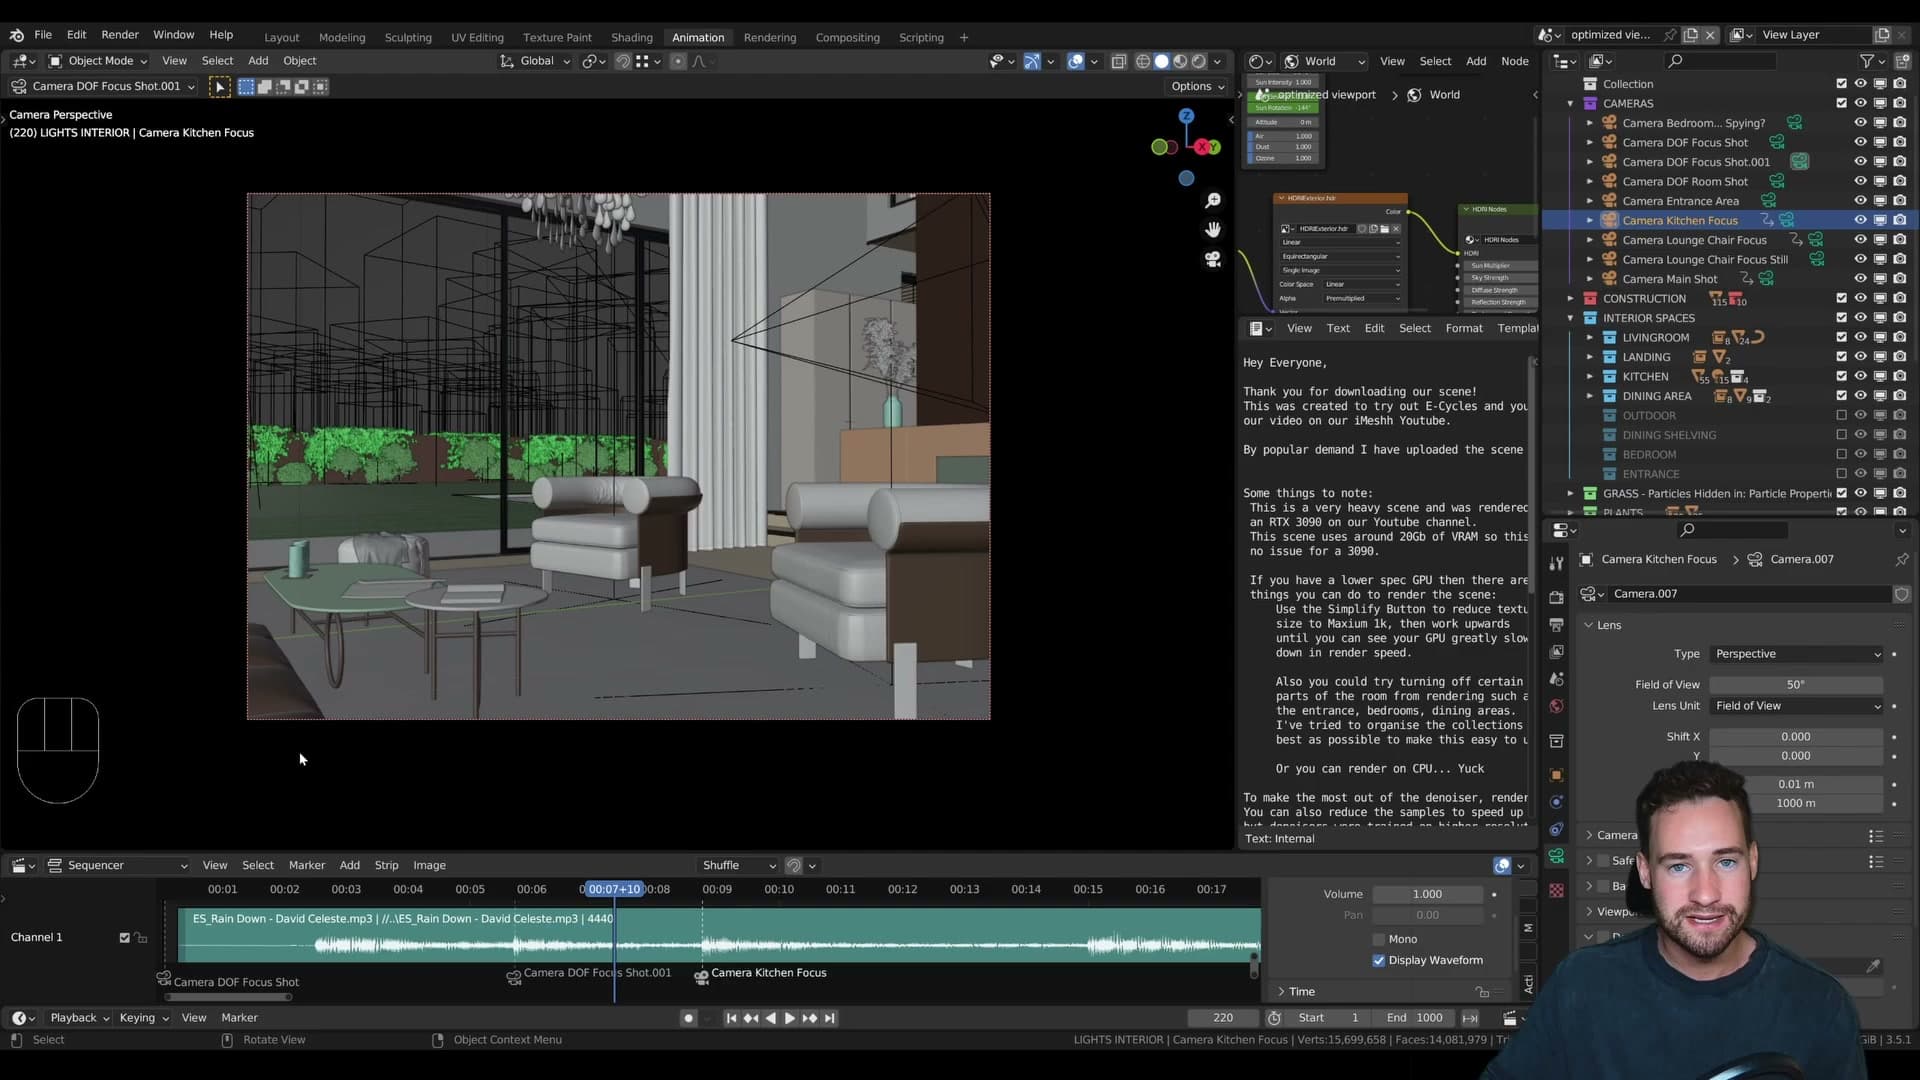
On very lightweight scenes you may not notice this at all, but as soon as the scene has dense geometry or reflective materials the lag becomes obvious. The fix is to let Blender skip frames it can't render in time so the timeline keeps pace with the soundtrack.
Open the Timeline header, click Playback, and under Sync choose Frame Dropping. Now when you go back to the Sequencer the camera changes hit on the beat. You've traded smooth visuals for accurate timing, which is exactly what you want while you're judging whether the cuts feel right.
Animating the cameras
Walk-navigate the camera into position with Shift+F, drop location keyframes at the start and end of each shot, then switch interpolation to Linear so motion stays steady.
Keyframing camera location with walk navigation
With your music marked up and the cameras parked in place, it is time to actually animate them. Start with the first camera, jump to the first frame of its shot, then with the camera selected press I and choose Location. That drops the starting keyframe.
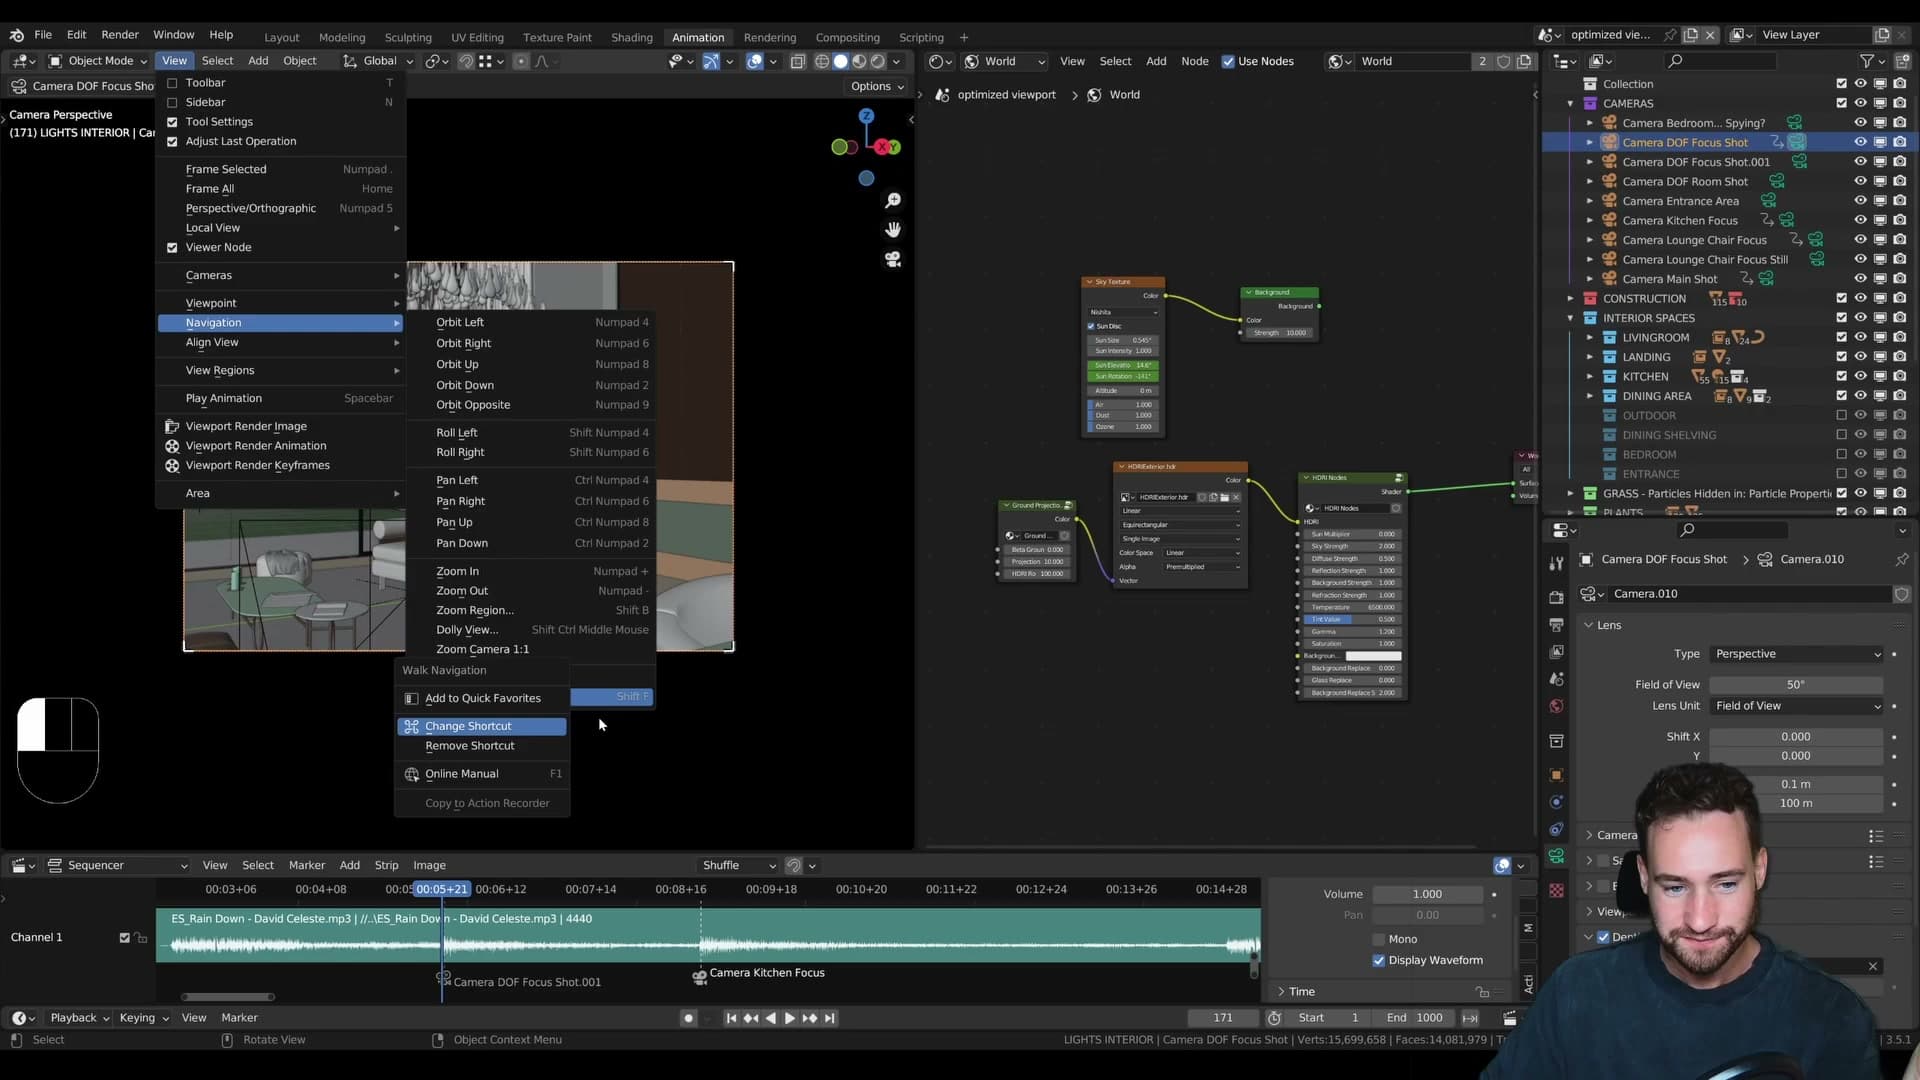
Now scrub to the last frame of that shot. You need the camera in its end position, and the cleanest way to fly it there is walk navigation. Press Shift+F, push the camera forward through the scene with the mouse and WASD, then left-click to commit the new position. Press I → Location again to set the second keyframe.
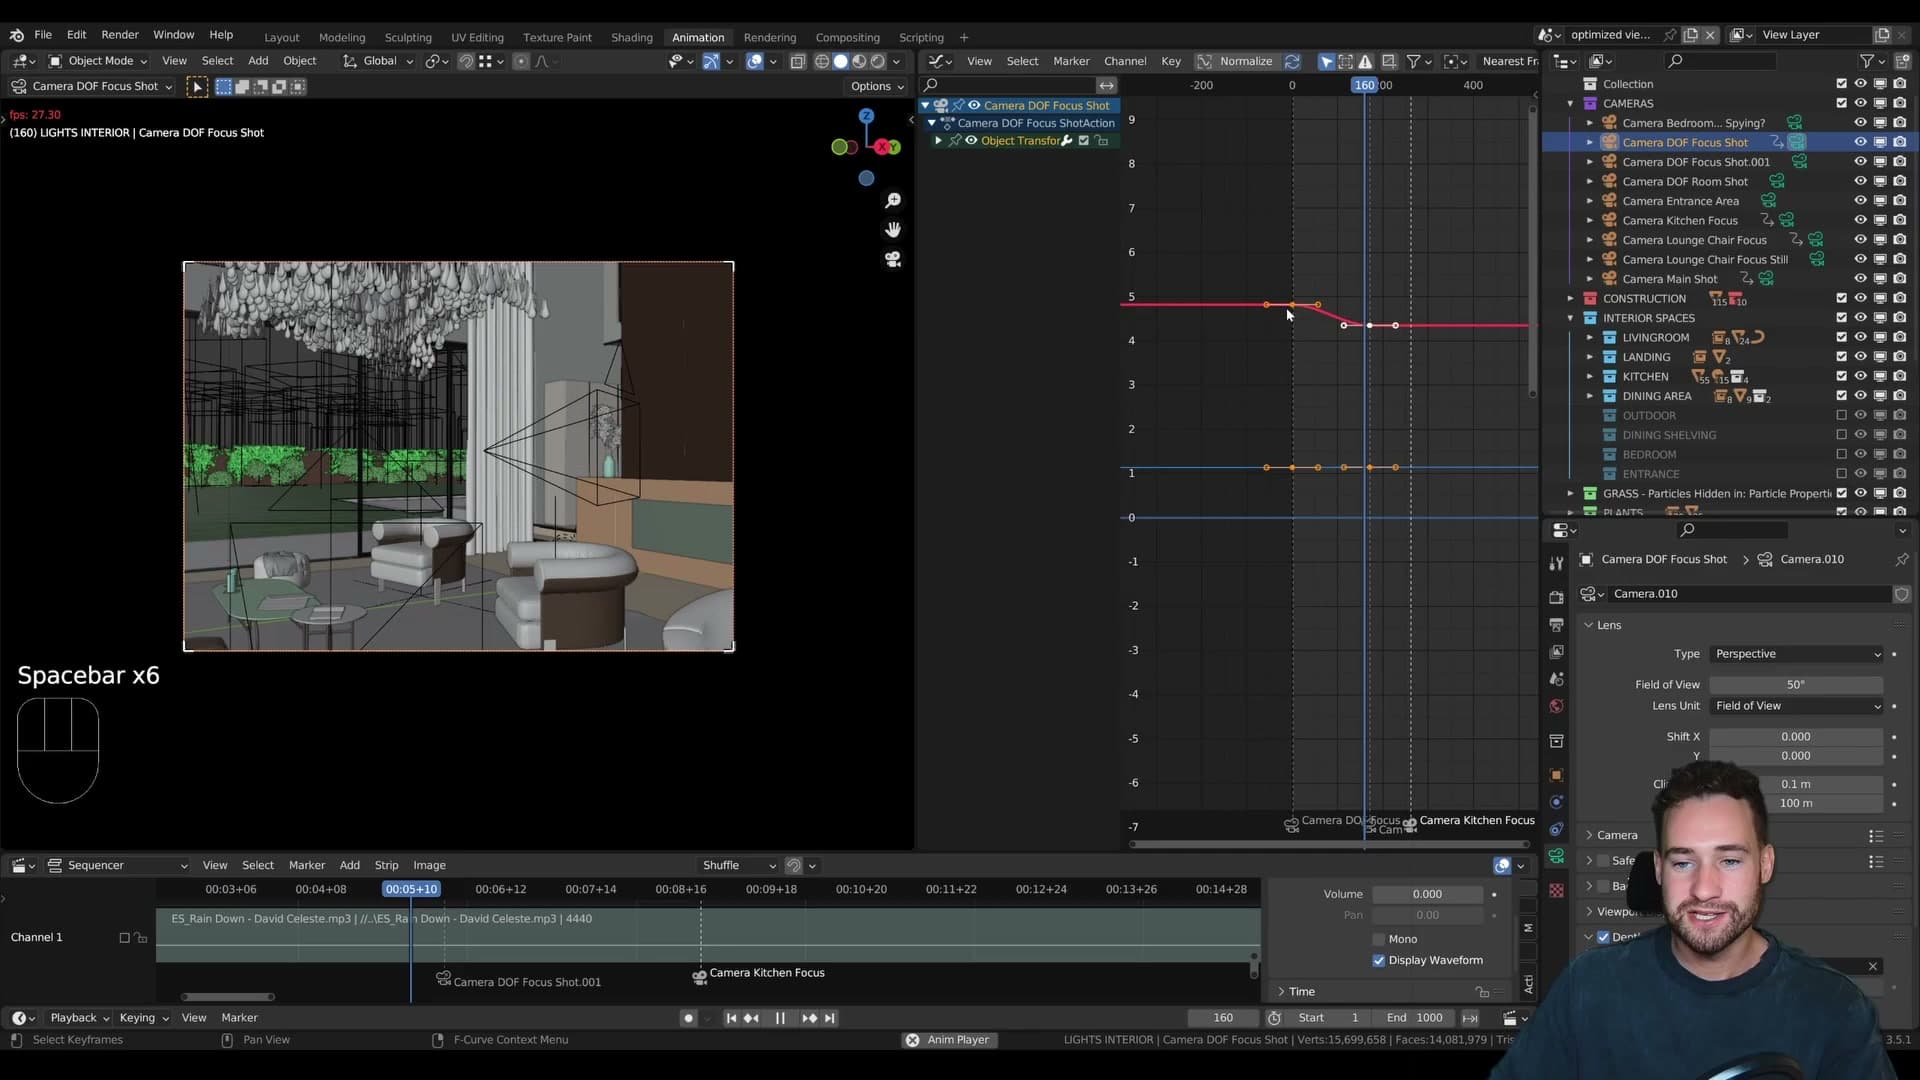
Shift+F is not Blender's default any more. It is a custom rebind. To set it up, head to View → Navigation → Walk Navigation, right-click the menu entry and choose Assign Shortcut, then tap Shift+F. Anyone who used Blender 2.79 will recognise it instantly; that was the original fly-mode shortcut before the 2.8 overhaul.
Switching default interpolation to Linear
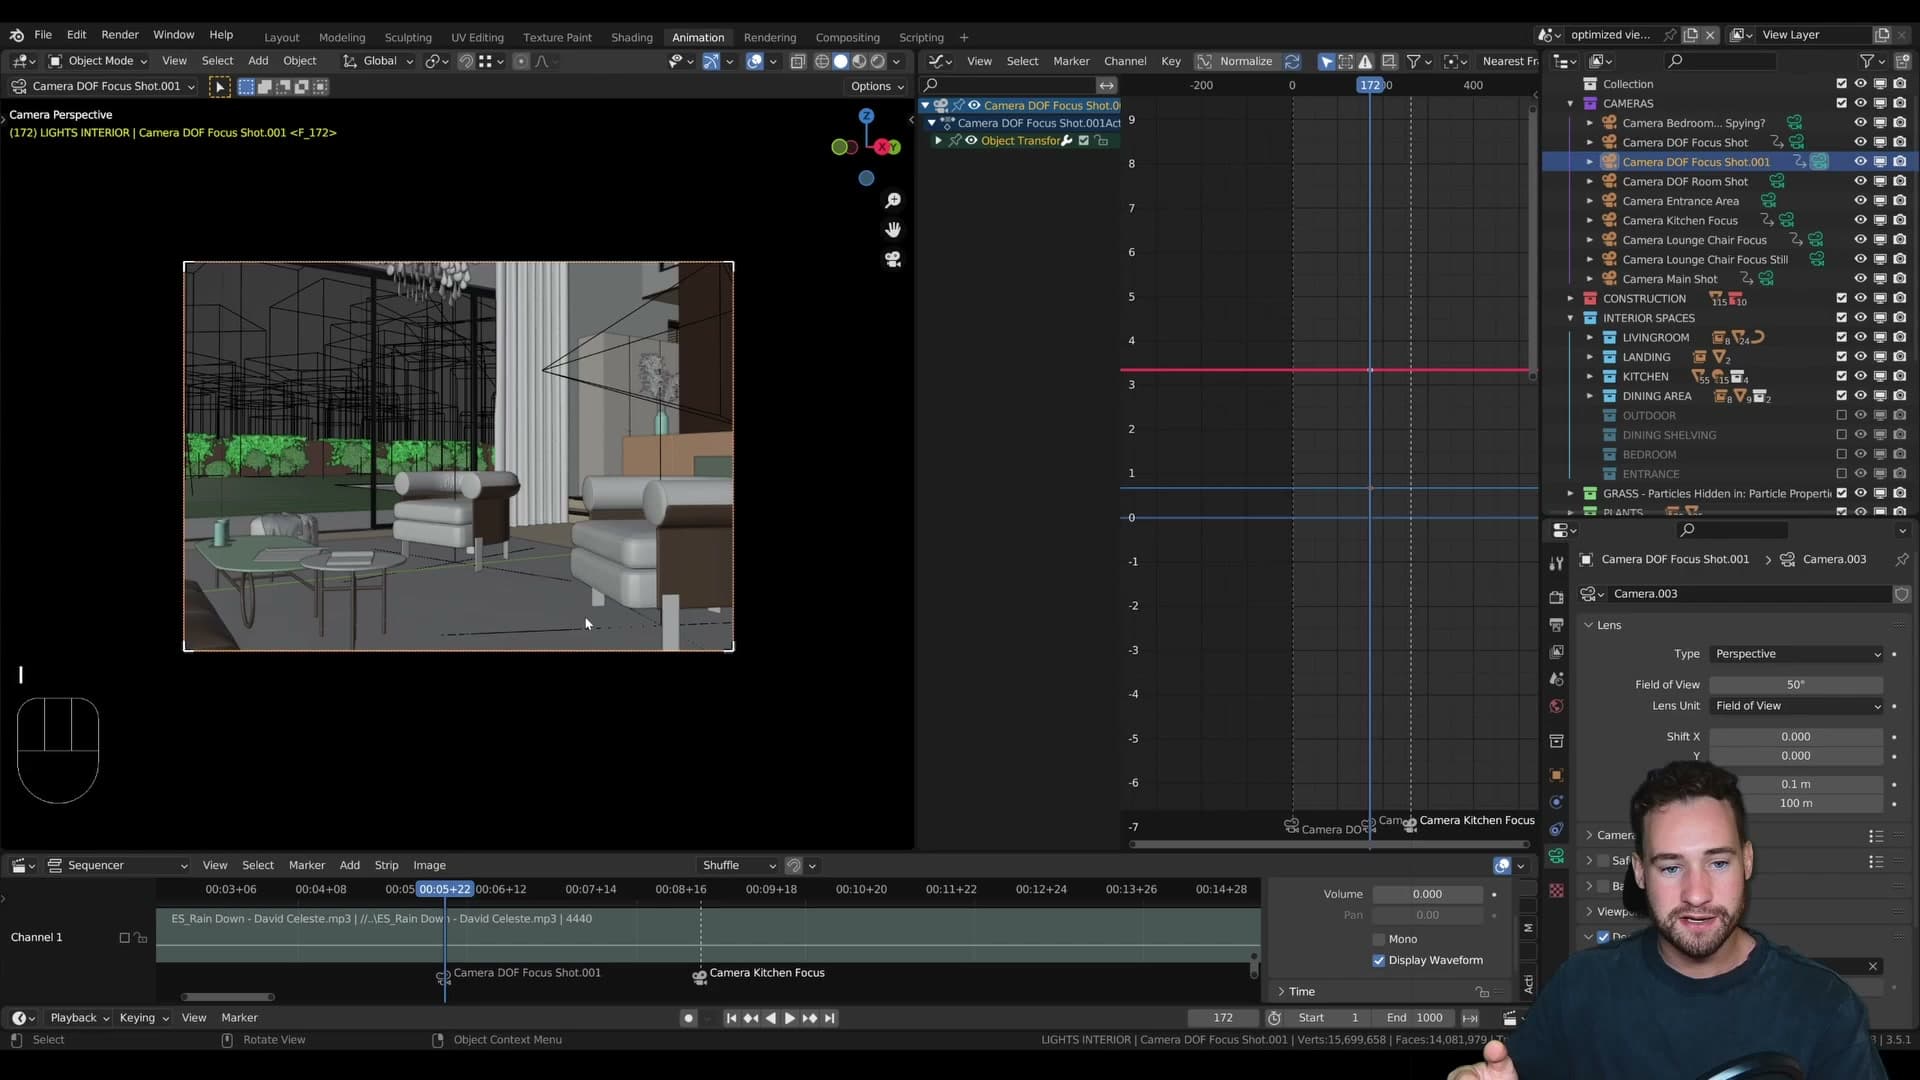
Split off a graph editor so you can see what Blender has actually done with those two keyframes. By default the curve eases in and eases out. The camera starts slow, accelerates through the middle, then slows again before it stops. That is fine for character animation but wrong for a music-synced walkthrough, where each shot needs to glide at a constant speed so the cuts on the beat feel even.
Fix the existing keyframes first. Hover over the graph editor, press A to select all the keys, then press T and choose Linear. The Bezier handles flatten out and the camera now travels at a steady speed from the first keyframe to the second.
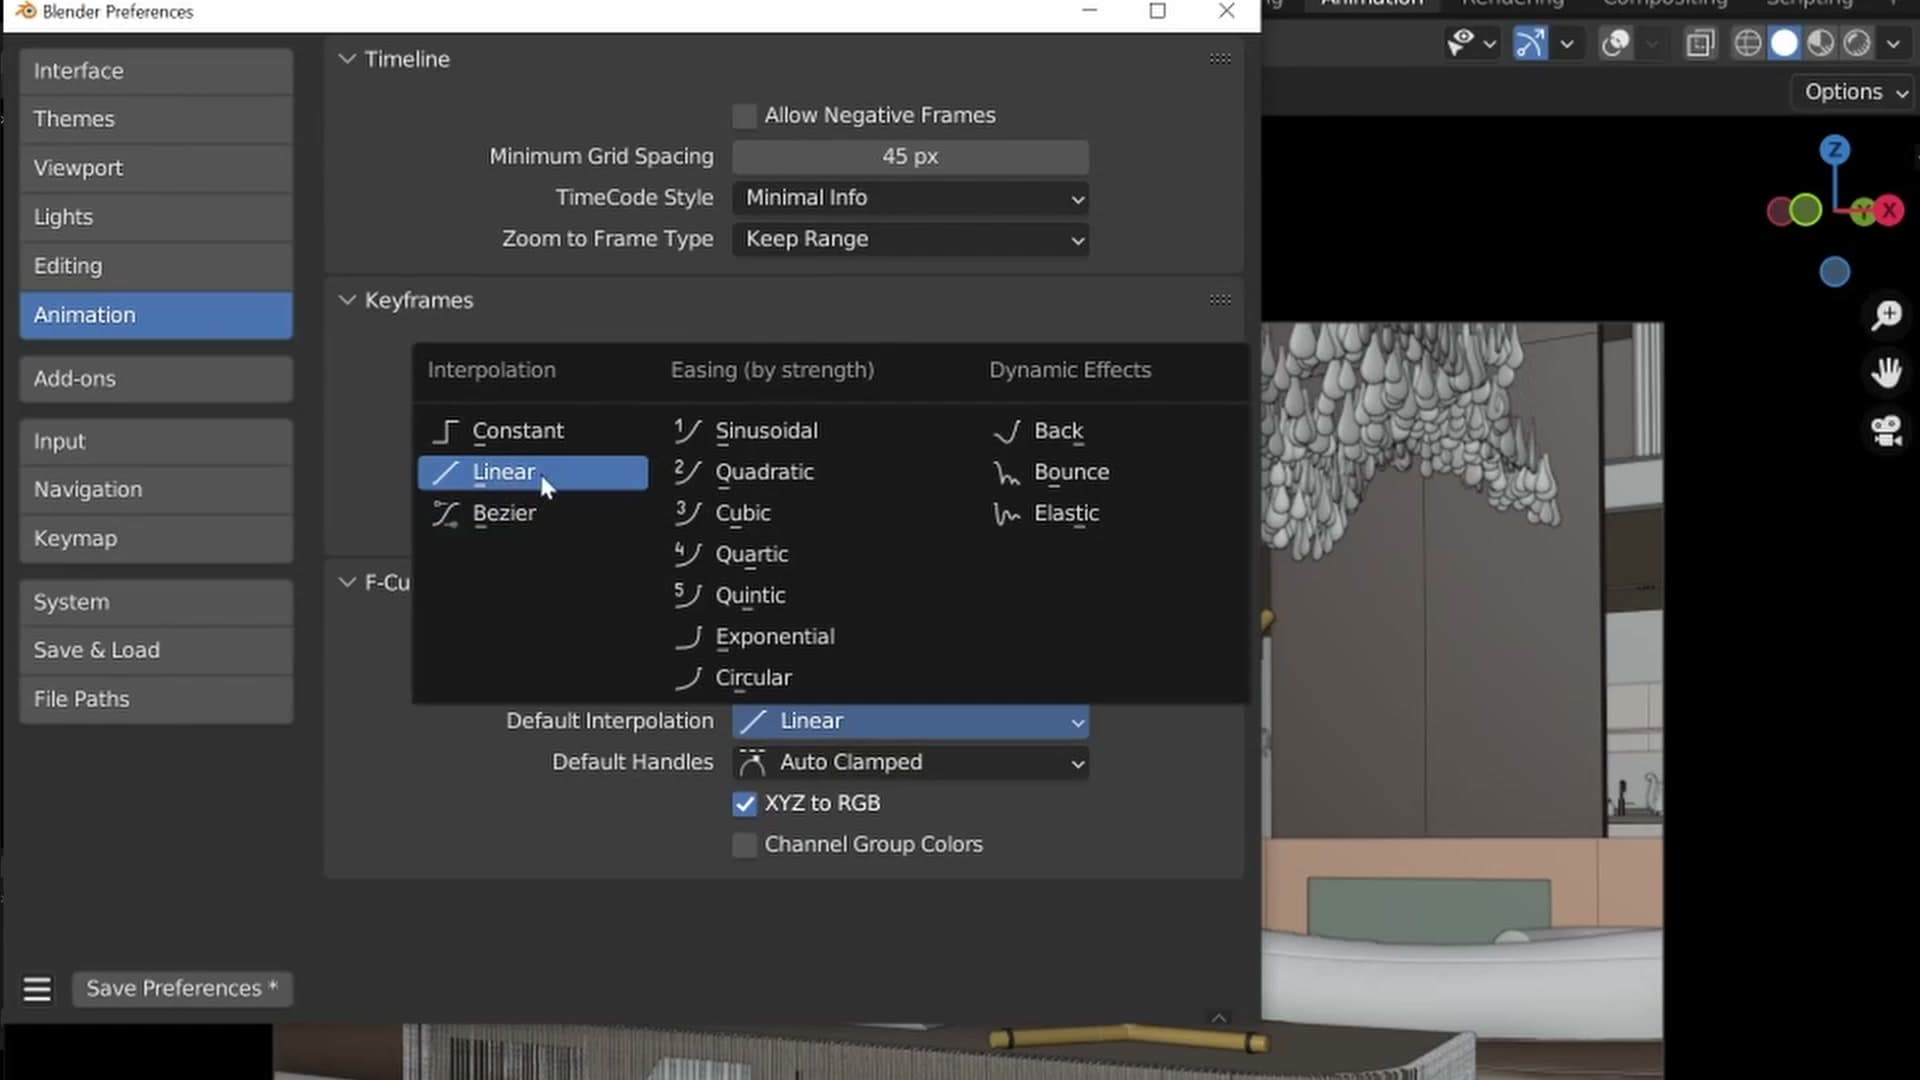
To stop doing that on every single camera, change the global default. Open Edit → Preferences → Animation and set Default Interpolation to Linear, then hit Save Preferences. From now on every new keyframe you create in any project starts out linear, and you can stop fighting the ease-in/ease-out on every shot.
Matching camera speeds in the graph editor
Move on to the next camera and repeat the workflow: first frame, I → Location, jump to the next marker, walk the camera into its end position with Shift+F, then drop another location keyframe. Vary the direction of travel so each shot reads differently. If the first one pushed forward, make this one move left to right, and so on. If a camera already has stray keyframes from earlier experiments, delete them before you start so you only have the two you want.
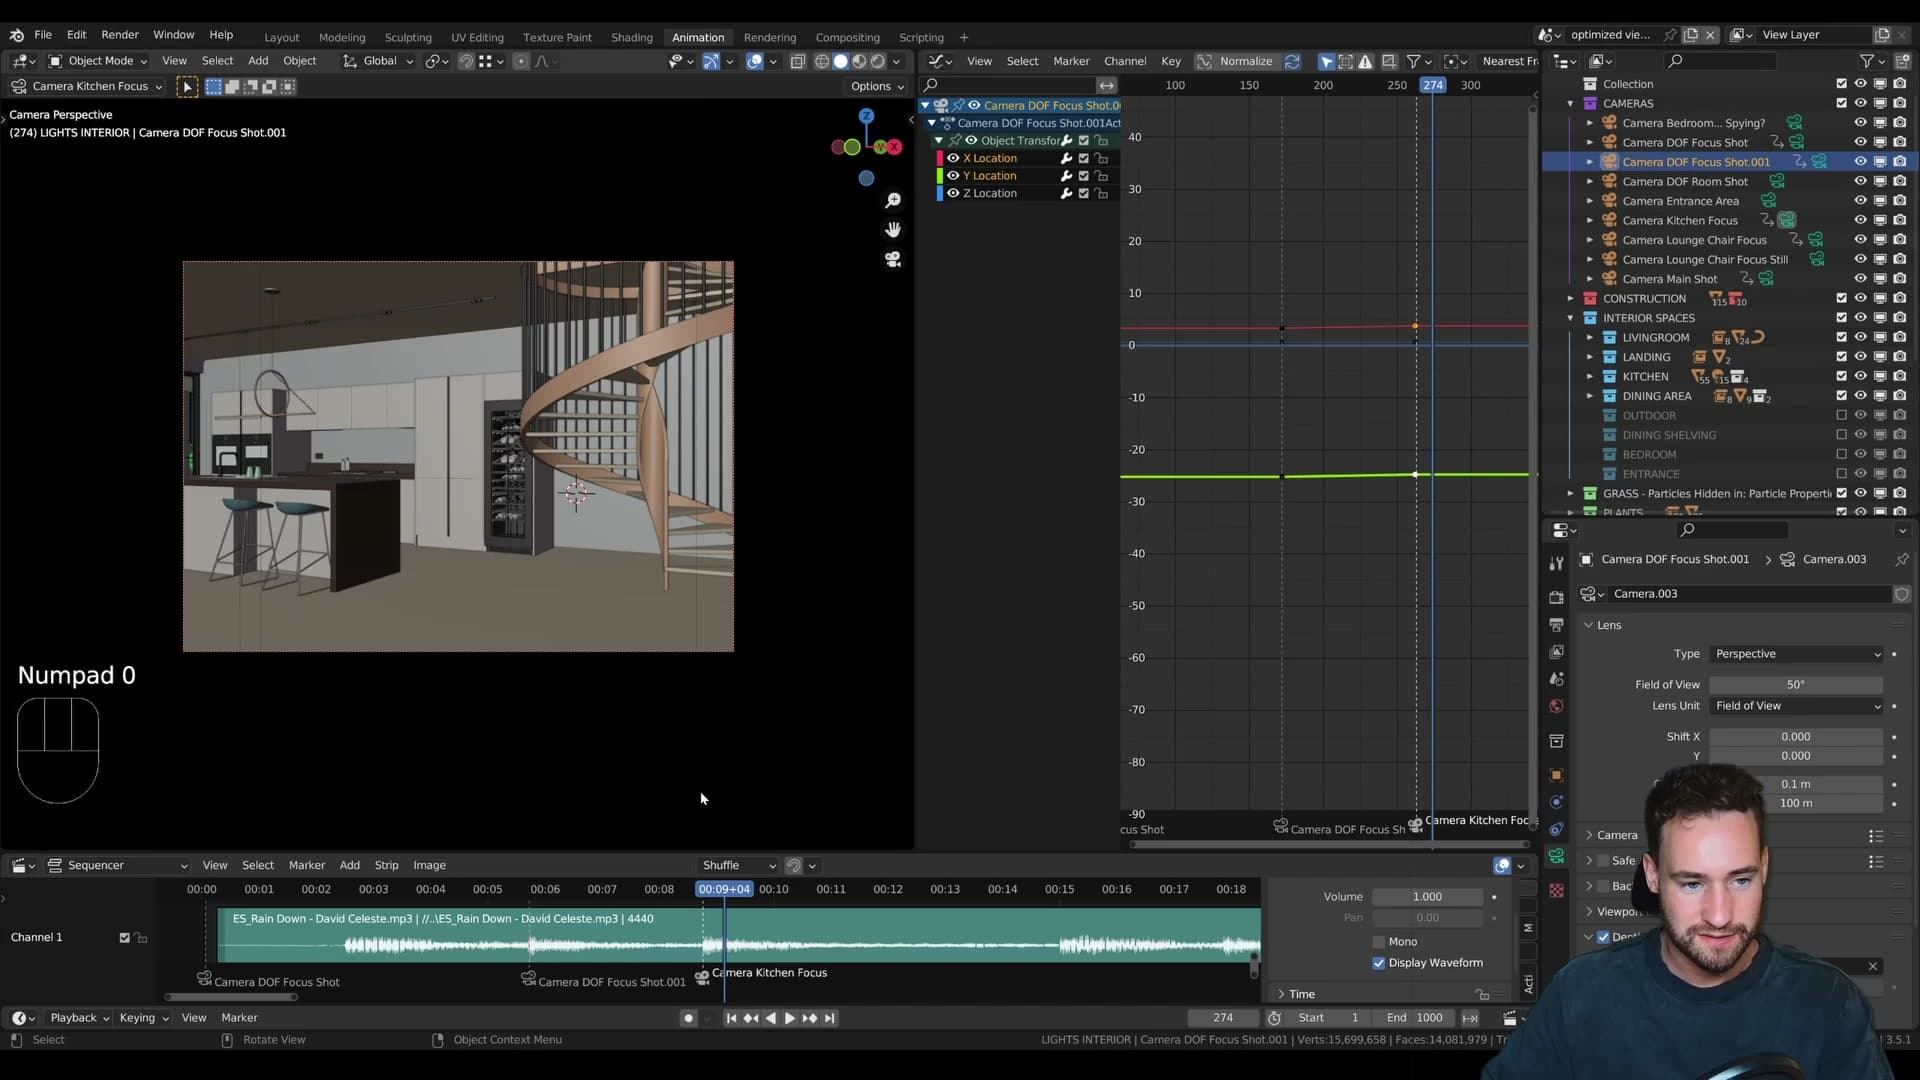
Once a few cameras are animated, scrub the whole sequence back. You will almost always find that the speeds do not match. One camera drifts slowly across a small area while the next shoots across the room in the same number of frames. Linear interpolation makes each individual shot steady, but the distance each camera covers is different, so the perceived speed is different too.
Drop into the graph editor with the offending camera selected. To slow a shot down, grab the location curve for the axis doing most of the work and pull it down. That reduces the distance travelled across the same frame range. Do the same on the Y axis if the camera is moving diagonally. For a shot that feels too slow, push the curve up instead.
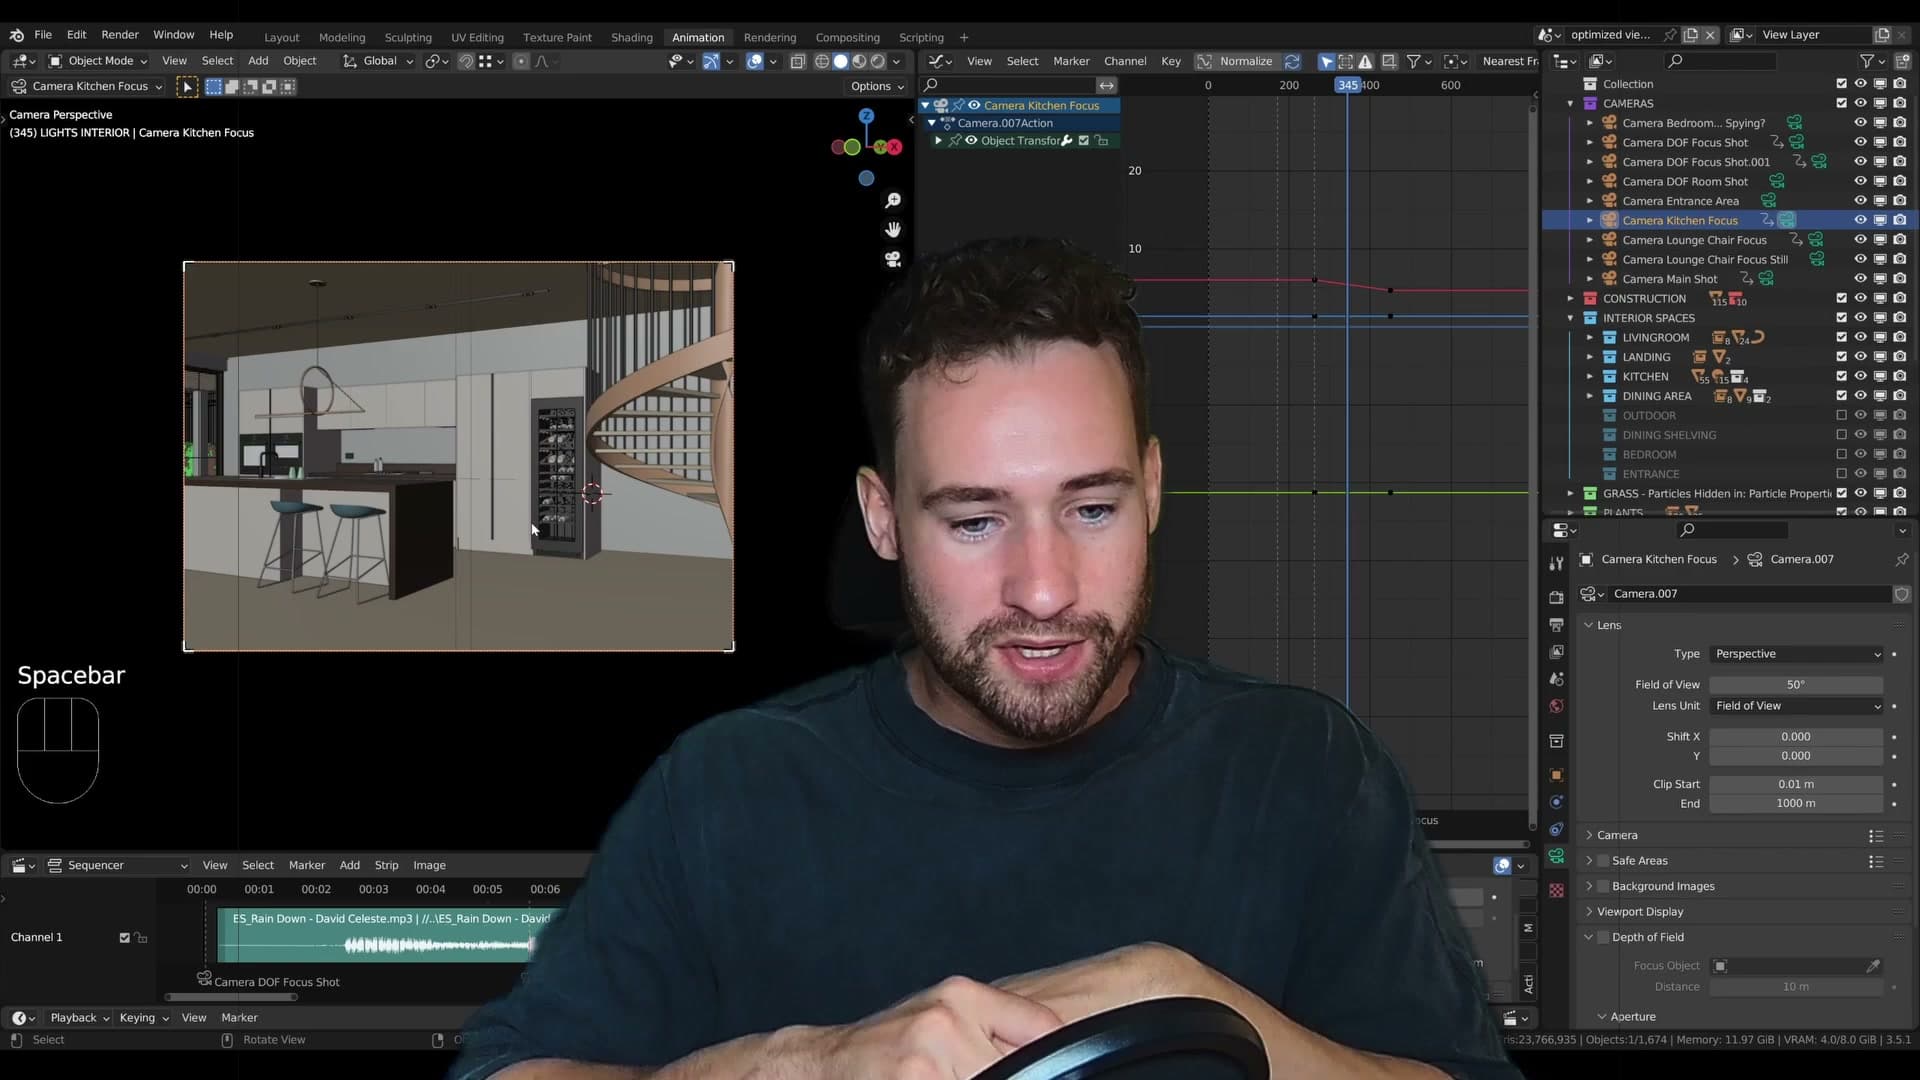
Play it back again and tweak until each camera feels like it is moving at roughly the same pace. The goal is not identical motion on every shot. It's a similar perceived speed, so the cuts land on the beat as one continuous walkthrough rather than a sequence of unrelated dolly moves.
Camera movement principles
Keep one solid motion per shot. No S-curves that swing the camera back and forth. For rotations, parent the camera to an empty and animate the empty.
Why one solid motion per shot beats curved paths
Keep every camera move to one solid motion. If a shot starts panning right, it should keep panning right until the cut. You do not want the camera changing direction in the middle of a shot, and you do not want it speeding up and slowing down between unrelated moves.
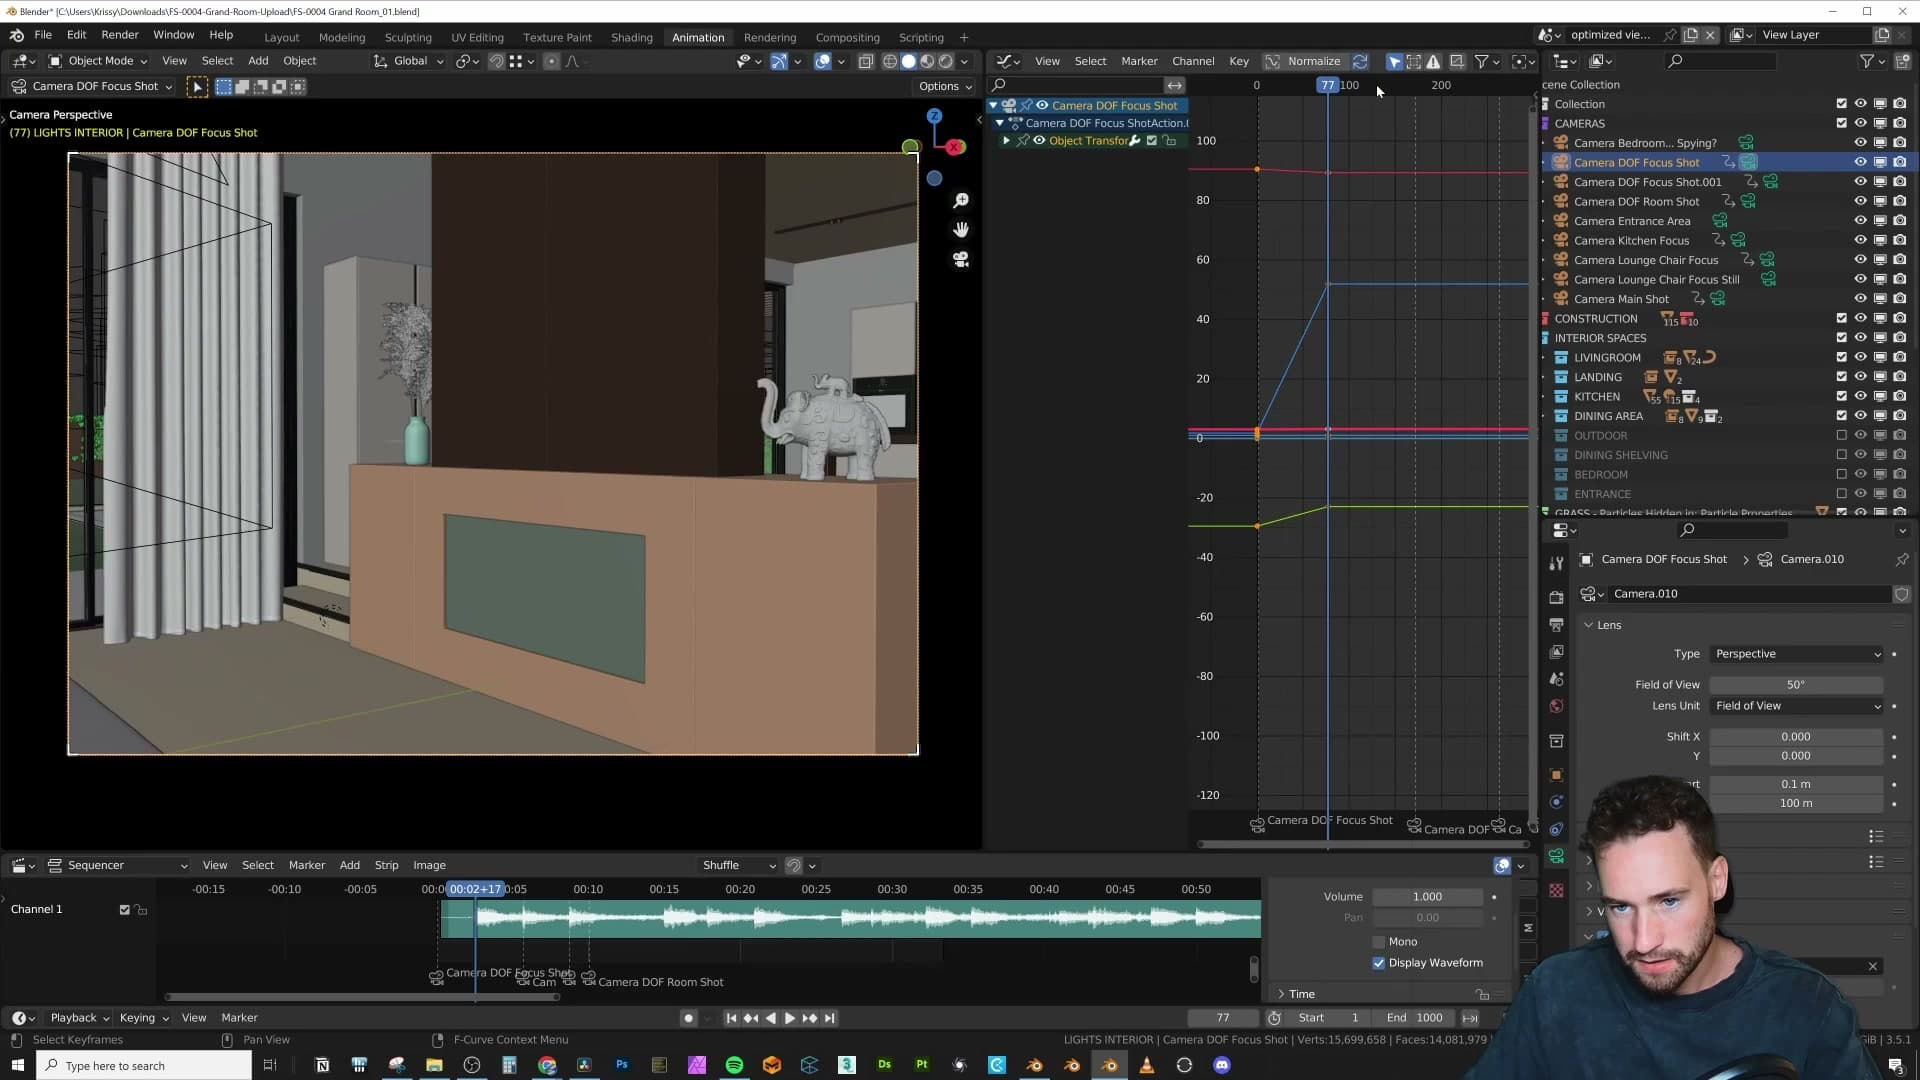
It is easy to demonstrate what to avoid. Drop a location keyframe on the camera, switch the interpolation to Bezier, then drag a later keyframe so the camera floats up before settling back down. Even in this exaggerated form the motion feels strange. The camera glides one way, then the other, and the eye reads it as a rollercoaster rather than a deliberate camera move.
Doing one solid motion per camera is much easier to get right. You are not trying to choreograph an S-curve through 3D space; you are picking a start, picking an end, and letting Blender interpolate between them. Save the more elaborate moves for shots where you genuinely need them.
Parenting a camera to an empty for clean rotations
When you want a camera to rotate around a specific point (say the centre of a hero piece in the room), animating the camera directly almost never feels right. Adding an empty as the rotation pivot is much more elegant, and it is the workflow you should reach for whenever a shot is built around an orbit.
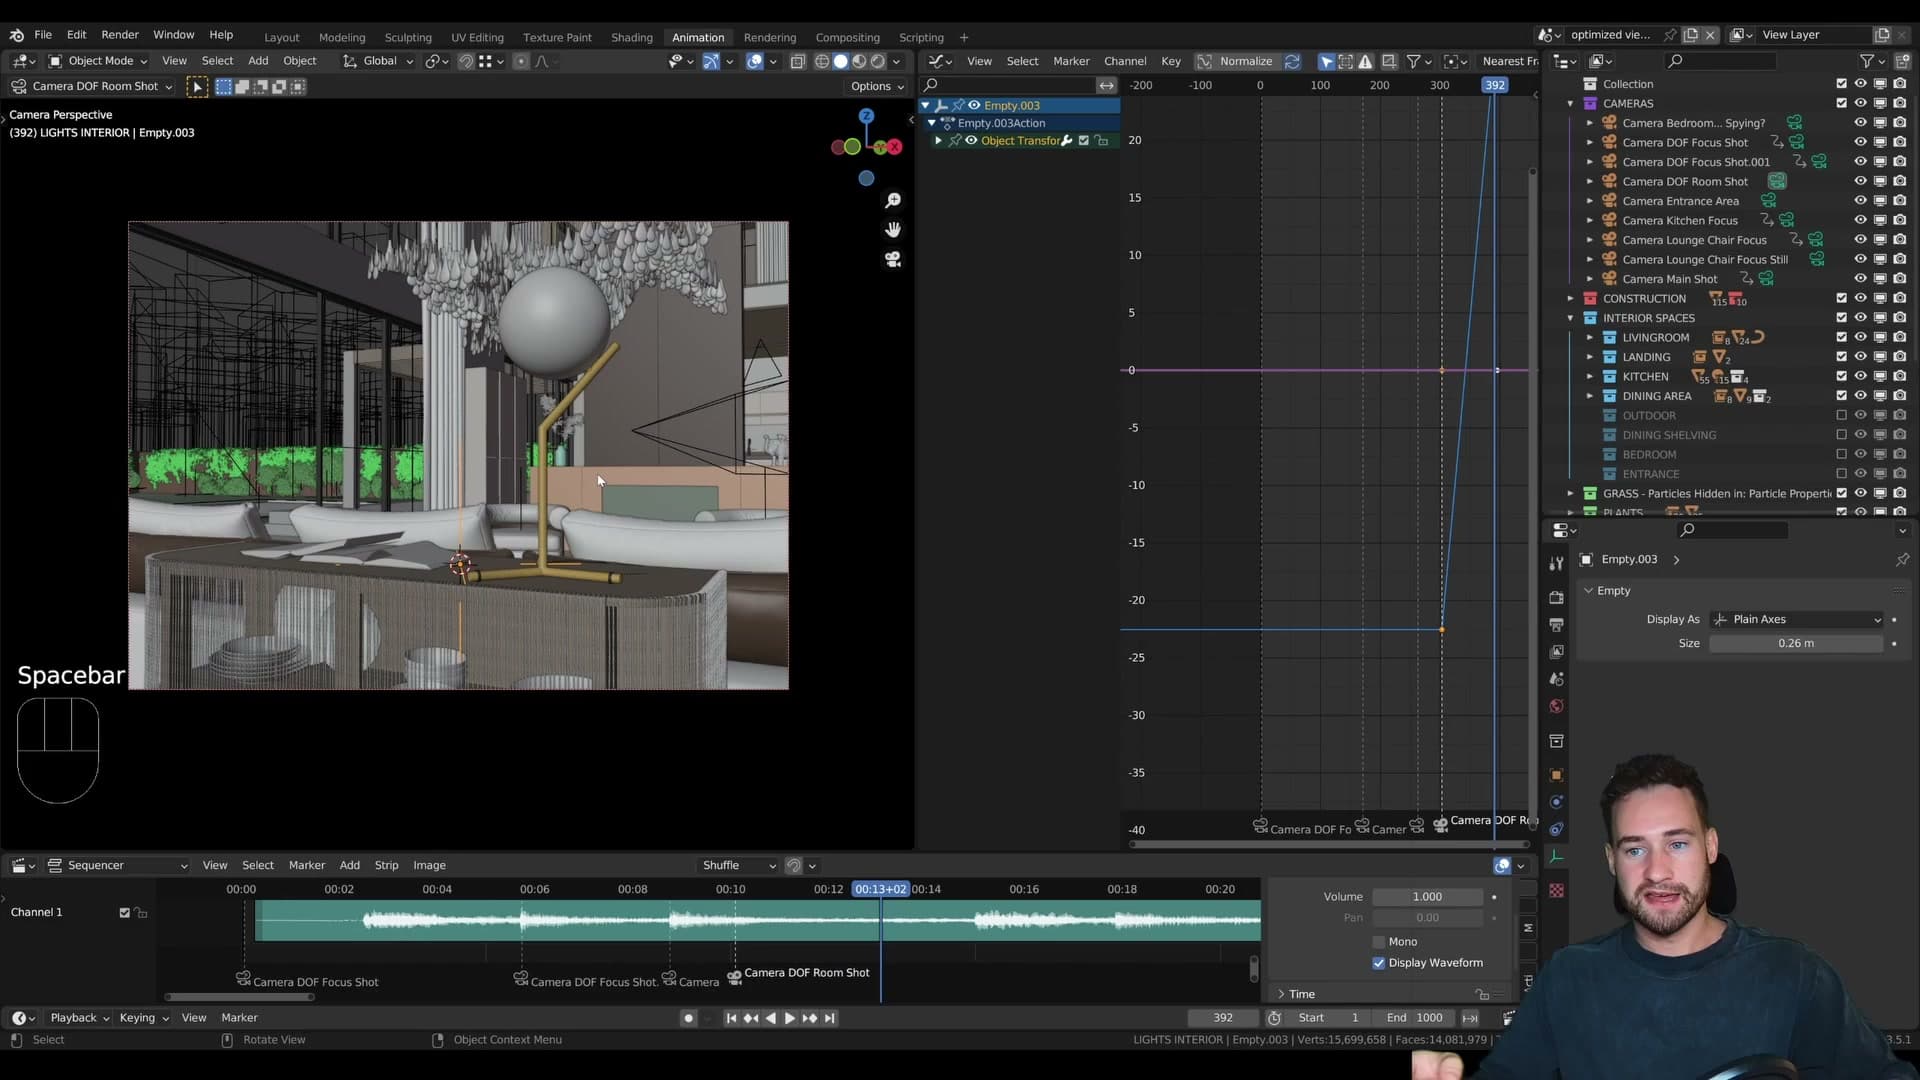
Press Shift+A and add an empty at the focal point you want the camera to orbit around. Scale it down so it does not take up too much space in the viewport. Then click the camera, shift-click the empty so the empty is the active object, and parent the camera to the empty.
From here the empty is your pivot. Move to the first frame of the shot, select the empty, press I and choose Rotation to set a keyframe. Step forward to the end of the shot, rotate the empty into its final position, then press I for Rotation again. Two keyframes on the empty produce a clean orbit. The camera swings around the focal point on a perfect arc, locked at the same distance the whole way.
If you skip the empty and try to do the same thing on the camera itself, you end up moving the camera over, pressing I for both location and rotation, then jumping to the next frame and repeating. It always feels a little bit off, and it is genuinely hard to get right. Letting the empty handle the orbital geometry takes that whole problem off your plate.
More complex moves (a rotation that also pushes in towards the subject, for example) are possible and worth a separate tutorial. But if you are starting out and you just want camera work that does not draw attention to itself, stick with the basics: one solid motion per shot, and an empty whenever you need to rotate.
Render time and budget maths
Do the maths before you commit. 750 frames × 10 min/frame is five days of local rendering; render farms commonly cost around $1 per frame, so a 30-second clip can blow past $750.
Render time and render-farm cost maths
Render time is the part of this workflow that bites hardest, and it depends entirely on your hardware. Skip the maths and you can quietly commit yourself to weeks of rendering for what felt like a short clip.
Walk through a worked example before you press the button. At 25 fps a 30-second animation is 750 frames. Assume each frame takes ten minutes to render (a sensible ceiling for an archviz walkthrough) and you are looking at 7,500 minutes, which is 125 hours, or roughly five days of unbroken render time on your own machine.
Treat ten minutes per frame as the line in the sand. If your test frame is coming in longer than that, you need to either optimise the scene or move the job to a render farm before you commit the full sequence.
Render farms then introduce their own maths. Pricing varies by scene complexity, but aim to stay under $1 per frame. Some scenes will come in around 50 cents, others can push closer to $2. At a dollar a frame, that same 750-frame clip is $750 before you have even compiled the edit, which is why local rendering remains the cheapest option whenever your machine can absorb the hours.
Compositor denoise node beats the render-tab toggle
Once you have the budget in front of you, the next step is test renders. The single biggest setting to get right here is denoising. My recommendation is to ignore the Denoise toggle in Render Properties entirely and wire a Denoise node into the compositor instead. The compositor node does a noticeably better job, it is easier to handle, and you can adjust the denoising level after the fact without having to re-render the frame.
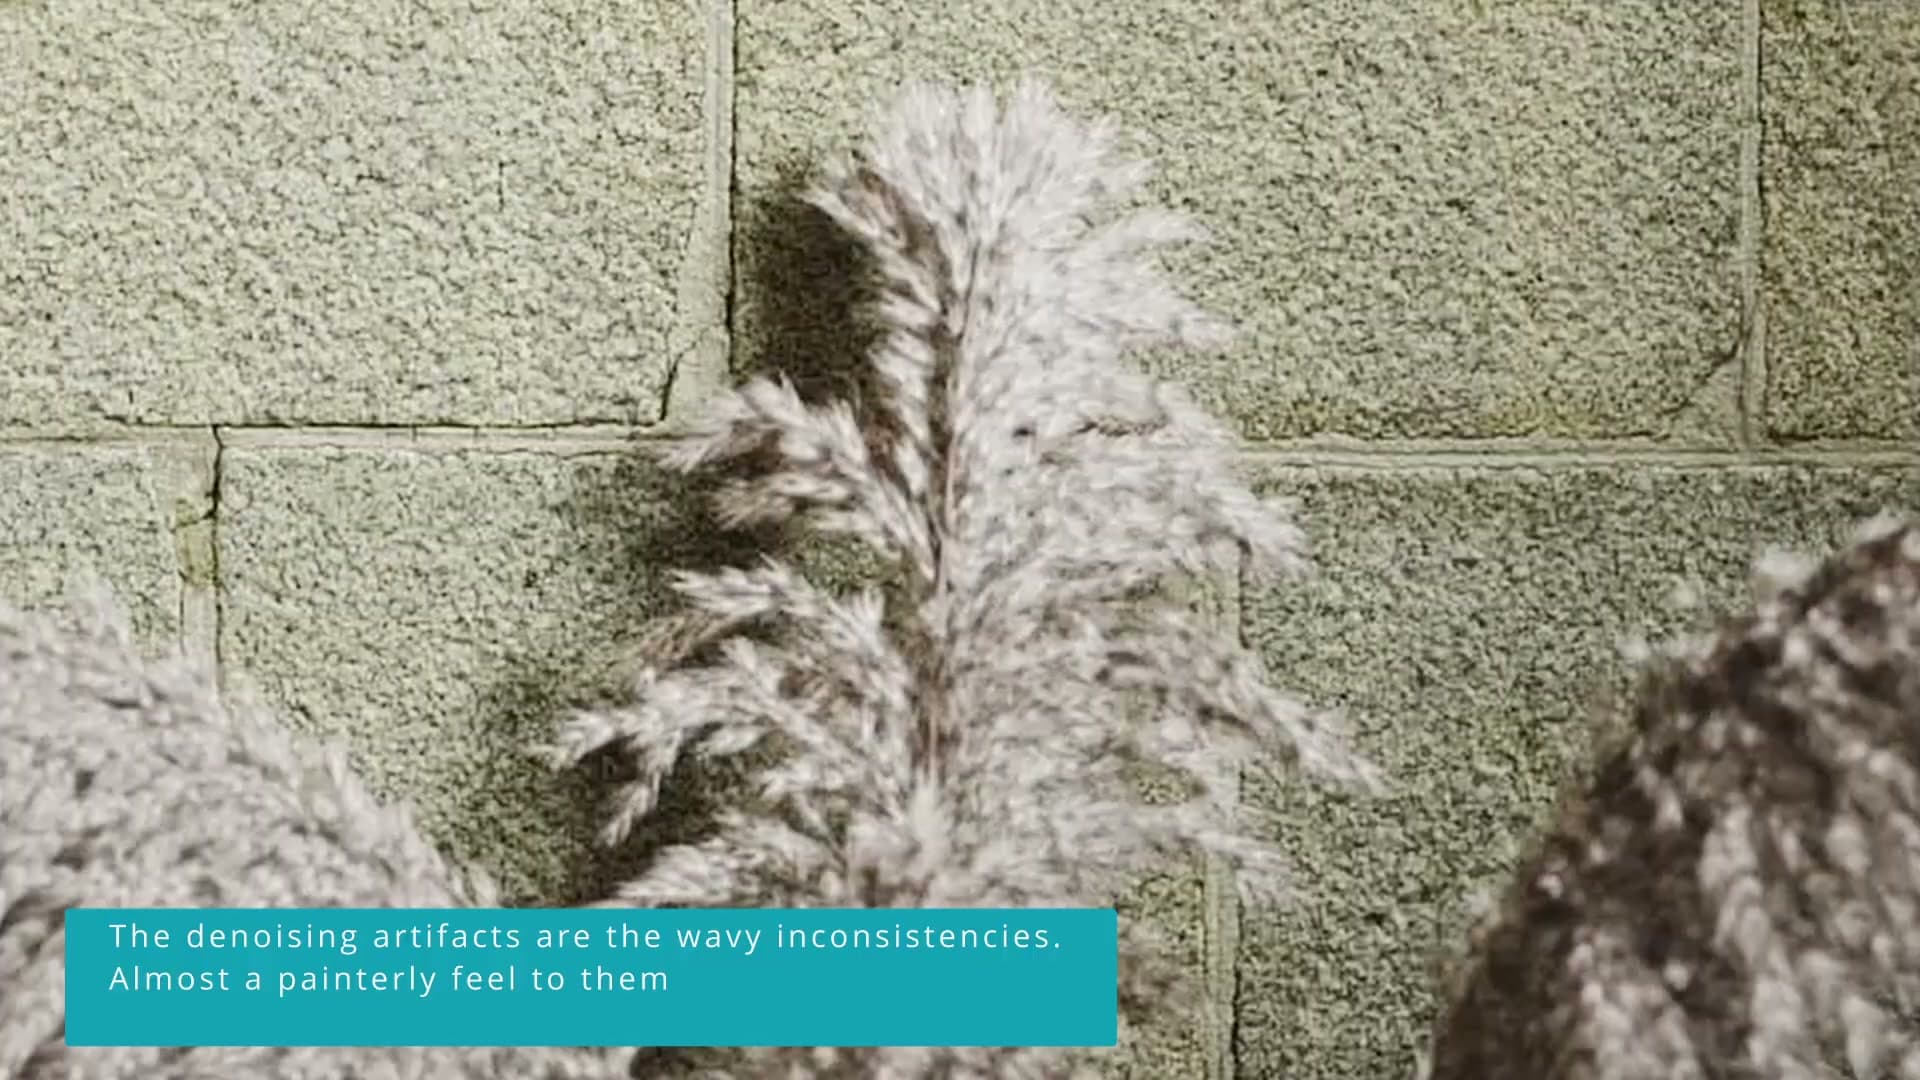
From there the game is finding the sweet spot between visible denoising artefacts and frames rendering quickly enough to be viable. In this scene a sample count of 375 holds up well. Drop the same scene to 50 samples and the artefacts get obvious quickly.
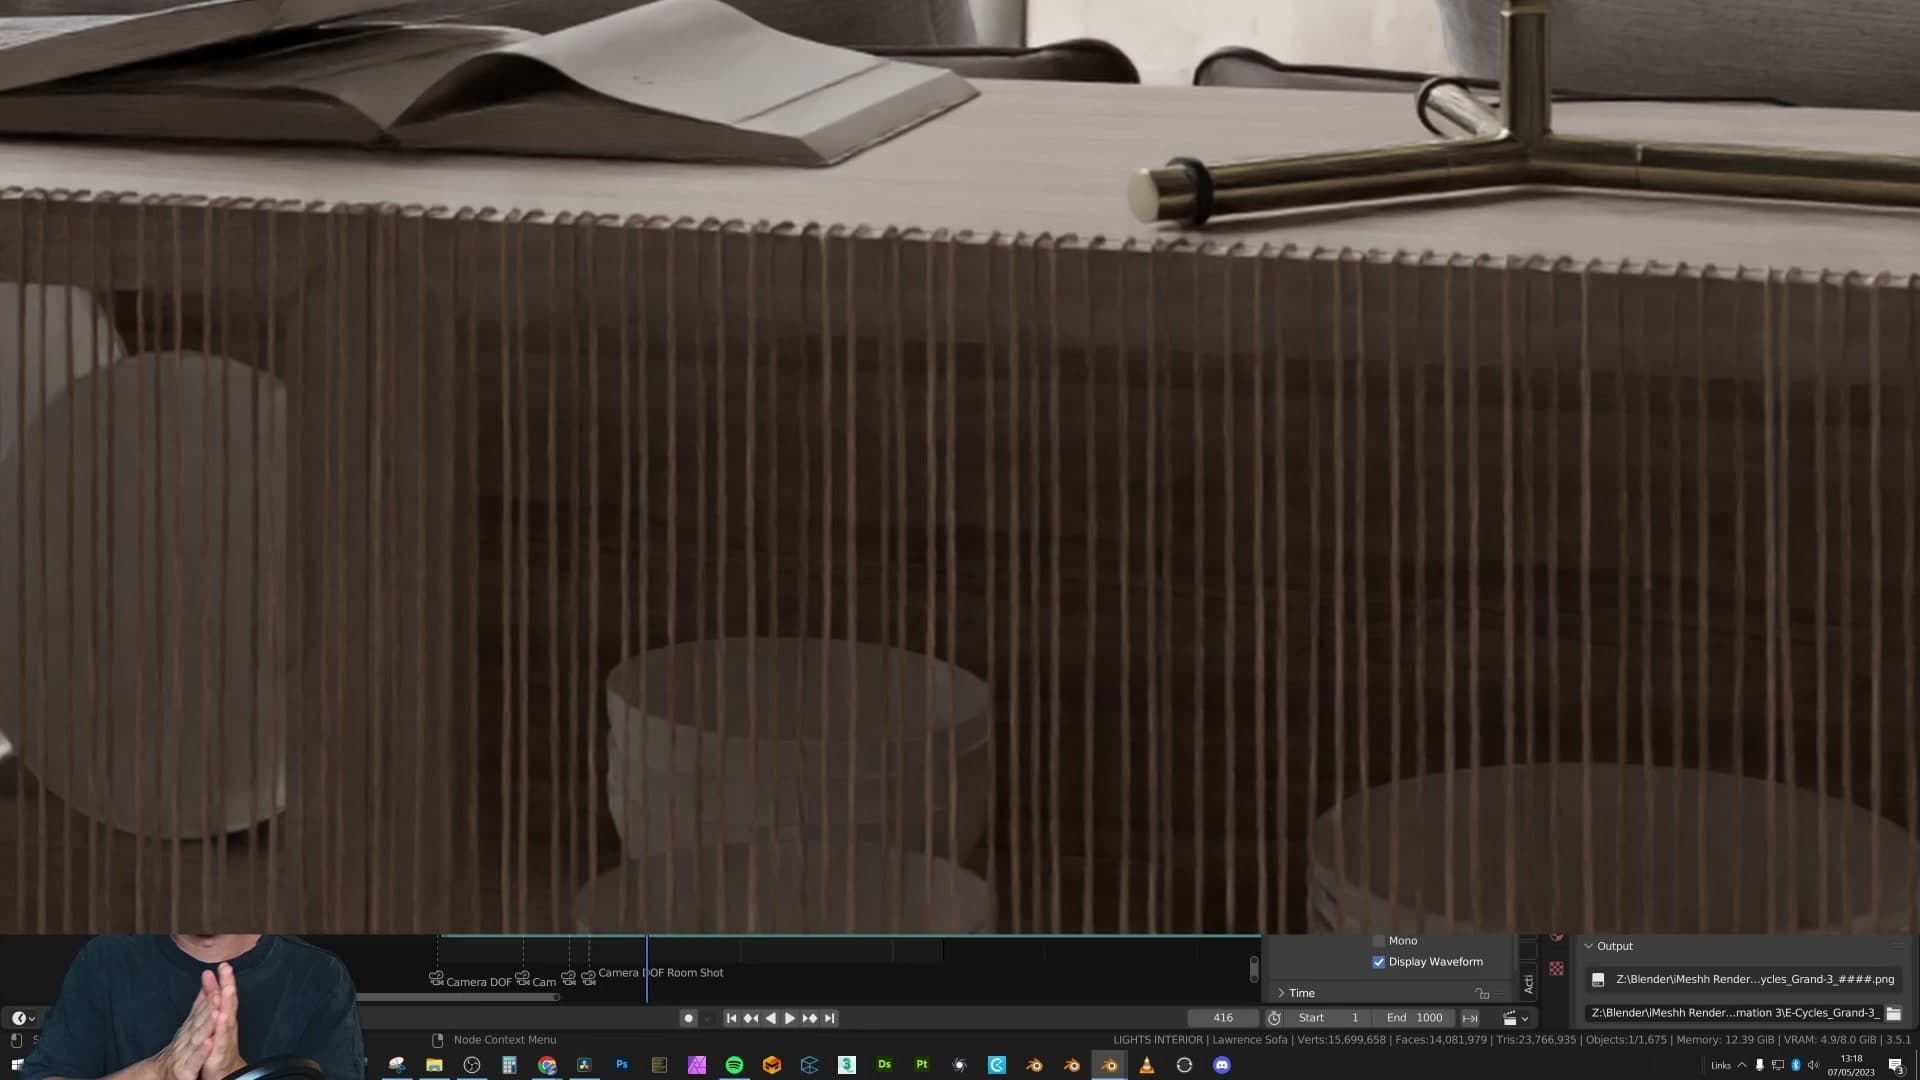
To see how much heavy lifting the denoiser is actually doing, plug the raw image through the compositor alongside the denoised result. At 50 samples the underlying render is extremely noisy. The denoised still looks fine in isolation, but frame to frame those artefacts will not land in the same place, so they crawl and shimmer the moment the animation plays back.
Cycles settings that save days of render time
Cap frame rate at 24-25 fps, enable Persistent Data, turn on Animated Seed, and pull texture resolution down in Simplify to stay under your GPU's VRAM ceiling.
Frame rate trade-offs (24 vs 30 fps)
Frame rate is the next setting worth thinking hard about. Most feature films run at 24 frames per second, and that cinema standard generally looks fine for archviz walkthroughs. If 24 fps is good enough for the movies, it's good enough for a client flythrough.
The cost of pushing higher adds up fast. Six extra frames per second over a 30-second clip is an additional 180 frames. At roughly 10 minutes per frame that works out to around 30 hours of extra render time before you've added a single sample.
Default to 24 or 25 fps. Push to 30 only when the deliverable genuinely demands it. When time and money are on the line, the lower frame rate is almost always the right call.
Persistent Data and Animated Seed
By default Cycles rebuilds your scene from scratch for every frame: loading textures, calculating the BVH, the lot. Persistent Data tells it to hold that work in memory between frames instead. Open Render Properties > Performance > Final Render and tick Persistent Data (or just type persistent data into the preferences search to jump straight to it).
The savings scale linearly with the length of the shot. If your scene takes a minute to build, that's a minute lost on every frame. Over 750 frames you've handed back 750 minutes of render time for the price of a single checkbox.
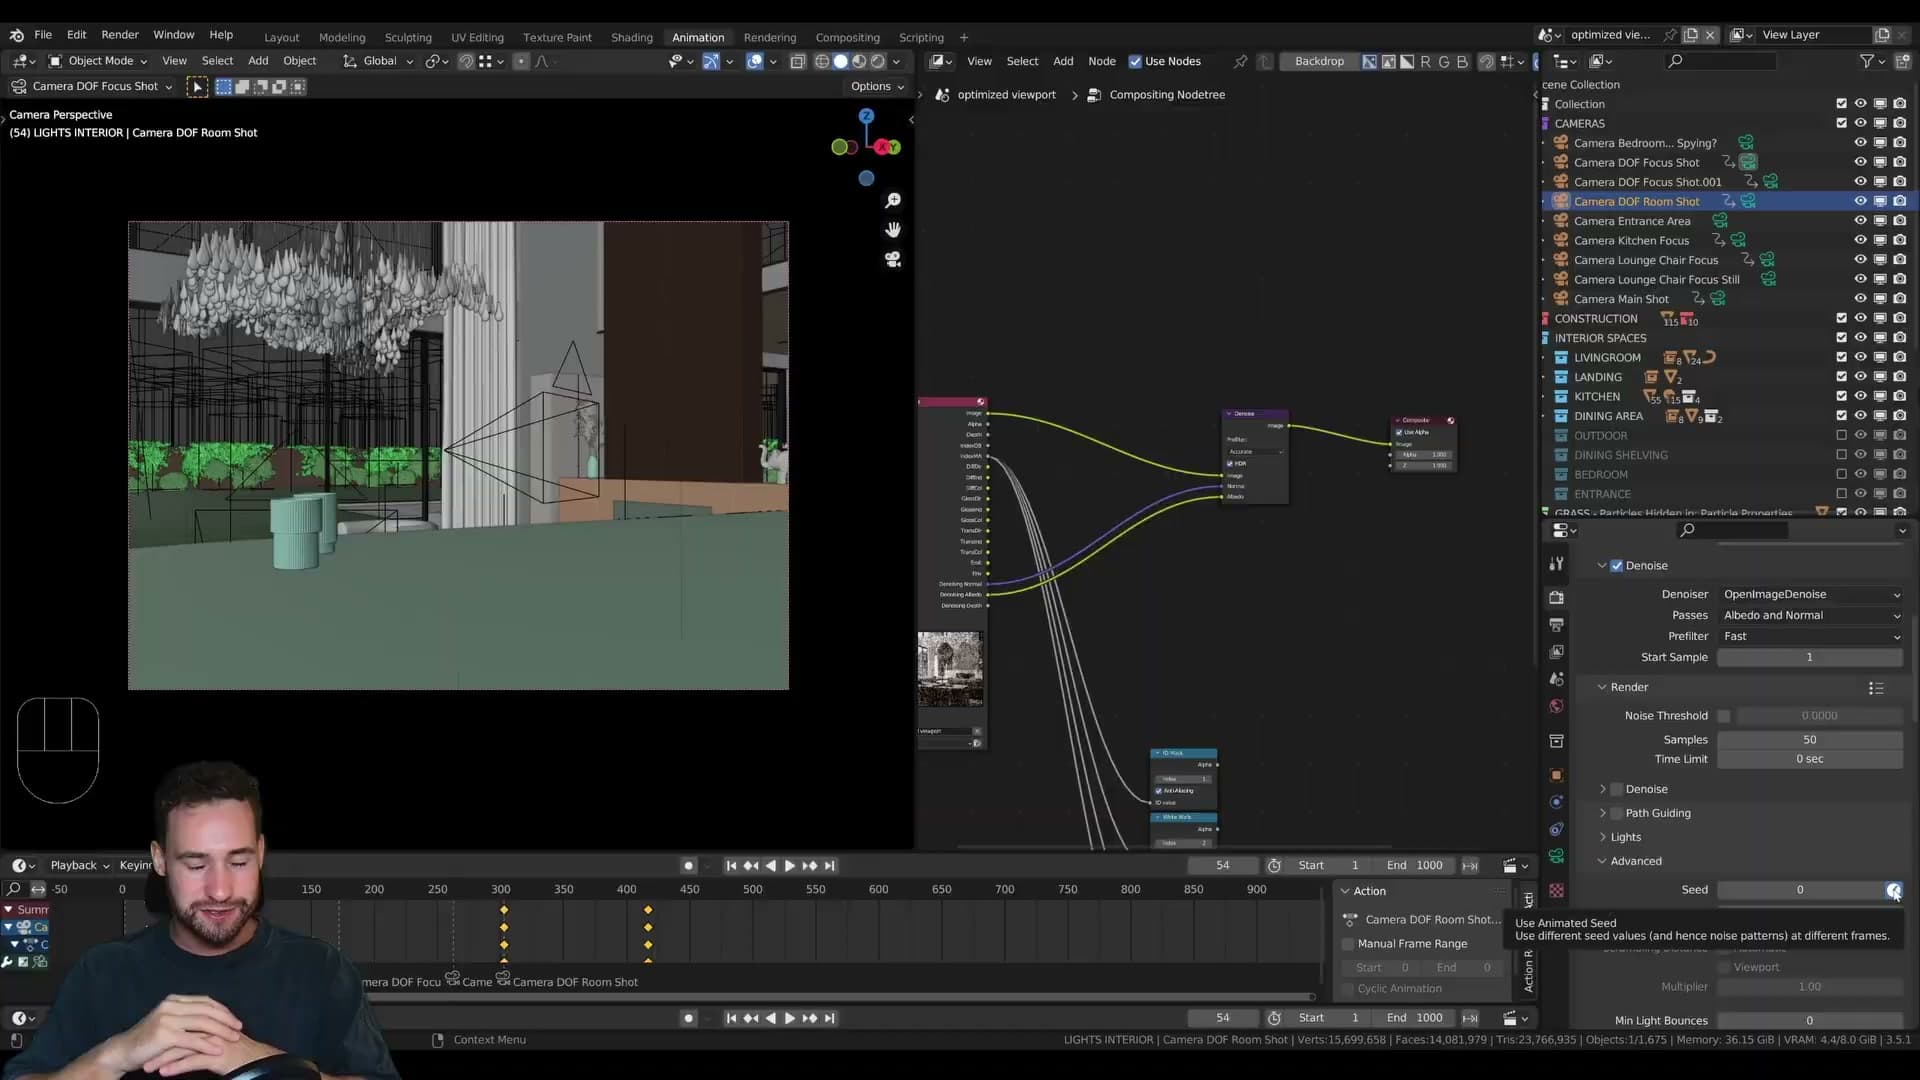
The second tweak lives under Render Properties > Sampling > Advanced. Tick the small clock icon next to Seed. That's the Animated Seed toggle. Without it, Cycles reuses the same noise pattern on every frame, which means denoising artefacts lock into place and read as a fixed dirty texture rather than motion. With it on, the noise shifts every frame and the denoiser's output behaves more like the natural grain a real camera would produce.
Simplify texture size to stay under VRAM
The last setting worth touching is texture resolution, and the reason is your GPU's VRAM. If the readout creeps up to something like 7.9 out of 8 GB used, the card is throttling. A frame that should take 10 minutes can balloon to one or two hours just because you're sitting at the VRAM ceiling.
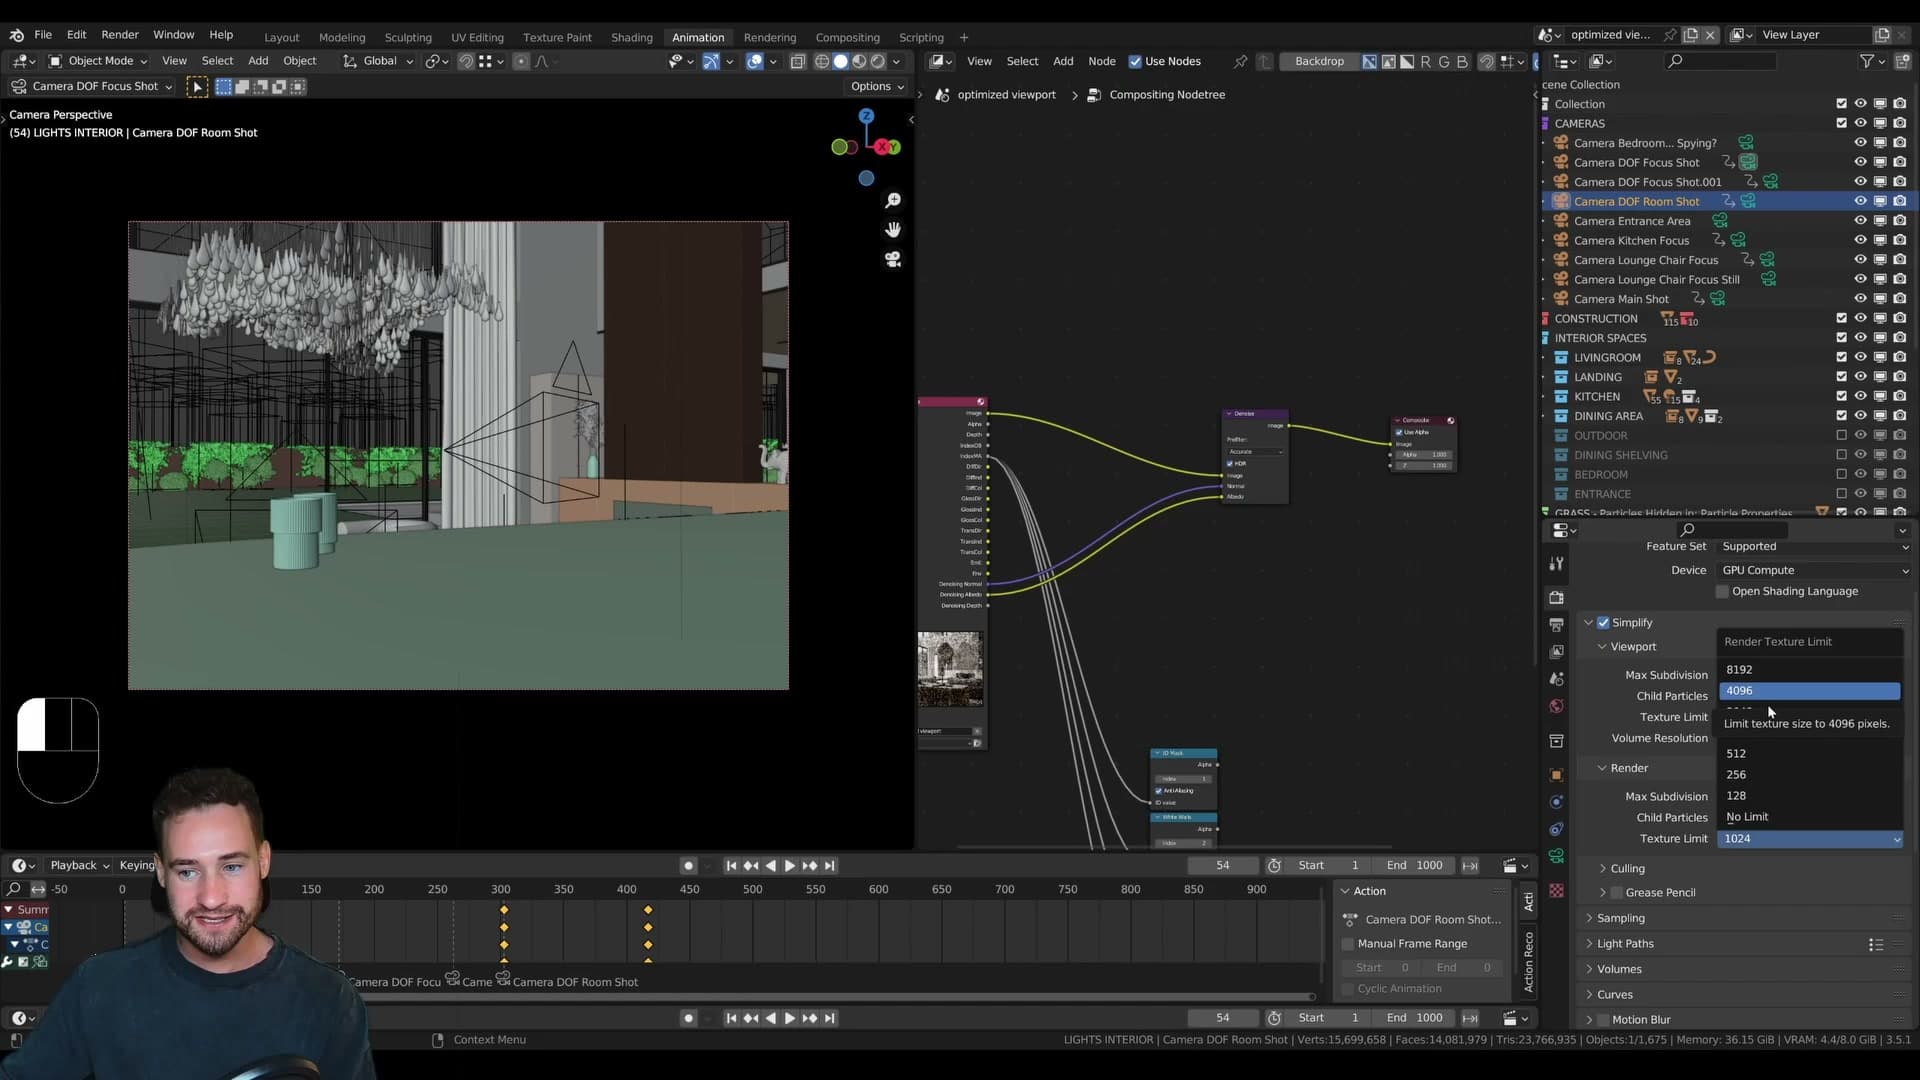
To keep texture data off the card, go to Render Properties > Simplify > Render and drop Texture Size Limit as low as you can stand. 1K is a sensible starting point. At final render resolution the difference is generally invisible, and you free up a huge amount of VRAM for everything else in the scene.
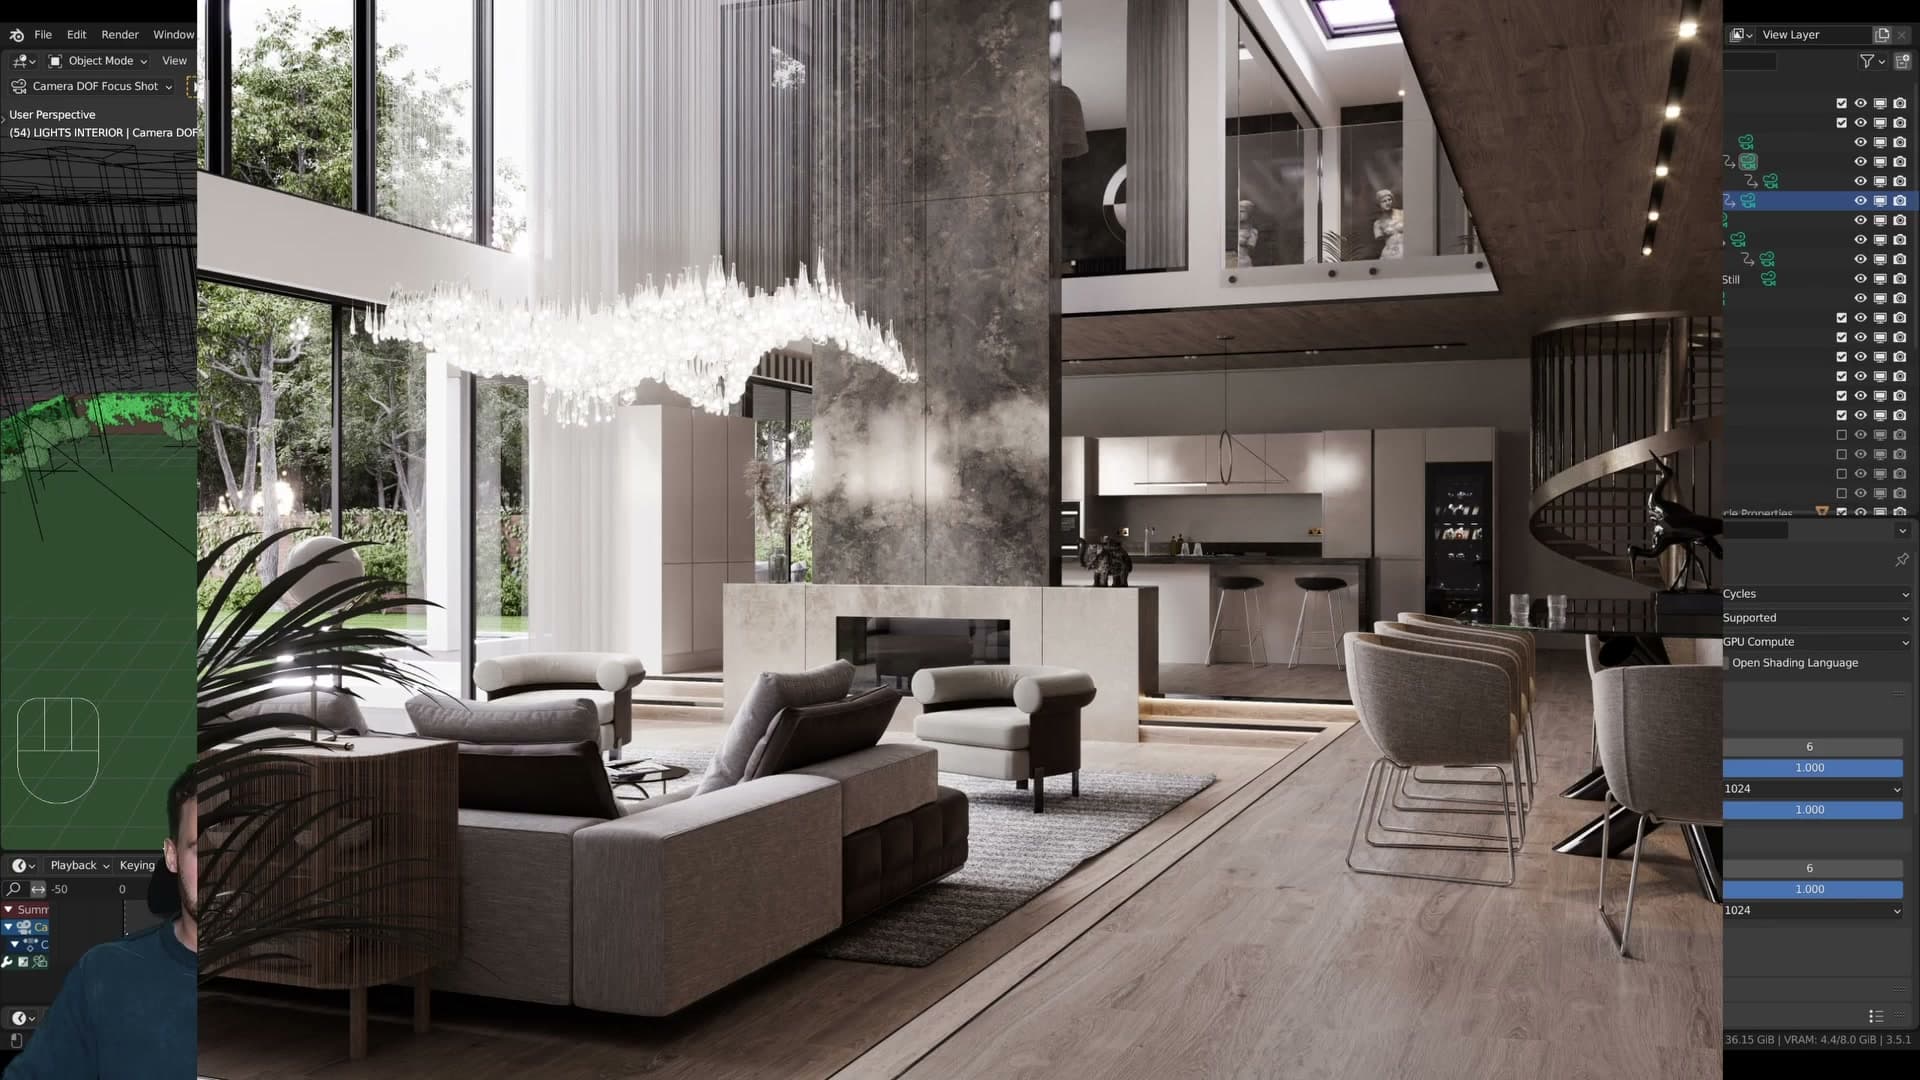
Scene-level optimisation matters just as much. The exterior used in this tutorial has thousands of trees, but every one is a collection instance rather than a unique mesh, which is why a scene this dense still renders comfortably on an 8 GB GPU.
Draft renders and output settings
Run a five-sample overnight draft to catch wall-clipping cameras and lighting pops before committing. Always render to a JPEG or PNG sequence, never a video container.
Overnight low-sample draft for client sign-off
Before you commit a 750-frame job to a farm, run an overnight draft at a brutally low sample count. Five samples is enough. The denoiser does the heavy lifting at that range and you will be surprised how watchable the result is. The point of this pass isn't final-image quality, it's catching anything that is structurally broken before you spend the money.
Set it going before bed. Most frames will be finished by morning, and once you compile them into a clip you will see things that scrubbing the timeline never reveals: a camera clipping through a wall on one of the shots, the lighting visibly popping between two cuts, a piece of furniture the dolly is passing straight through. These are obvious in motion and invisible while you are keyframing.
Once you have the compiled draft, send it to the client and ask them to sign off on the flow and the music before you commit. This is the moment to lock the edit. After it has rendered for real, a request to move a chair becomes a paid revision rather than a panic, because they have already agreed that the progression works.
Render to JPEG/PNG sequences, never AVI
Before you hit Render Animation, open Output Properties and change the file format to JPEG. This is the single most important setting in this section. Do not leave it on an animation container like AVI.
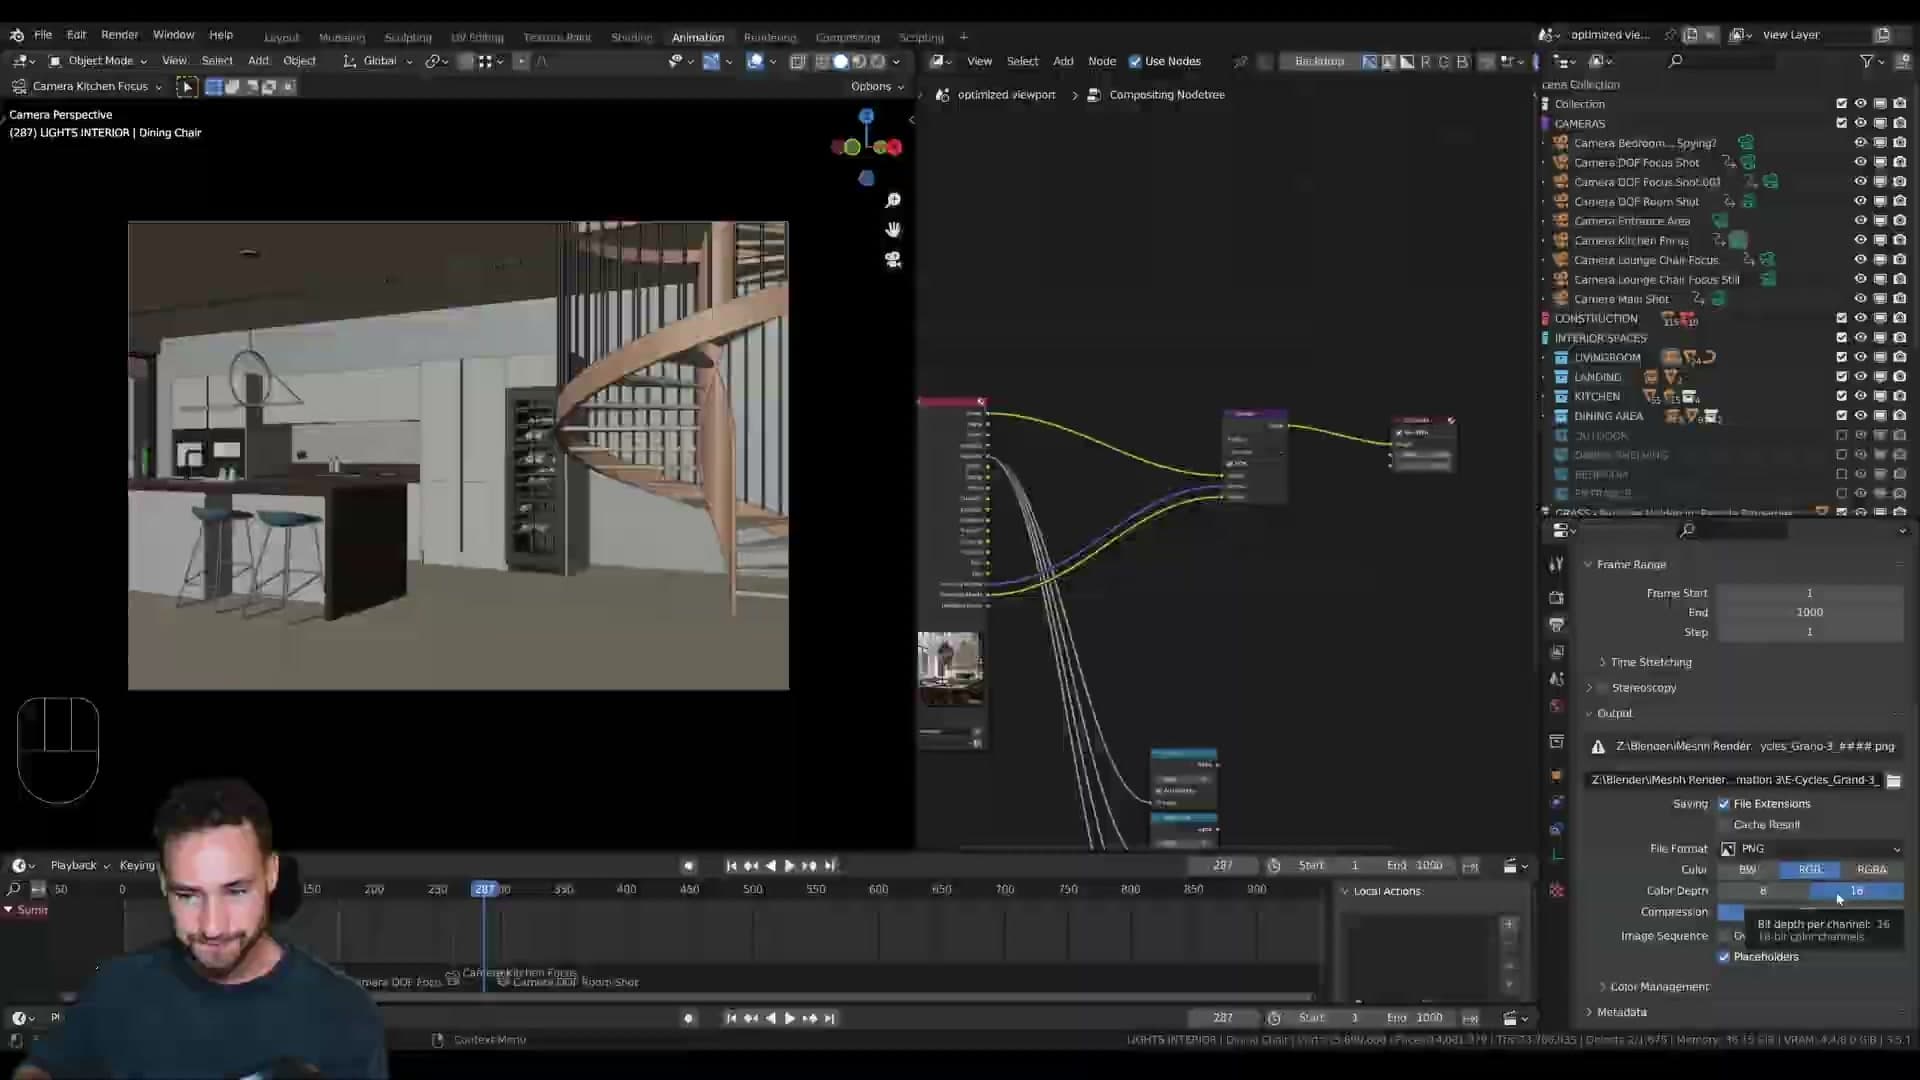
The reason is simple. A JPEG sequence writes a finished image to disk on every frame, so if Blender crashes at frame 749 of 750 on a long overnight job, you still have 748 usable frames in a folder and you resume the render from where it stopped. An AVI output writes one growing file. If Blender goes down mid-render, that file is gone and the whole night is gone with it.
For the final render, swap JPEG out for 16-bit PNG. The storage cost is significantly higher per frame, but the extra bit depth makes post-production in DaVinci far easier. Grading, exposure tweaks, and recovering blown highlights all have more headroom to work with than an 8-bit JPEG gives you.
Compiling the frames in DaVinci Resolve
Drop the frame sequence into DaVinci Resolve at a matching frame rate, lay the music on top, and finish with a quick S-curve and light sharpening.
Importing the sequence at the correct frame rate
Once Blender has finished spitting out the JPEG (or PNG) sequence, you need somewhere to stitch them back together and lay the music on top. I use DaVinci Resolve, specifically the free version, which does everything an archviz walkthrough compile needs.
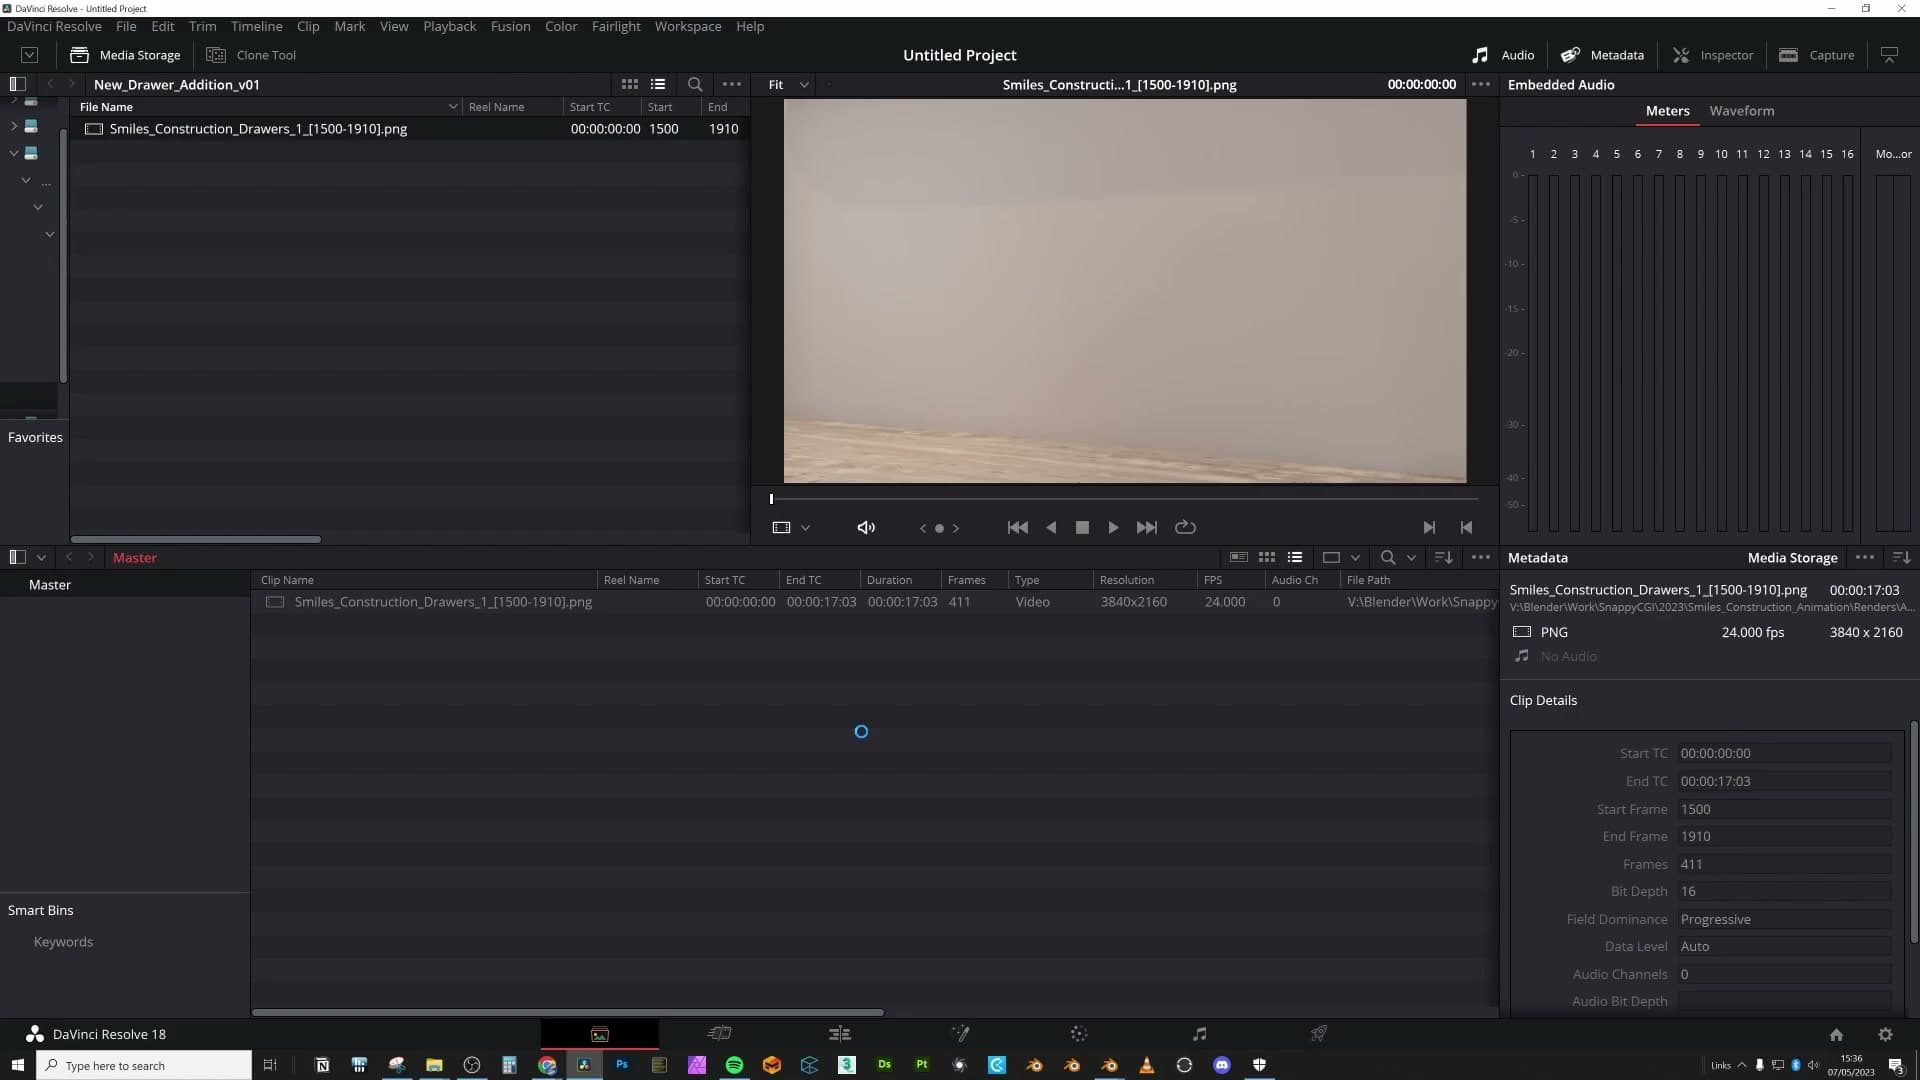
Start by dragging your render folder into Resolve's media pool. By default Resolve may list every frame as an individual clip, which is not what you want. Click the small three-button stack icon in that section of the media pool and the entire folder collapses into a single sequence clip you can drop on the timeline.
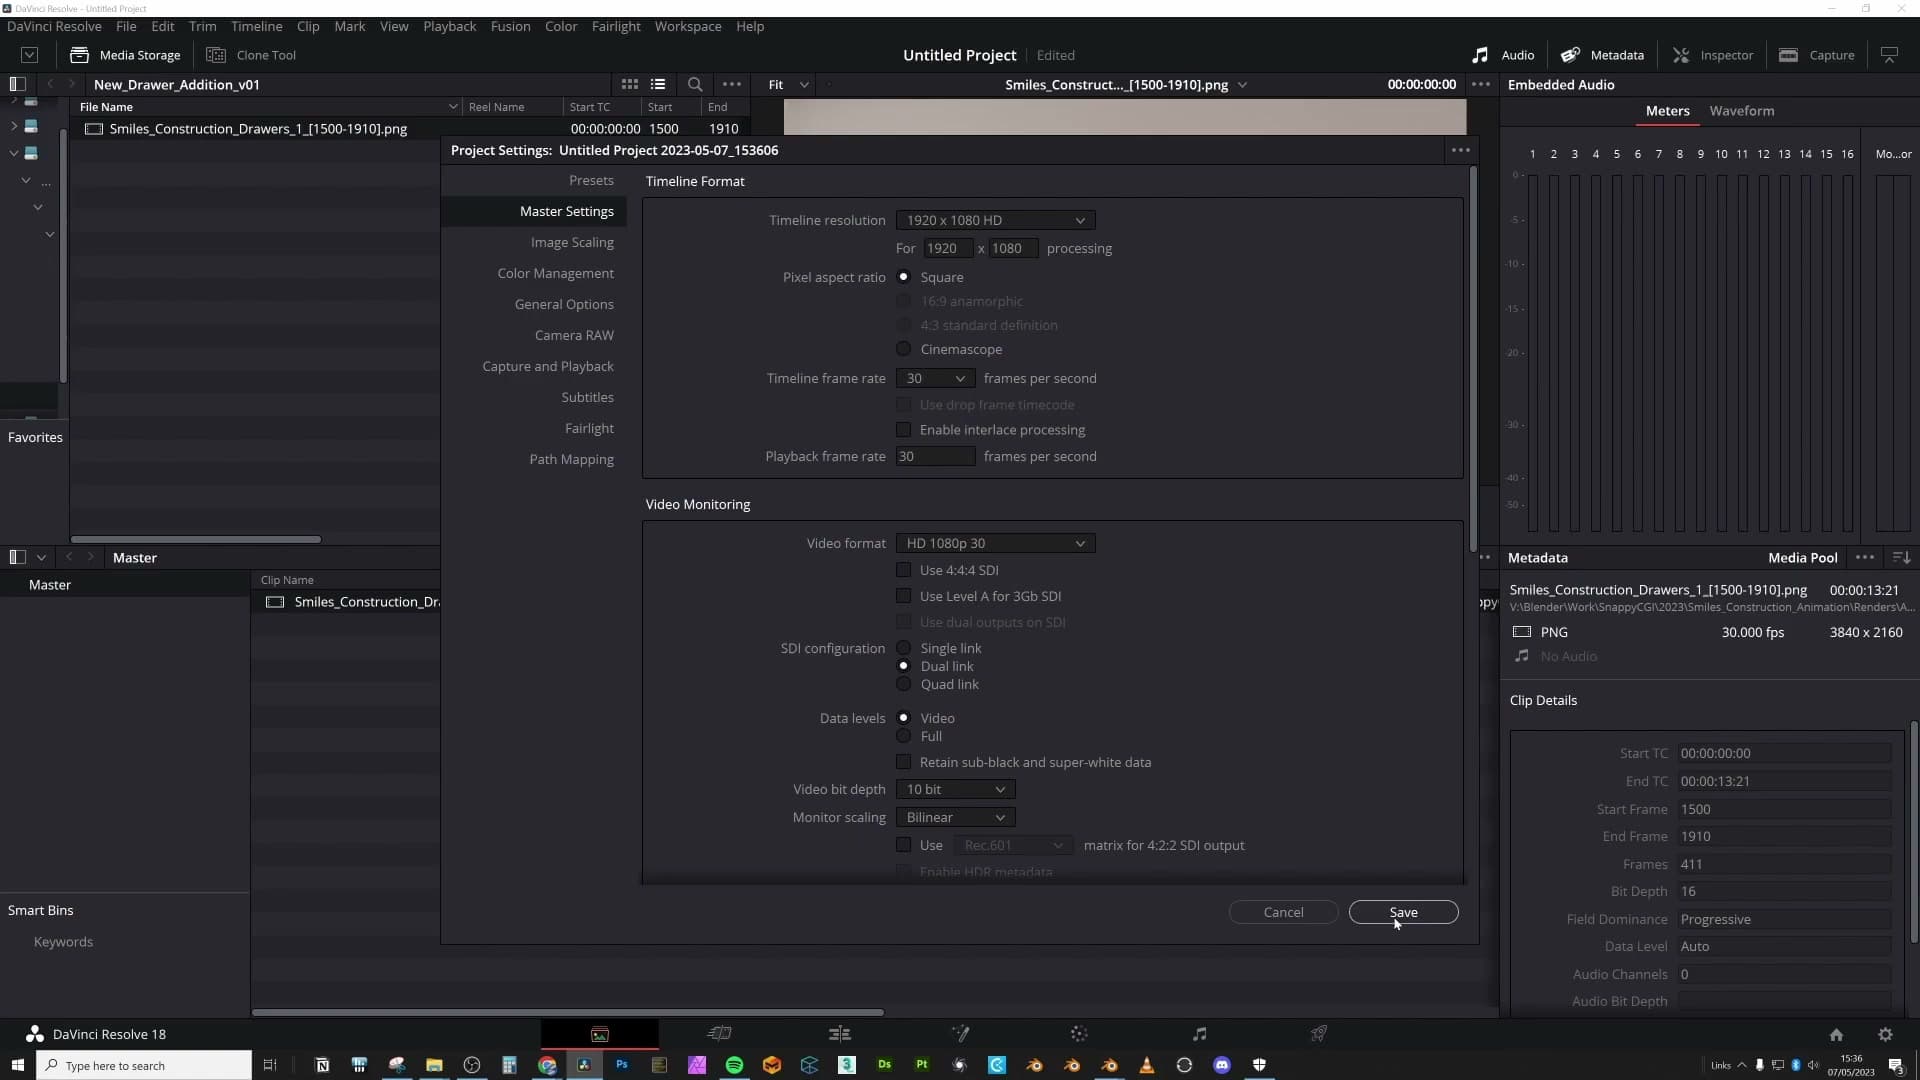
Before you do anything else, make the frame rate match Blender. If your Blender output was set to 30 fps, the imported clip and the project need to agree, or the playback will end up jolty. Set it in two places: right-click the clip → Clip Attributes and change the frame rate to 30 fps, then go to File → Project Settings and set the project frame rate to 30 fps as well. With both values aligned to Blender's output, the sequence drops onto the timeline and plays back cleanly.
From here it is genuinely as simple as dragging the audio track onto a second layer. Because every camera cut was already bound to a marker on the beat back in Blender's Video Sequencer, the cuts and the music line up without any further timing work.
Quick S-curve and sharpening pass
This is a quick and dirty finishing pass rather than a proper grade. Full post-production is out of scope here. But two small adjustments make a noticeable difference on almost any archviz clip.
On the Color page, drop a gentle S-curve onto the master curve. Lift the highlights slightly, pull the shadows down slightly, and you get a bit of contrast back into a render that may have come out of Cycles looking a little flat.
Follow that with a touch of sharpening. The key word is touch. It is easy to over-sharpen a render and reintroduce the noisy, crunchy look that the denoiser worked hard to remove. A subtle pass is plenty.
That is the entire finishing chain for the worked example: import the sequence, match the frame rate, lay the music on top, add a curve and a hint of sharpening. The result is a complete archviz walkthrough that was planned around the music, animated against markers, rendered as a recoverable image sequence, and compiled in minutes rather than re-rendered after every revision.
Tools and credits
Everything mentioned in this tutorial, with links.
- Blender (the renderer this entire build runs in)
- iMeshh (studio platform: project management, client review, asset library, invoicing). The asset library used in this tutorial is included with every iMeshh Pro plan.
- Poly Haven (free CC0 textures and HDRIs)
Pillar guide: Animation hub